Advertisement
Quick Links
Advertisement

Related Manuals for Body Solid GCCA


Summary of Contents for Body Solid GCCA
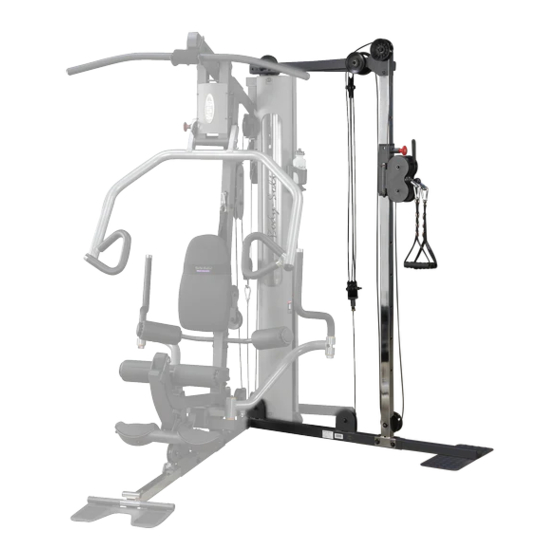
- Page 1 GCCA (fits onto G2B, G3S, G5S, G6B, G10B) ASSEMBLY INSTRUCTIONS...
-
Page 2: Before You Begin
Before You Begin Thank you for purchasing the Cable Column Attachment. This piece is part of the Body-Solid line of quality strength training machines, which let you target specific muscle groups to achieve better muscle tone and overall body conditioning. This Attachment will fit onto the: Unpacking the Equipment Each piece is carefully tested and inspected... -
Page 4: Safety Guidlines
Safety Guidlines Successful resistance training programs have one prominent feature in common...safety. Resistance training has some inherent dangers, as do all physical activities. The chance of injury can be greatly reduced or completely removed by using correct lifting techniques, proper breathing, maintaining equipment in good working condition, and by wearing the appropriate clothing. - Page 5 Assembly Instructions Professional installers are highly recommended! However, if you acquire the appropriate tools, obtain assistance, and follow the assembly steps sequentially, the process will take time, but is fairly easy. Do not fully tighten bolts until Required Tools: instructed to do so. 9/16”...
- Page 8 S T E P Be careful to assemble all components in the sequence they are presented. NOTE: Finger tighten all hardware in this step. Do Not wrench tighten until the end of step 6. Insert two Nylon Bushings (2) into Adjustable Pulley Holder (D) as shown. Slide Adjustable Pulley Holder (D) onto Chrome Upright (C) and hold in place with Flat Pop Pin (3).
- Page 9 S T E P Above shows STEP 2 assembled and completed FOR G2B , G5S , G6B , G10B assembled diagram FOR G3S assembled diagram...
- Page 10 S T E P Be careful to assemble all components in the sequence they are presented. NOTE: Finger tighten all hardware in this step. Do Not wrench tighten until the end of step 6. Remove the Curved End Cap, Metal Plate, and hardware from the top of your gym. Attach Top Support Attachment (K) to the top of your gym as shown using: Two 16 (3/8”...
- Page 12 S T E P Be careful to assemble all components in the sequence they are presented. NOTE: Finger tighten all hardware in this step. Do Not wrench tighten until the end of step 6. Remove both Cables from plastic bag, and locate the longer Cable. The longer of the two Cables is over 30 feet long, this is Cable number 9.
-
Page 13: Start Here
S T E P wide pulley front side back side START HERE By inserting cable between the two pulleys(remove and reinstall pulleys as small pulleys needed). - Page 14 S T E P Be careful to assemble all components in the sequence they are presented. NOTE: Finger tighten all hardware in this step. Do Not wrench tighten until the end of step 6. NOTE: The picture on page 15 is from the reverse angle, from the back of the gym. Route Cable (9) up to the angled Pulley (5), this is the Pulley hanging from Top Frame (J), and route Cable over Pulley.
- Page 15 Reverse Side Drawing S T E P front side Angled Pulley back side small pulley wide pulley...
- Page 16 S T E P Be careful to assemble all components in the sequence they are presented. Disconnect your gym’s small cable from the Main Support Frame of your gym and the hook at the bottom of the free floating pulley. Discard this cable. Connect Cable (35) to the hook at the bottom of the free floating pulley of your gym.
- Page 17 S T E P free floating pulley on your gym...
- Page 18 GCCA Main Frame Parts List KEY# QTY PART# DESCRIPTION GCCAMBF-A MAIN BASE FRAME GCCAFP-B FOOT PLATE GCCACU-C CHROME UPRIGHT GCCAAPH-D ADJUSTABLE PULLEY HOLDER GCCADPP-E DOUBLE PULLEY PIVOT GCCADPP-F DOUBLE PULLEY PIVOT GCCATFA-G TOP FRAME ATTACHMENT GCCATFC-H TOP FRAME CLAMP GCCATF-J...
- Page 19 PPS3.5X.875 PLASTIC PULLEY SMALL 3 1/2"OD X 7/8"W PP4.25X.875 PLASTIC PULLEY 4 1/4"OD X 7/8"W PP4.25X2 PLASTIC PULLEY WIDE 4 1/4"OD X 2"W...
Need help?
Do you have a question about the GCCA and is the answer not in the manual?
Questions and answers