Table of Contents
Advertisement
Quick Links
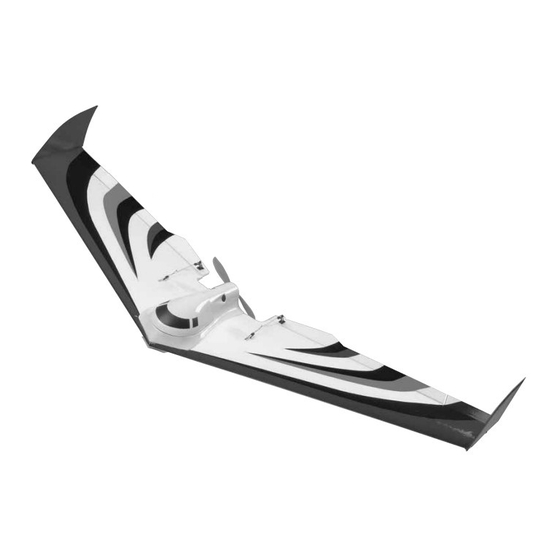
Wingspan: 805 mm [31.5 in]
Wing Area: 14.8 dm
2
[230 sq in]
Weight: 215-240 g [7.5-8.5 oz]
Wing Loading: 14-16 g/dm
2
Length: 380 mm [15 in]
Radio: 3-Channel with 2 servos, elevon mixer and ESC
Great Planes
®
Model Manufacturing Co. guarantees this kit to be free from defects in both material and workmanship at the date of
purchase. This warranty does not cover any component parts damaged by use or modification. In no case shall Great Planes' liability
exceed the original cost of the purchased kit. Further, Great Planes reserves the right to change or modify this warranty without notice.
In that Great Planes has no control over the final assembly or material used for final assembly, no liability shall be assumed nor
accepted for any damage resulting from the use by the user of the final user-assembled product. By the act of using the user-assembled
product, the user accepts all resulting liability.
If the buyer is not prepared to accept the liability associated with the use of this product, the buyer is advised to return this
kit immediately in new and unused condition to the place of purchase.
To make a warranty claim send the defective part or item to Hobby Services at the address below:
Include a letter stating your name, return shipping address, as much contact information as possible (daytime telephone number, fax
number, e-mail address), a detailed description of the problem and a photocopy of the purchase receipt. Upon receipt of the package
the problem will be evaluated as quickly as possible.
READ THROUGH THIS MANUAL BEFORE STARTING
CONSTRUCTION. IT CONTAINS IMPORTANT WARNINGS
AND INSTRUCTIONS CONCERNING THE ASSEMBLY
AND USE OF THIS MODEL.
© Copyright 2006
[4.7-5.3 oz/sq ft]
3002 N. Apollo Dr. Suite 1
Champaign IL 61822 USA
INSTRUCTION MANUAL
WARRANTY
Hobby Services
Champaign, Illinois
(217) 398-8970, Ext 5
airsupport@greatplanes.com
GPMZ0253 for GPMA1178 V1.1
™
Advertisement
Table of Contents

Related Manuals for GREAT PLANES Mini Slinger


Summary of Contents for GREAT PLANES Mini Slinger
-
Page 1: Instruction Manual
Further, Great Planes reserves the right to change or modify this warranty without notice. In that Great Planes has no control over the final assembly or material used for final assembly, no liability shall be assumed nor accepted for any damage resulting from the use by the user of the final user-assembled product. -
Page 2: Table Of Contents
AMA SAFETY CODE ............11 CHECK LIST ..............11 FLYING..............Back Cover 1. Your Mini Slinger ARF should not be considered a toy, but rather a sophisticated, working model that functions very Takeoff............Back Cover much like a full-size airplane. Because of its performance Flight ............Back Cover... -
Page 3: Decisions You Must Make
This is the list of Adhesives and Building Supplies that are servos (9 g or less). If you already have a transmitter you are required to finish the Mini Slinger ARF. going to use to fly the Mini Slinger, you can get the receiver ❏ and servos separately: 6-Minute Epoxy (GPMR6042) ™... -
Page 4: Ordering Replacement Parts
If any parts are missing or are not of acceptable quality, or if you need assistance with assembly, contact Great Planes Product Support. When reporting defective or missing parts, use the part names exactly as they are written in the Kit Contents list on this page. -
Page 5: Building Instructions
BUILDING INSTRUCTIONS Install the Servos ❏ 5. Temporarily connect the servos to your radio system. Turn the transmitter on and center your trim levers. With the radio on, position the arms perpendicular to the servos. Make a left and a right servo. If the servo model you are using has the servo lead exiting from the side of the servo case as shown in the picture above, use a hobby knife to remove ❏... -
Page 6: Join The Wing Halves
Join the Wing Halves ❏ 1. Test fit the wing halves together with the carbon wing joiner rods, with the long rod (500 mm [19-5/8"]) in the rear and the short rod (225 mm [8-7/8"]) in the front. If the rods prevent the wing halves from mating together, cut or sand the rods as necessary until a good fit is achieved. -
Page 7: Install The Radio Equipment
Install the Radio Equipment ❏ ❏ 4. Locate the four 2-1/2" [64mm] pushrods and two 1" 1. Using rubbing alcohol, clean the area where the radio [25mm] long pieces of heat shrink tubing. Using the 90° tray will be installed. Feed the servo wires through the hole pushrod connectors, attach a pushrod to the outer hole of in the hatch. -
Page 8: Finish The Model
❏ 2. Press the propeller onto the motor shaft. The two indentations at the center of the prop should face the model. ❏ 4. With a sharp hobby knife, cut a 3 mm [1/8"] deep slit on the underside of the wing from this hole to the end of the wing parallel with the leading edge. -
Page 9: Get The Model Ready To Fly
If, after you have become accustomed to the way the Mini Slinger ARF flies, you would like to change the throws to suit your taste, that is fine. However, too much control throw could make the model difficult to control, so remember, “more is... -
Page 10: Balance The Model Laterally
2. With all of the parts of the model installed (ready to fly), CAUTION: Unless the instructions that came with your place the model on a Great Planes CG Machine, or lift it at radio system state differently, the initial charge on new the balance point you marked. -
Page 11: Ama Safety Code
AMA SAFETY CODE ( CHECK LIST EXCERPTS Read and abide by the following excerpts from the Academy During the last few moments of preparation your mind may of Model Aeronautics Safety Code. For the complete Safety be elsewhere anticipating the excitement of the first flight. Code refer to Model Aviation magazine, the AMA web site or Because of this, you may be more likely to overlook certain the Code that came with your AMA license. -
Page 12: Flying
16 kmph [10 mph]. Less-experienced flyers slightly to slow the model, yet maintain altitude. The Mini should fly the Mini Slinger only in calm (less than one mile Slinger should fly well and maintain adequate airspeed at per hour) conditions. Frequently, winds are calm in the early about 1/2 throttle.
Need help?
Do you have a question about the Mini Slinger and is the answer not in the manual?
Questions and answers