Table of Contents
Advertisement
Quick Links
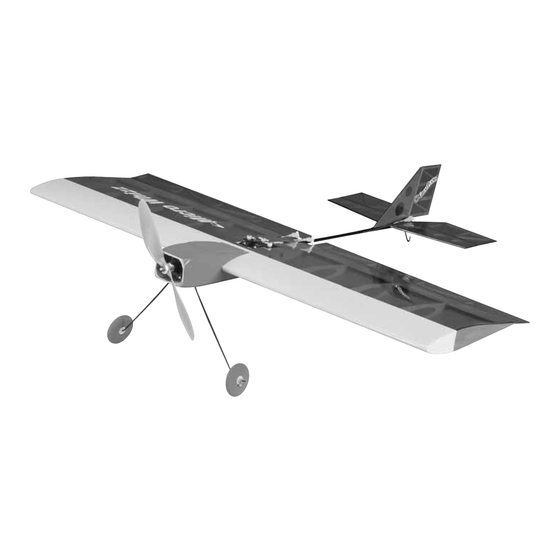
Wingspan: 32 in [813mm]
Wing Area: 352 sq in [23 dm
Weight: 18 oz [510 g]
Wing Loading: 7.4 oz/sq ft [22 g/dm
Length: 25-3/4 in [654mm]
Radio: 4-Channels
Motor: ElectriFly
™
S-280 5:1 Ratio STD Gearbox,
ElectriFly Ferrite BB Motor
Great Planes
®
Model Manufacturing Co. box guarantees this kit to be free from defects in both material and workmanship at the date of
purchase. This warranty does not cover any component parts damaged by use or modification. In no case shall Great Planes' liability exceed
the original cost of the purchased kit. Further, Great Planes reserves the right to change or modify this warranty without notice.
In that Great Planes has no control over the final assembly or material used for final assembly, no liability shall be assumed nor accepted for
any damage resulting from the use by the user of the final user-assembled product. By the act of using the user-assembled product, the user
accepts all resulting liability.
If the buyer is not prepared to accept the liability associated with the use of this product, the buyer is advised to return this kit
immediately in new and unused condition to the place of purchase.
READ THROUGH THIS MANUAL BEFORE STARTING
CONSTRUCTION.
INSTRUCTIONS AND WARNINGS CONCERNING THE
ASSEMBLY AND USE OF THIS MODEL.
GPMZ0224 for GPMA1102 V1.0
INSTRUCTION MANUAL
2
]
2
]
IT
CONTAINS
WARRANTY
IMPORTANT
™
Champaign, IL
(217) 398-8970, Ext. 5
airsupport@greatplanes.com
Entire Contents © Copyright 2003 Printed in Thailand
Advertisement
Table of Contents

Related Manuals for GREAT PLANES Micro Whizz


Summary of Contents for GREAT PLANES Micro Whizz
-
Page 1: Instruction Manual
Further, Great Planes reserves the right to change or modify this warranty without notice. In that Great Planes has no control over the final assembly or material used for final assembly, no liability shall be assumed nor accepted for any damage resulting from the use by the user of the final user-assembled product. -
Page 2: Table Of Contents
Micro Whizz. Do bear in mind that this airplane is capable of all aerobatic maneuvers. Therefore, you must realize that 7. If you are not already an experienced R/C pilot, you... -
Page 3: Tools & Supplies Required
Radio Equipment sites to help you get started the right way. Contact the AMA at The Micro Whizz requires a mini receiver such as the the address or toll-free phone number below: ElectriFly 4 channel FM Mini Receiver (GPML0045) and 3 Futaba ®... -
Page 4: Common Abbreviations
ORDERING REPLACEMENT PARTS To order replacement parts for the Great Planes Micro Whizz ARF, use the order numbers in the Replacement Parts List that follows. Replacement parts are available only as listed. Not all parts are available separately (an aileron cannot be purchased separately, but is only available with the wing kit). -
Page 5: Kit Contents
If any parts are missing or are not of acceptable quality, or if you need assistance with assembly, contact Great Planes Product Support. When reporting defective or missing parts, use the part names exactly as they are written in the Kit Contents list on this page. -
Page 6: Assembly Of The Model
ASSEMBLY OF THE MODEL Installing the Tail Surfaces 4. Use a sharp hobby knife to cut the covering away from the slot in the center of the leading edge of the horizontal stabilizer. 1. Locate the carbon fiber tail boom and note the pre-cut slot for the pushrods to exit. - Page 7 into place with CA. While the glue cures check the positioning with a ruler in the same way as when you marked the location. 10. Cut a slot into the right elevator at a point 3/16" [5mm] toward the outer end of the elevator from the inside edge of the elevator.
-
Page 8: Assembly Of The Fuselage/Wing
Assembly of the Fuselage/Wing 1. As shown in the photograph above, install the two 13. Apply CA to the areas where you removed the covering control horns in the ailerons by cutting a small portion of the and into the slot in the stabilizer. Slide the fin/rudder into aileron away with a sharp hobby knife. -
Page 9: Installing The Motor
4. Locate and test fit the tail skid into the hole you drilled 2. When the adhesive has cured completely, insert the earlier at the forward end of the slot in the bracket under the motor all the way into the gear drive unit. This is a tight fit horizontal stabilizer. - Page 10 5. Insert the rudder and elevator pushrods into the slot in the tail boom. Snap the clevis onto the elevator and rudder control horns as shown in the photograph above. 2. Gather the four pushrods, threaded couplers, clevises, and clevis retainers as shown in the above photograph. 6.
-
Page 11: Installing The Receiver & Speed Control
2. Be certain the model is clean and free from oily Installing the Receiver fingerprints and dust. Prepare a dishpan or small bucket & Speed Control with a mixture of liquid dish soap and warm water–about one teaspoon of soap per gallon of water. Submerse the decal in the soap and water and peel off the paper backing while the decal is in the soapy water. -
Page 12: Set The Control Throws
If, after you have become accustomed to the change the flying characteristics. Moving the C.G. forward way the Great Planes Micro Whizz ARF flies, you would may improve the smoothness and stability, but the model like to change the throws to suit your taste, that’s fine. -
Page 13: Balance The Model Laterally
Charge the Batteries 2. With all parts of the model installed (ready to fly), place the model on a Great Planes CG Machine, or lift it at the balance point you marked. Follow the battery charging instructions that came with your radio control equipment to charge the transmitter battery. -
Page 14: Range Check
airport operator. I will give right of way to, and avoid flying in Range Check the proximity of full-scale aircraft. Where necessary an observer shall be used to supervise flying to avoid having Ground check the operational range of your radio before the models fly in the proximity of full-scale aircraft. -
Page 15: Flying
While full throttle is usually desirable for takeoff, most models fly more smoothly at reduced speeds. Take it easy with the Great Planes Micro Whizz ARF for the FLYING first few flights, gradually getting acquainted with it as you gain confidence. - Page 16 Includes 2-pin connector for capacitors, and a factory-installed 2-pin connector designed to plug into Great Planes ElectriFly C-5 or C-10 electronic ElectriFly packs; adapters available separately. 1-year speed controls. GPMG0305...
Need help?
Do you have a question about the Micro Whizz and is the answer not in the manual?
Questions and answers