
Related Manuals for Zennio ZVI-SQTMDD


Summary of Contents for Zennio ZVI-SQTMDD
- Page 1 5-Button Capacitive Touch Panel with Upper Graphic Display ZVI-SQTMDD Application Program Version: [1.0] User Manual Version: [1.0]_a www.zennio.com...
-
Page 2: Table Of Contents
2.2.7 Translations ......................20 2.2.8 Touch Locking ......................22 2.2.9 Cleaning Function ....................23 2.2.10 Welcome Greeting ....................25 2.2.11 Welcome Back ......................26 2.3 Buttons ........................... 29 2.3.1 CONFIGURATION ....................29 2.3.2 Disabled ........................31 http://www.zennio.com Technical Support: http://zennioenglish.zendesk.com... - Page 3 2.4.2 Disabled ........................67 2.4.3 Single ........................67 2.4.4 Double........................80 2.4.5 Borders ........................81 2.5 Inputs ..........................83 2.6 Thermostat ........................84 ANNEX I: LED Illumination Modes ....................85 ANNEX II: Communication Objects ..................... 88 http://www.zennio.com Technical Support: http://zennioenglish.zendesk.com...
-
Page 4: Introduction
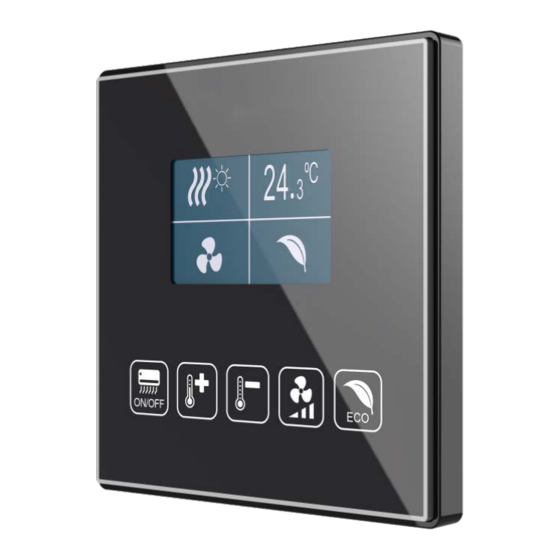
1 INTRODUCTION 1.1 TMD-DISPLAY Square TMD-Display is an evolution of TMD-Display, the KNX multifunction capacitive touch switch with an analogue display from Zennio. While it aims at covering similar functional requirements, Square TMD-Display is offered at a smaller size. Square TMD-Display provides five capacitive buttons aligned in a sole row, as well as LEDs to indicate user presses or states, and a wide display on the top of the front panel, as in ZAS and Roll-ZAS from Zennio. - Page 5 Because of this, the design of the front glass can contain icons specific enough as to make the function of the touch buttons evident at a simple glance. http://www.zennio.com Technical Support: http://zennioenglish.zendesk.com...
- Page 6 Individual button functions: binary switch, hold & release, scenes, light dimmer, shutter controller, numeric constants, etc. On the display: Single-box indicator: icon, number, text, time of day, climate, etc. Double-box indicator: icon, number, text, time of day, climate, etc. http://www.zennio.com Technical Support: http://zennioenglish.zendesk.com...
-
Page 7: Installation
This device does not need any external supply, as it is powered through the KNX bus. 1. Temperature sensor. 2. KNX bus. 3. Analogue-digital inputs. 4. Prog./Test. button. 5. Prog./Test LED. 6. Magnets. 7. Display. 8. Status LED. 9. Touch buttons. Figure 3 Element diagram. http://www.zennio.com Technical Support: http://zennioenglish.zendesk.com... - Page 8 For detailed information about the technical features of the device and for safety instructions and on the installation process, please refer to the Datasheet bundled with the original packaging of the device and also available at www.zennio.com. http://www.zennio.com Technical Support:...
-
Page 9: Configuration
In the particular case of an external temperature probe (such as model ZN1AC-NTC68 from Zennio), it will be possible to use it with independence of the built-in temperature sensor of the device, which implements its own communication objects and can be enabled and disabled in parameters. - Page 10 Display: contains the parameters related to the configuration of the display of the device. See section 2.4 for details. Depending on the configuration, other tabs may show in the tab tree on the left. These tabs will be explained in the next sections. http://www.zennio.com Technical Support: http://zennioenglish.zendesk.com...
-
Page 11: General
Internal Temperature Sensor: enables or disables the “Temperature Sensor” tab in the tree on the left. See section 2.2.2 for details. Screensaver: enables or disables the “Screensaver” tab in the tree on the left. See section 2.2.3 for details. http://www.zennio.com Technical Support: http://zennioenglish.zendesk.com... - Page 12 [General] Scene: Receive and [General] Scene: Send: objects for respectively receiving and sending scene values from/to the KNX bus whenever it is necessary (e.g., when the user touches a button that has been configured to send scene commands; see section 2.3.4). http://www.zennio.com Technical Support: http://zennioenglish.zendesk.com...
-
Page 13: Temperature Sensor
KNX bus and of triggering certain actions when the temperature reaches specific values. Please refer to the specific manual “Temperature Sensor in Square TMD-Display” (available at the Zennio homepage, www.zennio.com) for detailed information about the functionality and the configuration of the related parameters. 2.2.3 SCREENSAVER The screensaver is a special page that will only be shown after a period of inactivity, configurable by parameter. -
Page 14: Leds & Display
Moreover, the LEDs and the display can also commute between two operation modes: the normal mode and the night mode. The second one is optional. It is provided for temporary situations and environments where an excess of brightness may disturb the http://www.zennio.com Technical Support: http://zennioenglish.zendesk.com... -
Page 15: Led Brightness Levels
2.2.4.1 LED BRIGHTNESS LEVELS Normal Mode: LEDs: OFF level brightness: values between 0 (default) and 255. LEDs: ON level brightness: values between 0 and 255 (default). Display: Brightness: values between 0 and 10 (default). http://www.zennio.com Technical Support: http://zennioenglish.zendesk.com... - Page 16 (1 through 64) will trigger each mode. Idle time to change to Night Mode (0=disabled): when the time set in this parameter elapses, Square TMD-Display will switch to Night Mode (provided http://www.zennio.com Technical Support: http://zennioenglish.zendesk.com...
-
Page 17: Display
On the other hand, Square TMD-Display can also emit the following sounds on request (through the corresponding communication objects): Doorbell sounds (a single beep), http://www.zennio.com Technical Support: http://zennioenglish.zendesk.com... - Page 18 (default option) the following parameters will also be available: Enable / Disable button sounds through a 1-bit object: makes it possible to disable / resume the button beeping function in runtime by writing to a specific object (“[General] Sounds – Disabling button sound”). http://www.zennio.com Technical Support: http://zennioenglish.zendesk.com...
-
Page 19: Advanced
As stated in section 2.2.1, an independent tab for the parameterisation of some advanced functions is shown in ETS if enabled from the “Configuration” tab. These functions are explained next. ETS PARAMETERISATION The “Advanced” tab (Figure 11) contains the following parameters: Figure 11 General - Advanced. http://www.zennio.com Technical Support: http://zennioenglish.zendesk.com... -
Page 20: Translations
(otherwise the main language is activated). A one-byte scene object. The values expected by this object are fixed from 0 to 4, to select the corresponding language. When receiving the value of a http://www.zennio.com Technical Support: http://zennioenglish.zendesk.com... - Page 21 Select language: list of available languages to select the language X. Only the Main language is enabled by default. While Translations stays enabled, the following objects are visible: “[General] Translations – Select language” (one-byte). “[General] Translations – Main language” (one-bit). http://www.zennio.com Technical Support: http://zennioenglish.zendesk.com...
-
Page 22: Touch Locking
Figure 14 General - Touch Locking. This screen is divided into two parts: Control and Indication. Control comprises two simple, non-exclusive checkboxes to select how the touch panel lock/unlock should be performed: http://www.zennio.com Technical Support: http://zennioenglish.zendesk.com... -
Page 23: Cleaning Function
This feature is very similar to the touch locking, that is, it locks the touch area, thus discarding further button touches. The difference is that this function remains active only during a parameterisable time, and then stops. http://www.zennio.com Technical Support: http://zennioenglish.zendesk.com... - Page 24 • Timer expiry warning time: sets the ahead-time (5 to 65535 seconds; 10 by default) to start the notification prior to the end of the cleaning function. http://www.zennio.com Technical Support: http://zennioenglish.zendesk.com...
-
Page 25: Welcome Greeting
Line X: sets whether the corresponding text line will be pre-defined (“Fixed”) or object-dependent (“Received form text object”). If “Fixed” is selected, the following parameter will appear: Text: textbox to enter the desired text for the corresponding line. http://www.zennio.com Technical Support: http://zennioenglish.zendesk.com... -
Page 26: Welcome Back
The welcome back object can consist in a one-bit value or a scene value (or both), depending on the parameterisation. ETS PARAMETERISATION After enabling “Welcome Back Object” (see section 2.2.6), a new tab will be incorporated into the tree on the left. This screen contains the following parameters: http://www.zennio.com Technical Support: http://zennioenglish.zendesk.com... - Page 27 (if any) evaluates to true. The desired value (0 or 1) should to be set in “Value”. Welcome Back Object (Scene): checkbox to enable the sending of a scene run request (through “[General] Scene: send”) when the welcome back http://www.zennio.com Technical Support: http://zennioenglish.zendesk.com...
- Page 28 Square TMD-Display function is triggered and the condition (if any) evaluates to true. The desired scene number (1 through 64) should to be entered in “Value”. Figure 21 General - Welcome Back Object - Custom Configuration. http://www.zennio.com Technical Support: http://zennioenglish.zendesk.com...
-
Page 29: Buttons
[Climate] Mode. [Climate] Fan. Individual: LED indicator. Switch (Binary). Hold & release. Two objects (short press / long press). Scene. Scaling constant. Counter constant. Float constant. http://www.zennio.com Technical Support: http://zennioenglish.zendesk.com... - Page 30 See section 2.3.3. Individual. Selecting this option brings a new tab (“Button Ix”, where “x” depends on the button), which will make it possible to configure the functionality of that particular touch button. See section 2.3.4. http://www.zennio.com Technical Support: http://zennioenglish.zendesk.com...
-
Page 31: Disabled
“Enumerated” or “[Climate] Mode”. 2.3.2 DISABLED While a button stays disabled, it will not be functional: touching on it will not cause the execution of actions, nor will make the associated LED light. http://www.zennio.com Technical Support: http://zennioenglish.zendesk.com... -
Page 32: Pair
Long presses will make it send a step dimming order (the value of which is configurable) to make a dimmer increase or decrease the light level (and a stop order as soon as the user releases the push button). It is possible to configure which button does what. http://www.zennio.com Technical Support: http://zennioenglish.zendesk.com... - Page 33 1.5 seconds after the last press. “state-dependent” “state-dependent (both LEDs)” illumination modes are not available for this function (only the “regular” and http://www.zennio.com Technical Support: http://zennioenglish.zendesk.com...
- Page 34 Display send climate mode values to the bus. Two mode control types are possible: Heat / Cool and Extended (HVAC). As above, it is possible to link the control to a box in the display in order to show the current mode on it. http://www.zennio.com Technical Support: http://zennioenglish.zendesk.com...
- Page 35 Enumeration: this control is similar to the previous one, but integer values are sent instead of scaling values. The table below shows the relation between the scaling values and the enumeration values, depending on the number of speed levels configured http://www.zennio.com Technical Support: http://zennioenglish.zendesk.com...
- Page 36 Note: the INFO textboxes are functionless (they simply bring the option to add a description to each button of the project) and can be hidden if desired. See section 2.2.6. The main parameter that needs to be configured is: http://www.zennio.com Technical Support: http://zennioenglish.zendesk.com...
- Page 37 Action of the pair buttons (see section 2.3.1). LED illumination control: sets the behaviour of the LEDs on the buttons. The options are “Regular”, “State-dependent”, “State-dependent (both LEDs)” and “Dedicated Object”. http://www.zennio.com Technical Support: http://zennioenglish.zendesk.com...
- Page 38 Two switches - Short press” after the user short-presses one of the two buttons. “Left=0; Right=1”. “Left=1; Right=0”. Note: this parameter will remain hidden unless having selected “Every button pair is configured separately” in Action of the pair buttons (see section 2.3.1). http://www.zennio.com Technical Support: http://zennioenglish.zendesk.com...
- Page 39 “[Btn] [PX] Light - Dimming” four-bit object. On the other hand, the “[Btn] [PX] Light Dimming (Status)” one-byte object may be linked to the light level status object of the dimmer (in fact, this object is only intended http://www.zennio.com Technical Support: http://zennioenglish.zendesk.com...
- Page 40 Action of the pair buttons (see section 2.3.1). LED illumination control: analogous to the homonymous parameter for the “Switch” and “Two Objects (short press / long press)” function (see above). Shutter Figure 30 Pair Buttons – Shutter. http://www.zennio.com Technical Support: http://zennioenglish.zendesk.com...
- Page 41 (see above). In this case, the only options are “Regular” and “Dedicated Object”. Scaling Figure 31 Pair Buttons – Scaling. Action: assigns each of the two buttons the order to be sent: “Left=Decrease; Right=Increase”. http://www.zennio.com Technical Support: http://zennioenglish.zendesk.com...
- Page 42 LED illumination control: analogous to the homonymous parameter for the previous functions (see above). In this case, the only options are “Regular” and “Dedicated Object”. The percentage values will be sent to the bus through object “[Btn] [PX] Scaling”. http://www.zennio.com Technical Support: http://zennioenglish.zendesk.com...
- Page 43 1 byte signed: -128 – 127. 2 bytes unsigned: 0 – 65535. 2 bytes signed: -32768 – 32767. Minimum Value: sets which value from the available range will be the minimum value permitted by the control. http://www.zennio.com Technical Support: http://zennioenglish.zendesk.com...
- Page 44 See section 2.4 for details. LED illumination control: analogous to the homonymous parameter for the previous functions (see above). In this case, the only options are “Regular” and “Dedicated Object”. http://www.zennio.com Technical Support: http://zennioenglish.zendesk.com...
- Page 45 Note: this parameter will remain hidden unless having selected “Every button pair is configured separately” in Action of the pair buttons (see section 2.3.1). Minimum Value: sets which value from the available range (-671088.625 to 670760.9375) will be the minimum value permitted by the control. http://www.zennio.com Technical Support: http://zennioenglish.zendesk.com...
- Page 46 Action of the pair buttons (see section 2.3.1). Minimum Value: sets which value from the available range (-671088.625 to 670760.9375; 10 by default) will be the minimum value permitted by the control. http://www.zennio.com Technical Support: http://zennioenglish.zendesk.com...
- Page 47 Mode Type: sets mode control type: “Heat/Cool” or “Extended” (HVAC). “Heat/Cool”: pressing one of the two buttons will make Square TMD- Display send a one-bit value to the bus (Left=Cool, value “0”; Right=Heat, value “1”). http://www.zennio.com Technical Support: http://zennioenglish.zendesk.com...
- Page 48 LED illumination control: sets the behaviour of the LEDs on the buttons. The options are “Regular”, “State-dependent”, “State-dependent (both LEDs)” and “Dedicated Object”. The values will be sent to the bus through object “[Btn] [PX] (Climate) Mode”. [Climate] Fan Figure 38 Pair Buttons – [Climate] Fan. http://www.zennio.com Technical Support: http://zennioenglish.zendesk.com...
- Page 49 In this case the fan levels activated by short presses are: Auto Mode ( 0 ) Minimum Medium Maximum On the other hand, marking the checkbox enables the one-bit object “[Btn] [PX] Fan control – Auto mode”, which will trigger the Auto mode when it http://www.zennio.com Technical Support: http://zennioenglish.zendesk.com...
- Page 50 Allow speed 0: sets whether the speed level 0 will be present or not. When the Auto Mode without a dedicated object has been configured, this option will be necessarily activated. Action: assigns each of the two buttons the order to be sent: “Left=0; Right=1”. http://www.zennio.com Technical Support: http://zennioenglish.zendesk.com...
-
Page 51: Individual
“1”, configurable) will be sent to the KNX bus. And as long as the user releases the button, another value (“0” or “1”, also configurable) will be sent through the same object. The “state-dependent” LED mode is not available for this function. http://www.zennio.com Technical Support: http://zennioenglish.zendesk.com... - Page 52 Float Constant: sends a two-byte floating point value (configurable) to the bus when the user touches the button. The available range is -671088.625 to 670760.9375. The “state-dependent” LED illumination mode is analogous as for the Scaling Constant and Counter Constant functions. http://www.zennio.com Technical Support: http://zennioenglish.zendesk.com...
- Page 53 KNX bus, which can then be executed by an actuator. Two control types can be configured: Standard: the device will react to both long and short presses, being possible to send the bus the following commands: http://www.zennio.com Technical Support: http://zennioenglish.zendesk.com...
- Page 54 The direction of this motion (upwards or downwards) will alternate with every touch, according to the following sequence: downwards upwards downwards … However, there are some exceptions to this alternation: http://www.zennio.com Technical Support: http://zennioenglish.zendesk.com...
- Page 55 This function is similar to the pair button fan control described in section 2.3.3 (however in this case the object is sent to the bus immediately after the button is pressed). ETS PARAMETERISATION Figure 41 Individual Button. http://www.zennio.com Technical Support: http://zennioenglish.zendesk.com...
- Page 56 After assigning this function to the button, object “[Btn] [In] LED On/Off” is included in the project topology, so that the values that determine the state of the LED at a given time can be received from the bus. http://www.zennio.com Technical Support: http://zennioenglish.zendesk.com...
- Page 57 “[Btn] [In] Hold & Release”) when the user stops touching the button. The options are “Send 0” (default) and “Send 1”. LED illumination control: analogous to the homonymous parameter for the “Disabled” and “Switch” functions (see above). The options in this case are “Regular” and “Dedicated object”. http://www.zennio.com Technical Support: http://zennioenglish.zendesk.com...
- Page 58 Illumination State Object”, to make the state of the LED correspond either to object “[Btn] [In] Two switches - Short press” (“Short Press Object”) or to object “[Btn] [In] Two switches - Long press” (“Long Press Object”). http://www.zennio.com Technical Support: http://zennioenglish.zendesk.com...
- Page 59 “Signed”) will be displayed to respectively define the size of the constant (“1 byte” or “2 bytes”) and whether it is a signed value or an unsigned value. Depending on that, the range and the name of the object will vary. http://www.zennio.com Technical Support: http://zennioenglish.zendesk.com...
- Page 60 The parameters for this function are: Step: defines the dimming step (“100%”, “50%”, “25%”, “12.5%”, “6.25%”, “3.1%” or “1.5%”) to be sent (through “[Btn] [In] Light - Dimming”) to the light dimmer with every long press. http://www.zennio.com Technical Support: http://zennioenglish.zendesk.com...
- Page 61 Type: sets the desired control type: “Standard” or “Hold & Release”, which have been described in section 2.3.4. LED illumination control: analogous to the homonymous parameter for all the previous functions (see previous pages). The options in this case are “Regular” and “Dedicated object”. http://www.zennio.com Technical Support: http://zennioenglish.zendesk.com...
- Page 62 (see previous pages). The options in this case are “Regular” and “Dedicated object”. [Climate] Fan Figure 51 Individual Buttons – [Climate] Fan. This control is analogous to the Fan control in pair buttons (see section 2.3.3). http://www.zennio.com Technical Support: http://zennioenglish.zendesk.com...
- Page 63 Auto mode has been left disabled or has been enabled with a dedicated object or not, the minimum and maximum levels of the range may not always be the same. See section 2.3.3 for further details. http://www.zennio.com Technical Support: http://zennioenglish.zendesk.com...
-
Page 64: Display
The information provided by the display can consist in icons (with a resolution up to 28 x 22 pixels) or alphanumeric characters (texts). Please refer to the specific document “Icons in Square TMD-Display” (available at the Zennio homepage, www.zennio.com) to see the list of available icons. - Page 65 Depending on this, up to two new tabs (named “Box Xn”) will be included in the tree on the left. See section 2.4.4. There is also a checkbox named Advanced options, which permit configuring the border lines and the representation of the indicators. http://www.zennio.com Technical Support: http://zennioenglish.zendesk.com...
- Page 66 Object to show/hide the indicator: shows or hides a parameter in the configuration screen of each box to let the integrator add the project a one-bit object per box to show or hide its indicator in runtime. Not needed, Enable the option in every box. http://www.zennio.com Technical Support: http://zennioenglish.zendesk.com...
-
Page 67: Disabled
The types are the same: One bit: a text represents the On state and another one represents the Off state. Enumeration: up to six different states can be represented through one text each. http://www.zennio.com Technical Support: http://zennioenglish.zendesk.com... - Page 68 [Climate] On/Off + Mode + Status: climate status indicator with three one- bit objects associated: On/Off, Mode and Status. The icon represented depends on the value of these three objects, as explained in next section. http://www.zennio.com Technical Support: http://zennioenglish.zendesk.com...
- Page 69 Depending on the indicator, some more parameters are shown, as described next. Please note that in the next pages the general notation “[x]” is used for the name of the communication objects, as “x” depends on the display zone (a, b, etc.). http://www.zennio.com Technical Support: http://zennioenglish.zendesk.com...
- Page 70 “Indicator representation” (see 2.4.1). “Enumeration”: the icon represented depends on the value of the one-byte object “[Disp] [x] Icon – Enumeration”. When selecting this type, the following parameters need to be configured. http://www.zennio.com Technical Support: http://zennioenglish.zendesk.com...
- Page 71 [x] Show/Hide indicator”) to show or hide the indicator in runtime (1 = Show indicator; 0 = Hide indicator). Note: this parameter will remain hidden unless having selected “Enable the option in every box” in “Object to show/hide the indicator” (see 2.4.1). http://www.zennio.com Technical Support: http://zennioenglish.zendesk.com...
- Page 72 “Indicator representation” (see 2.4.1). Object to show/hide indicator: enables or disables a one-bit object (“[Disp] [x] Show/Hide indicator”) to show or hide the indicator (1 = Show indicator; 0 = Hide indicator). http://www.zennio.com Technical Support: http://zennioenglish.zendesk.com...
- Page 73 “Indicator representation” (see 2.4). Enumeration: the icon represented depends on the value of the one-byte object “[Disp] [x] Text – Enumeration”. When selecting this type, the following parameters need to be configured. http://www.zennio.com Technical Support: http://zennioenglish.zendesk.com...
- Page 74 [x] Show/Hide indicator”) to show or hide the indicator (1 = Show indicator; 0 = Hide indicator). Note: this parameter will remain hidden unless having selected “Enable the option in every box” in “Object to show/hide the indicator” (see 2.4). http://www.zennio.com Technical Support: http://zennioenglish.zendesk.com...
- Page 75 “Object to show/hide the indicator” (see 2.4.1). Text from object Figure 62 Display indicator – Text from object. The text to be shown is to be received through the “[Disp] [x] Text from object” 14- byte communication object. http://www.zennio.com Technical Support: http://zennioenglish.zendesk.com...
- Page 76 “Indicator representation” (see 2.4). Object to show/hide indicator: enables or disables a one-bit object (“[Disp] [x] Show/Hide indicator”) to show or hide the indicator (1 = Show indicator; 0 = Hide indicator). http://www.zennio.com Technical Support: http://zennioenglish.zendesk.com...
- Page 77 (“Auto”, “Heat”, “Cool”, “Fan” and “Dry”, as shown in Figure 65). Figure 65 Display indicator – [Climate] Mode – Mode Type: Extended. Representation: sets the representation type. The options are: “Permanent”, “Temporary”, “Intermittent” and “Progressive”. Note: this parameter will remain hidden unless having selected “Every http://www.zennio.com Technical Support: http://zennioenglish.zendesk.com...
- Page 78 “2: Min (1% - 50%); Max (51% - 100%)”, • 3: Min (1% - 33%); Med (34% - 67%); Max (68% - 100%)” The value 0% does not correspond to any level, but to the Off/Auto state. http://www.zennio.com Technical Support: http://zennioenglish.zendesk.com...
- Page 79 (Climate) On/Off - Mode” (1 = Heat or 0 = Cool). The representation type will be Permanent. If “[Disp] [x] (Climate) On/Off” = 1 and “[Disp] [x] (Climate) On/Off - Status” = 1, it means that the climate is on and running. The icon http://www.zennio.com Technical Support: http://zennioenglish.zendesk.com...
-
Page 80: Double
When a display zone has been set to Double, a specific tab (“Box Xn”) becomes available under “Display” in the tree on the left. The ETS parameterisation of each indicator is exactly the same as for Single boxes. See section 2.4.3 for details. http://www.zennio.com Technical Support: http://zennioenglish.zendesk.com... -
Page 81: Borders
To simplify the configuration, this screen is divided into three parts (see Figure 70): Upper lines (vertical): configures the upper vertical lines a1-a2, a2-b1 and b1-b2. Middle lines (horizontal): configures the middle horizontal lines a1-c1, a2- c2, b1-d1 and b2-d2. http://www.zennio.com Technical Support: http://zennioenglish.zendesk.com... - Page 82 Square TMD-Display Lower lines (vertical): configures the lower vertical lines c1-c2, c2-d1 and d1-d2. The options available for all the lines are: “Solid line”, “Invisible” and “Dotted line”. Figure 70 Display – Borders. http://www.zennio.com Technical Support: http://zennioenglish.zendesk.com...
-
Page 83: Inputs
The two models mentioned incorporate a voltage selection microswitch on the rear side, which should be set to position “Type B”. Older models of the Zennio motion detector (e.g., ZN1IO-DETEC and ZN1IO-DETEC-N) will not work properly with Square TMD-Display. -
Page 84: Thermostat
Square TMD-Display 2.6 THERMOSTAT Square TMD-Display implements one Zennio thermostat which can be enabled and fully customised. Please refer to the specific manual “Zennio Thermostat for Square TMD-Display” (available at the Zennio homepage, www.zennio.com) for detailed information about the functionality and the configuration of the related parameters. -
Page 85: Annex I: Led Illumination Modes
Disabled button: the LED will remain off, and the button will have no function. Button configured as “Individual” with “LED Indicator” function: the button will still have no function. The LED may be turned on/off through a binary object. http://www.zennio.com Technical Support: http://zennioenglish.zendesk.com... - Page 86 (see section 2.3.1) thus not being then necessary to configure the same option multiple times. In case of opting for a general configuration, the options are: http://www.zennio.com Technical Support: http://zennioenglish.zendesk.com...
- Page 87 In case of desiring a similar behaviour for all of the LEDs, please find the parameter “LED Illumination Control (All Buttons)” in the options of the General configuration screen. This parameter is explained in section 2.3.1. http://www.zennio.com Technical Support: http://zennioenglish.zendesk.com...
-
Page 88: Annex Ii: Communication Objects
[General] Welcome Greeting - Line 1 Text to show on the display at Line 1 C - - W - 14 Byte DPT_String_ASCII [General] Welcome Greeting - Line 2 Text to show on the display at Line 2 http://www.zennio.com Technical Support: http://zennioenglish.zendesk.com... - Page 89 4 Bit C T - W - DPT_Control_Dimming [Btn] [In] Light - Dimming (Long press) Switch between dimming up and down 0x4 (Dec. by 12%) 0x5 (Dec. by 6%) 0x6 (Dec. by 3%) 0x7 (Dec. by 1%) http://www.zennio.com Technical Support: http://zennioenglish.zendesk.com...
- Page 90 C T - W - DPT_Scaling 0% - 100% [Btn] [In] Fan control scaling Auto, 25%, 50%, 75%, 100% 1 Byte C T - W - DPT_Scaling 0% - 100% [Btn] [In] Fan control scaling 20%, 40%, 60%, 80%, 100% http://www.zennio.com Technical Support: http://zennioenglish.zendesk.com...
- Page 91 0x0 (Stop) 0x1 (Dec. by 100%) 67, 73 4 Bit C T - W - DPT_Control_Dimming … [Btn] [Px] Light - Dimming (Long press) Left = Darker; Right = Brighter 0x8 (Stop) 0x9 (Inc. by 100%) http://www.zennio.com Technical Support: http://zennioenglish.zendesk.com...
- Page 92 -128 - 127 [Btn] [Px] Counter - 1-byte signed Left = Increase; Right = Decrease 2 Byte C T - W - DPT_Value_2_Ucount 0 - 65535 [Btn] [Px] Counter - 2-bytes unsigned Left = Decrease; Right = Increase http://www.zennio.com Technical Support: http://zennioenglish.zendesk.com...
- Page 93 1 Bit DPT_Switch [Disp] [X] Show/Hide indicator 0 = Hide indicator; 1 = Show indicator 116, C - - W - 1 Bit DPT_Switch [Disp] [X1] Show/Hide indicator 0 = Hide indicator; 1 = Show indicator http://www.zennio.com Technical Support: http://zennioenglish.zendesk.com...
- Page 94 C - - W - DPT_Scaling 0% - 100% [Disp] [X1] Fan (67% - 100%) C - - W - 1 Byte DPT_Scaling 0% - 100% [Disp] [X1] Fan Off/Auto + 1 level: Off/Auto = 0%; Max. (1% - 100%) http://www.zennio.com Technical Support: http://zennioenglish.zendesk.com...
- Page 95 -128 - 127 [Disp] [X2] Number - Counter (1-byte signed) Object numeric value is shown 1 Byte C - - W - DPT_Value_1_Ucount 0 - 255 [Disp] [X2] Text - Enumeration Parameterized text shown on new value reception http://www.zennio.com Technical Support: http://zennioenglish.zendesk.com...
- Page 96 C - - W - 1 Bit DPT_Switch √ [T1] Special Mode: comfort 0 = Off; 1 = On C - - W - 1 Bit DPT_Trigger √ [T1] Special Mode: standby 0 = Nothing; 1 = Trigger http://www.zennio.com Technical Support: http://zennioenglish.zendesk.com...
- Page 97 C T R - - DPT_Switch [T1] PI State (Heat) 0 = PI signal 0%; 1 = PI signal greater than 0% 179, 2 Byte C T R - - DPT_Value_Temp -273.0 - 670760.0 [Ix] Current Temperature Temperature sensor value http://www.zennio.com Technical Support: http://zennioenglish.zendesk.com...
- Page 98 Auto, Comfort, Standby, Economy, Building Protection 4=Building Protection 203, 1 Bit C T R - - DPT_Switch [Ix][C1] Detection State (Binary) Binary Value 204, 1 Bit C - - W - DPT_Switch [Ix][C1] Channel Lock According to parameters http://www.zennio.com Technical Support: http://zennioenglish.zendesk.com...
- Page 99 [Ix] [Short Press] Stop/Step Shutter (switched) Switching of 0/1 (Stop/Step up/down) 0x0 (Stop) 0x1 (Dec. by 100%) 4 Bit C T - - - DPT_Control_Dimming … [Ix] [Short Press] Brighter Increase Brightness 0x8 (Stop) 0x9 (Inc. by 100%) http://www.zennio.com Technical Support: http://zennioenglish.zendesk.com...
- Page 100 Switching of 0/1 (Stop/Step up/down) 0x0 (Stop) 0x1 (Dec. by 100%) 4 Bit C T - - - DPT_Control_Dimming … [Ix] [Long Press] Brighter Long Pr. -> Brighter; Release -> Stop 0x8 (Stop) 0x9 (Inc. by 100%) http://www.zennio.com Technical Support: http://zennioenglish.zendesk.com...
- Page 101 0% - 100% [Ix] [Long Press] Dimming Status (input) 0% - 100% 245, C - - W - 1 Byte DPT_Scaling 0% - 100% [Ix] [Long Press] Shutter Position (Status input) 0% = Top; 100% = Bottom http://www.zennio.com Technical Support: http://zennioenglish.zendesk.com...
- Page 102 Join and send us your inquiries about Zennio devices: http://zennioenglish.zendesk.com Zennio Avance y Tecnología S.L. C/ Río Jarama, 132. Nave P-8.11 45007 Toledo (Spain). Tel. +34 925 232 002. Fax. +34 925 337 310. www.zennio.com info@zennio.com...
Need help?
Do you have a question about the ZVI-SQTMDD and is the answer not in the manual?
Questions and answers