Table of Contents
Advertisement
Quick Links
Advertisement
Table of Contents

Related Manuals for Zennio FLAT


Summary of Contents for Zennio FLAT
- Page 1 FLAT & FLAT 55 1/2/4/6-Button Capacitive Touch Panel 1/2/4-Button 55x55mm Capacitive Touch Panel ZVI-F1 / ZVI-F2 / ZVI-F4 / ZVI-F6 ZVI-F55X1 / ZVI-F55X2 / ZVI-F55X4 Application Programme Version: [1.4] User Manual Version: [1.4]_b www.zennio.com...
-
Page 2: Table Of Contents
Flat & Flat 55 CONTENTS Contents ........................... 2 Document Updates ........................3 Introduction ........................4 Flat / Flat 55 ....................... 4 Installation ......................... 6 Start-Up and Power Loss .................... 7 Configuration ........................8 GENERAL ........................8 2.1.1 CONFIGURATION ....................8 2.1.2 Temperature Sensor ..................... -
Page 3: Document Updates
Flat & Flat 55 DOCUMENT UPDATES Version Changes Page(s) New devices: Flat 55 X1, Flat 55 X2 y Flat 55 X4. [1_4]_b Changes in the application program: New functionality for individual buttons: Room State. [1.4]_a Optimisation binary... -
Page 4: Introduction
The most outstanding features of Flat / Flat 55 are: Fully customisable design of the front glass. 1 / 2 / 4 / 6 (only in Flat) touch buttons, which can operate as individual or pair controls: Horizontally or vertically-oriented configuration (only available for the two- button and six-button models in Flat and for the two-button model in Flat 55). - Page 5 Flat & Flat 55 Built-in temperature sensor (only in Flat). Ambient luminosity sensor for brightness automatic adjustment. Proximity sensor for quick start. Two analogue/digital inputs (for motion detectors, temperature probes, additional switches, etc.). Thermostat function. Heartbeat or periodical “still-alive” notification.
-
Page 6: Installation
Proximity and Luminosity Sensors. Figure 1 Schematic diagram. Flat / Flat 55 are connected to the KNX bus through the built-in terminal (2). An external DC power supply is not needed. A short press on the Prog. /Test button (4) will make the device enter the programming mode. -
Page 7: Start-Up And Power Loss
Flat & Flat 55 1.3 START-UP AND POWER LOSS After download or device reset it is necessary to wait for about 2 minutes without performing any action in order to make it possible a proper calibration of: Proximity sensor. Luminosity sensor. -
Page 8: Configuration
Vertical (normal): Horizontal (rotated): Temperature probe hole Temperature probe hole (only in Flat) on the right (only in Flat) on the top of the bottom side and the of the right side and sensors on the middle of sensors on the middle of the top side. - Page 9 Flat & Flat 55 Figure 3 Main configuration. Buttons [enabled]: read-only parameter to make it evident that the “Buttons” tab is always enabled in the tab tree on the left. See section 2.2 for details. Inputs [disabled/enabled]: enables or disables the “Inputs” tab in the tree on the left, depending on whether the device will or will not be connected any external accessories.
- Page 10 “waking up” the device when detecting presence. Please refer to the specific manual “Proximity and Luminosity Sensor” (available in the Flat / Flat 55 product section at the Zennio homepage, www.zennio.com) for detailed information about the functionality and the configuration of the related parameters.
-
Page 11: Temperature Sensor
2.1.4 SOUNDS It is possible to configure Flat / Flat 55 so that a brief beep is emitted as an acoustic feedback when a button is pressed. Enabling the button sounds can be done either by parameters or through an object, being also possible to define in parameters if the button sounds should be initially enabled or not. - Page 12 Flat & Flat 55 ETS PARAMETERISATION In case the default button beep sound matches the requirements of the installation and the doorbell and alarm functions are not necessary, the Sounds parameter in the general “CONFIGURATION” tab (see section 2.1.1) can be set to “Default”. This will also imply that the button beeps will be unconditional, as it will not be possible to disable this function through an object.
-
Page 13: Ambient Luminosity Sensor
If enabled, a specific object (“[General] Sounds - Alarm”) will be included into the project topology. 2.1.5 AMBIENT LUMINOSITY SENSOR Flat / Flat 55 incorporate a luminosity sensor to receive and monitor ambient brightness measurement. Please refer to the specific manual “Luminosity and Proximity Sensor” (available in the Flat / Flat 55 product section at the Zennio homepage, www.zennio.com) for... - Page 14 See section 2.1.6.2 for details. 2.1.6.1 TOUCH LOCKING The touch panel of Flat / Flat 55 can be optionally locked and unlocked anytime by writing a configurable one-bit value to a specific object provided for this purpose. It can also be done through scene values.
- Page 15 Receive” object. 2.1.6.2 WELCOME BACK OBJECT Flat / Flat 55 can send a specific object (the welcome back object) to the KNX bus when the user presses a touch button after a significant amount of time since the last or presence detection (when the proximity sensor is enabled). Sending it or not can also depend on an additional, configurable condition consisting in the evaluation of up to five binary objects.
- Page 16 Flat & Flat 55 Timeout to Activate the Welcome Object [1…255][s/min/h]: sets the minimum time that should elapse after the last button touch touch (or presence detection, when the proximity sensor is enabled) before the next one triggers the execution of the welcome back function.
- Page 17 Flat & Flat 55 welcome back function is triggered and the condition (if any) evaluates to true. The desired value should set in Value [Send 0/Send 1]. Welcome Back Object (Scene) [disabled/enabled]: checkbox to enable the sending of a scene run request (through “[General] Scene: send”) when the welcome back function is triggered and the condition (if any) evaluates to true.
-
Page 18: Buttons
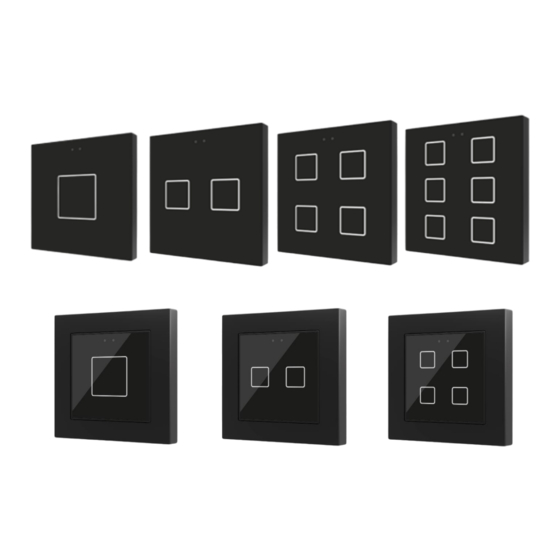
Flat & Flat 55 2.2 BUTTONS As indicated in previous sections, Flat / Flat 55 have one, two, four or six (only in Flat) capacitive buttons (depending on the model) at the user’s disposal for the execution of actions. The distribution of the buttons will depend on the model, being possible to configure them as single-button controls or in pairs by combining any two of them. -
Page 19: Configuration
Flat & Flat 55 Figure 13 Flat 4 and Flat 55 X4 Flat 6 (only in Flat): up to six one-button controls, or three two-button controls (by combining any two push buttons for each pair) can be configured, under any of the two orientations. The figure shows which number identifies each button during the configuration process. - Page 20 Flat & Flat 55 LED indicator. Room State Apart from the button function itself, the desired behaviour of the button LEDs can be set. The different illumination modes have been detailed in ANNEX I. LED Illumination Modes. The next sections explain the configuration involved for each of the above functions.
- Page 21 Flat & Flat 55 [Individual]. Selecting this option brings a new tab (“Button Ix”, where “x” depends on the button), which will make it possible to configure the functionality of that particular touch button. See section 2.2.3 for details. [Pair X]. Sets that this touch button will belong to a two-button control (where X is A, B or C, depending on the model).
-
Page 22: Disabled
Flat & Flat 55 2.2.2 DISABLED While a button stays disabled, it will not be functional: touching on it will not cause the execution of actions, nor will make the associated LED light. ETS PARAMETERISATION This function has no related parameters. - Page 23 Flat & Flat 55 the scene can also be sent to the bus after a three-second press on the button. The “State-dependent” LED mode is not available for this function. Scaling Constant: sends a percentage value (configurable) to the bus when the user touches the button.
- Page 24 Flat & Flat 55 On a long press: an increase dimming order will be sent if the light is found to be off (according to the status object). On the other hand, a decrease order will be sent if it is found to be 100%.
- Page 25 (in case it is already moving up or down). Flat / Flat 55 are aware of the current position of the shutter through a specific object which should be linked to the analogous object of the shutter actuator in order to receive feedback.
- Page 26 Flat & Flat 55 Room State: allows controlling the room states (normal, make up request, do not disturb). Pressing the button will activate the Do Not Disturb or Make-Up Request status (as configured) or deactivate it to return to Normal status.
- Page 27 Flat & Flat 55 Figure 17 Individual Button. Depending on the function, some more parameters are involved (as described next). Please note that in the next pages “[In]” is used as a general notation for the communication objects, where “n” depends on the particular button pair.
- Page 28 Flat & Flat 55 Hold & Release Figure 19 Individual Button - Hold & Release. Action on Hold [Send 1/Send 0]: sets the value to be sent to the bus (through “[Btn] [In] Hold & Release”) when the user touches the button.
- Page 29 Flat & Flat 55 In case of selecting the latter, an additional parameter (“Value”) will be displayed to enter the desired one-byte value (0 - 255). Action on Long press [Send 0/Send 1/Toggle 0/1/Send 1-byte value]: sets the value to be sent to the bus (through “[Btn] [In] Two switches - Long press”) when the user long-presses the button.
- Page 30 Flat & Flat 55 Scaling Constant / Counter Constant / Float Constant Figure 22 Individual Button - Scaling Constant Value [0]: sets the value to be sent to the KNX bus when the user touches the button. The available range and the object through which the value is sent depend for each case, as the table below shows.
- Page 31 Note: since dimmers typically do not apply the new light level immediately (i.e., the step is performed progressively) and since Flat / Flat 55 send an order to interrupt the step dimming once the user releases the button, it is advisable to configure a step of 100%.
- Page 32 Flat & Flat 55 Shutter Figure 24 Individual Button – Shutter. The (alternating) move up/down orders will be sent through the “[Btn] [In] Shutter - Move” one-bit object, while the (alternating) step up/down orders will be through the “[Btn] [In] Shutter - Stop / Step” one-bit object.
-
Page 33: Pair
Buttons configured to work as a joint control can be assigned the following functions: Switch: pressing one of the two buttons will make Flat / Flat 55 send a binary value to the bus, while pressing on the other will make it send the inverse binary value. - Page 34 (where available)” only the short press object will be considered Dimmer: short-pressing one of the two buttons will make Flat / Flat 55 send a switch-on order to the bus, while doing so on the other button will make it send a switch-off order.
- Page 35 Flat & Flat 55 The “state-dependent” and “state-dependent (both LEDs)” LED illumination modes are not available for this function (only the “regular” and “dedicated object” LED illumination are available). See ANNEX I. LED Illumination Modes for details. ETS PARAMETERISATION Once two buttons have been assigned to a particular pair, a specific tab (“Pair X”) becomes available under “Buttons”...
- Page 36 Flat & Flat 55 Action [Left=0; Right=1/Left=1; Right=0]: assigns each of the two buttons the value to be sent through “[Btn] [PX] Switch” (which has the Write flag enabled, so the state of the switch can be updated from external devices).
- Page 37 Flat & Flat 55 Long Press Threshold Time [5…50 ds]: sets the minimum time the user should hold the button in order to consider it a long press. The available range is 5 to 50 tenths of a second, being 5 tenths the default value.
- Page 38 / decrease order. Note: since dimmers typically do not apply the new light level immediately (i.e., the step regulation is performed progressively) and since Flat / Flat 55 send an order to interrupt the step dimming once the user releases the button, it is advisable to configure a step of 100%.
- Page 39 Flat & Flat 55 The move orders will be sent through “[Btn] [PX] Shutter - Move”, while the stop orders will be sent through “[Btn] [X] Shutter Stop/Step” (for Standard type) or “[Btn] [PX] Shutter - Stop” (for Hold & Release type).
-
Page 40: Inputs
2.3.1 BINARY INPUT Please refer to the specific user manual “Binary Inputs”, available in the Flat / Flat 55 product section, at the Zennio website (www.zennio.com). 2.3.2 TEMPERATURE PROBE Please refer to the specific user manual “Temperature Probe”, available in the Flat /... -
Page 41: Motion Detector
Flat & Flat 55 2.3.3 MOTION DETECTOR It is possible to connect motion detectors to the input ports of Flat / Flat 55. Please refer to the specific user manual “Motion Detector”, available in the Flat / Flat 55 product section, at the Zennio website (www.zennio.com). -
Page 42: Thermostat
In said tab, a set of screens (Configuration, Setpoint, etc.) is provided to define the type of the thermostatic control the user will be performing from Flat / Flat 55. For further information about the behaviour and the parameterisation of the Zennio “Building”... -
Page 43: Annex I. Led Illumination Modes
Flat & Flat 55 ANNEX I. LED ILLUMINATION MODES The LED backlight of every button, by default (in most functions), will turn on for a brief instant whenever the button is touched. This behaviour is referred to as the “Regular Illumination”. - Page 44 Flat & Flat 55 Table 4 illustrates which of the above are configurable for each function. State-dep. Dedicated Disabled Regular State-dep. (both LEDs) object Switch Two Objects PAIR Dimmer Shutter Switch Hold & Release Two Objects Scene INDIVIDUAL Constants Dimmer...
- Page 45 Flat & Flat 55 Although the behaviour of the LEDs can be configured independently for each control, it is also possible to define a general behaviour for all of them thus not being then necessary to configure the same option multiple times.
-
Page 46: Annex Ii. Communication Objects
Flat 55 does not incorporate the internal temperature probe, nor the 6-button model, so objects applicable to these characteristics will not be available. The objects shown in this table are from model Flat 6. Note that certain objects will not be available in models with less push buttons. Number... - Page 47 Flat & Flat 55 [General] Welcome Back Object - Additional 1 Bit C - - W - DPT_Switch Additional Condition Object 5 Condition 1 Bit C - - W - DPT_Enable [General] Proximity Sensor 0 = Disable; 1 = Enable...
- Page 48 Flat & Flat 55 0x7 (Dec. by 1%) 0x8 (Stop) 0x9 (Inc. by 100%) … 0xF (Inc. by 1%) 1 Bit C T - - - DPT_UpDown [Btn][Ix] Shutter - Move (Long Press) 0 = Up ; 1 = Down...
- Page 49 Flat & Flat 55 1 Bit C T - W - DPT_Switch [Btn][Px] Switch Lower = 1; Upper = 0 1 Bit C T - - - DPT_Switch [Btn][Px] Light - On/Off (Short Press) Lower = Off; Upper = On...
- Page 50 Flat & Flat 55 1 Bit C T - W - DPT_Switch [Btn][Px] Two objects - Long Press Left = 0; Right = 1 1 Bit C T - W - DPT_Switch [Btn][Px] Two objects - Long Press Left = 1; Right = 0...
- Page 51 Flat & Flat 55 -670760.00 - 2 Bytes C - - W - DPT_Value_Tempd [Tx] Setpoint Offset Float Offset Value 670760.00 2 Bytes C T R - - DPT_Value_Temp -273.00 - 670760.00 [Tx] Setpoint Status Current Setpoint 2 Bytes C T R - - DPT_Value_Temp -273.00 - 670760.00 [Tx] Basic Setpoint Status...
- Page 52 Flat & Flat 55 150, 179 1 Bit C T R - - DPT_Alarm [Ix] Short Circuit Error 0 = No Error; 1 = Short Circuit Error 151, 180 1 Byte C T R - - DPT_Scaling 0% - 100%...
- Page 53 Flat & Flat 55 0x1 (Dec. by 100%) … 0x7 (Dec. by 1%) 0x8 (Stop) 0x9 (Inc. by 100%) … 0xF (Inc. by 1%) 0x0 (Stop) 0x1 (Dec. by 100%) … DPT_Control_Dimmin 0x7 (Dec. by 1%) 4 Bit C T - - -...
- Page 54 Flat & Flat 55 1 Bit C T - - - DPT_Step [Ix] [Long Press] Stop/Step Up Shutter Sending of 0 (Stop/Step Up) 1 Bit C T - - - DPT_Step [Ix] [Long Press] Stop/Step Down Shutter Sending of 1 (Stop/Step Down)
- Page 55 Join and send us your inquiries about Zennio devices: http://support.zennio.com Zennio Avance y Tecnología S.L. C/ Río Jarama, 132. Nave P-8.11 45007 Toledo (Spain). Tel. +34 925 232 002. www.zennio.com info@zennio.com...
Need help?
Do you have a question about the FLAT and is the answer not in the manual?
Questions and answers