Table of Contents
Advertisement
Advertisement
Table of Contents

Subscribe to Our Youtube Channel
Related Manuals for Arecont Vision MicroDome G2 AV1555DN-S


Summary of Contents for Arecont Vision MicroDome G2 AV1555DN-S
- Page 1 MicroDome® G 2 -S Model Installation Manual Models: 1.2 Megapixel • AV1555DN-S • AV1555DN-S-NL 1080p • AV2555DN-S • AV2556DN-S • AV2555DN-S-NL • AV2556DN-S-NL 3 Megapixel • AV3555DN-S • AV3556DN-S • AV3555DN-S-NL • AV3556DN-S-NL 5 Megapixel • AV5555DN-S •...
-
Page 2: Table Of Contents
MicroDome® G 2 Installation M anual Contents Package Contents .............................. 3 Camera Overview .............................. 5 Surface Mount (-S Model) Installation ......................... 6 ... -
Page 3: Package Contents
This equipment should be unpacked and handled with care. The original packaging is the safest container in which to transport the unit and can be used if returning the unit for service. The packaging contains: One (1) Arecont Vision MicroDome® G2 Camera • One (1) ceiling template •... -
Page 4: Warranty Information
VISION’s written authorization; (ii) has not been used in accordance with applicable documentation; (iii) has been subjected to unusual stress, neglect, misuse, abuse, improper storage, testing or connection; or unauthorized repair; or (iv) is no longer covered under the Warranty Period. ARECONT VISION MAKE NO WARRANTIES OR CONDITIONS, EXPRESS, IMPLIED, STATUTORY OR OTHERWISE,... -
Page 5: Camera Overview
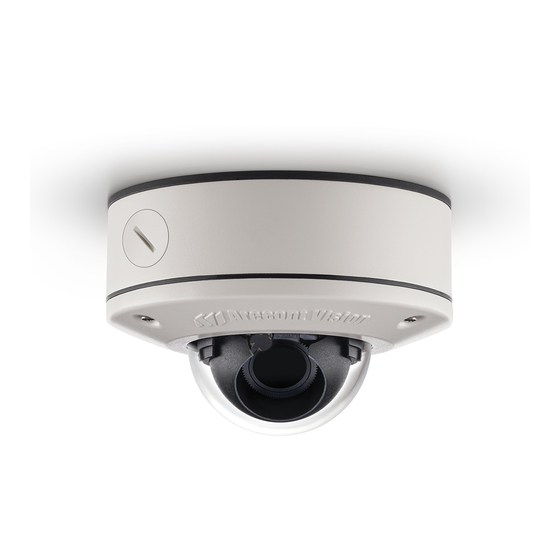
MicroDome® G 2 Installation M anual Camera Overview The MicroDome® G2 megapixel IP cameras provide professional surveillance for a variety of network surveillance requirements. These remote focus true day/night cameras are available with a choice of lenses including 2.8mm, 4mm, 6mm, 8mm, 12mm, and 16mm options. -
Page 6: Surface Mount (-S Model) Installation
MicroDome® G 2 Installation M anual Surface Mount (-S Model) Installation 1. Determine a secure location to mount the camera. 2. Remove the dome cover from the camera by unscrewing the three captive fasteners. Figure 1: Remove dome cover 3. - Page 7 MicroDome® G 2 Installation M anual Figure 3: Drill three of the six holes provided. NOTE: For installations in harsh environments, it is recommended to use all six mounting screws supplied with the camera to create the best seal possible between the camera and the mounting surface and using the supplied gasket.
- Page 8 MicroDome® G 2 Installation M anual NOTE: If you use the side connection of the NPT port, remove the cap covering the side entrance, otherwise; leave the cap in place. If using the NPT port, always use Teflon tape around the threads to ensure proper sealing.
- Page 9 MicroDome® G 2 Installation M anual Figure 6: Attach dome cover with captive fasteners 9. If using the MCD-4S accessory plate, tighten the two captive fasteners with the supplied Philips head screwdriver to secure the dome cover to the user supplied 4S junction box. Tightly insert the two black plugs supplied with the MCD-4S for the remaining open holes.
- Page 10 MicroDome® G 2 Installation M anual Figure 8: Surface mount configuration Reference # Description Ceiling Gasket NPT Port Camera Housing Dome Cover Page | 10 support@arecontvision.com +1.818.937.0700 877.CAMERA.8 www.arecontvision.com avsales@arecontvision.com...
- Page 11 MCD-4S Dome Cover Accessory (fits common 4S junction box) 10. Use the Arecont Vision software AV IP Utility located on the CD or available for download at our website (www.arecontvision.com) for camera discovery and setup (see Instruction Manual located on the CD or available on our website).
-
Page 12: Changing The Lens
MicroDome® G 2 Installation M anual Changing the Lens 1. Remove the dome cover by loosening the captive fasteners with the supplied Philips head screwdriver. Reference # Description Captive Fasteners 2. Loosen the lens lock screws (3) using the supplied flat-head screwdriver (if necessary). Only do so if the lens seems very tight when turning. -
Page 13: Optional: Removing The Bubble
MicroDome® G 2 Installation M anual 6. Reinstall the dome cover per instructions outlined above. Optional: Removing the Bubble For best image quality in an indoor environment, the bubble can be easily removed. 1. -
Page 14: Optional: Connecting Digital I
MicroDome® G 2 Installation M anual Optional: Connecting Digital I/O To use digital I/O, connect digital I/O with pigtail cable connector as shown below. Reference # Description Input (White + / Black -) Output (Orange + / Yellow -) ®... - Page 15 MicroDome® G 2 Installation M anual NOTE: Table 2 shows the cable color for digital input and output. Digital I/O Orange Digital OUT + Yellow Digital OUT - White Digital IN + Black Digital IN - Table ...
- Page 16 MicroDome® G 2 Installation M anual Camera Power Up This product should be installed by a qualified service technician in accordance with the National Electrical Code (NEC 800 CEC Section 60) or applicable local code. 1.
- Page 17 MicroDome® G 2 Installation M anual NOTE: A yellow LED on the rear of the camera illuminates after a few seconds. The flashing yellow LED indicates that a link to your computer has been established. •...
-
Page 18: Camera Discovery, Setup, And
AV IP Utility tool is efficient and convenient for mass or single camera uploads. The AV IP Utility tool is compatible with all Arecont Vision® megapixel cameras. The user manual for the software is included on the CD that came with your camera or available on our website. -
Page 19: General Remote Focus
2. Scroll to the Focus Tab section. ® NOTE: Additional information regarding the Arecont Vision web interface is found separately in the A V IP Utility Web Browser Manual v ia the Arecont Vision website. Page | 19 support@arecontvision.com ... -
Page 20: Refined Remote Focus
MicroDome® G 2 Installation M anual 3. Click the Full-range Focus button. The camera begins to autofocus with the lens stopping at the best overall point of focus. When the focus area turns to Green, the autofocus is complete. ... - Page 21 MicroDome® G 2 Installation M anual 5. Left click and drag to highlight the area within the zoomed window you created. 6. Click the focus menu, then the Short-Range Focus button. 7. The camera proceeds to go through the short range adjustment around the original focus. It stops at the best point of focus using the new reference area.
-
Page 22: Av Ip Utility Focus Tab
MicroDome® G 2 Installation M anual AV IP Utility Focus Tab Menu Feature Description Manual Focus: Numbers indicate the level of focusing in order to adjust the field-of-view. +20, +5, +1, - 20, -5, -1 To set-up a focus area (if necessary), draw a rectangle with the mouse (by left-clicking and dragging the mouse to a desired zoom size). -
Page 23: Wall Mount Accessory
MicroDome® G 2 Installation M anual Wall Mount Accessory (MCD-WMT) Gasket Alignment f eatures m ust b e a ligned for ... -
Page 24: Pendant Mount Accessory
MicroDome® G 2 Installation M anual Pendant Mount Accessory (MCD-CMT) Installation Notes: 1. 3x mounting screws are #10x1” wood or sheet metal screws (3x mount anchors also included). 2. Always ensure gaskets are properly ... -
Page 25: Mounting Template: Microdome
MicroDome® G 2 Installation M anual Mounting Template: MicroDome G2 Camera ® Page | 25 support@arecontvision.com ... -
Page 26: Mount Template: Microdome
MicroDome® G 2 Installation M anual Mount Template: MicroDome MCD-WMT Wall Mount ® Page | 26 support@arecontvision.com ... - Page 27 MicroDome® G 2 Installation M anual Mount Template: MicroDome MCD-CMT Pendant Mount ® Page | 27 support@arecontvision.com ...
-
Page 28: Support
Swap the “troubled” camera with a known good camera to see if the problem follows the • camera or stays at the location. 3. Contact Arecont Vision Technical Support one of three ways: 1. Online Portal: Support.ArecontVision.com 2. Phone: 1.818.937.0700 (option #1) 3.
Need help?
Do you have a question about the MicroDome G2 AV1555DN-S and is the answer not in the manual?
Questions and answers