Table of Contents
Advertisement
Quick Links
Advertisement
Table of Contents

Related Manuals for OWC Mercury On-The-Go Pro Series


Summary of Contents for OWC Mercury On-The-Go Pro Series
- Page 1 OWC Mercury On-The-Go Pro Series Assembly Manual...
-
Page 2: Table Of Contents
OWC Mercury On-The-Go Pro Table of Contents 1 INTRODUCTION 1.1 SYSTEM REQUIREMENTS 1.1.1 Mac Requirements 1.1.2 PC Requirements 1.2 PACKAGE CONTENTS 1.3 ABOUT THIS MANUAL 1.4 PORT VIEW & CABLE CONNECTIONS 1.5 DETAILED VIEW 1.5.1 LED Indicator 2 SYSTEM SETUP 2.1 SOFTWARE INSTALLATION... -
Page 3: Introduction
•USB 2.0 or 3.0 interface, Windows 2000 / XP / Vista / Windows 7 1.2 Package Contents ➂ ➀ ➁ ➃ All Models of the OWC Mercury On-The-Go Pro Series Owner’s Manual OWC Mercury On-The-Go Pro ➀ ➅ ➆ ➄... -
Page 4: Port View & Cable Connections
NOTE: OWC does not recommend bus powering more than one external storage device. 1.5 Detailed View The OWC Mercury On-The-Go Pro has a blue LED at the front of the hard drive enclosure. It will illuminate blue when powered on, and flash on drive activity (both reading and... -
Page 5: System Setup
2 SYSTEM SETUP This guide will get you up and running quickly, demonstrating how to install your own 2.5” hard drive into the OWC Mercury On-The-Go Pro enclosure. Your computer is a static-sensitive device. It is susceptible to invisible damage if not protected during installation. - Page 6 OWC Mercury On-The-Go Pro Chapter 2 - System Setup 2.1 Hard Drive Assembly & Installation ① Remove the bridge card and aluminum heatsink from the packaging. ② Remove the bridge card from the aluminum heatsink. It just slides in, no screws are...
- Page 7 OWC Mercury On-The-Go Pro Chapter 2 - System Setup ③ Set the aluminum heatsink aside for now. ④ Place your hard drive mechanism onto the bridge card and fully seat the drive onto the connector. ⑤ Turn the bridge over and look through the screw holes. Make sure they are fully lined up...
- Page 8 OWC Mercury On-The-Go Pro Chapter 2 - System Setup ➅ Slide the bridge card with the hard drive into the aluminum heatsink - there is a notch that the bridge card will slide into. Do NOT insert screws into the side of the drive through the heatsink.
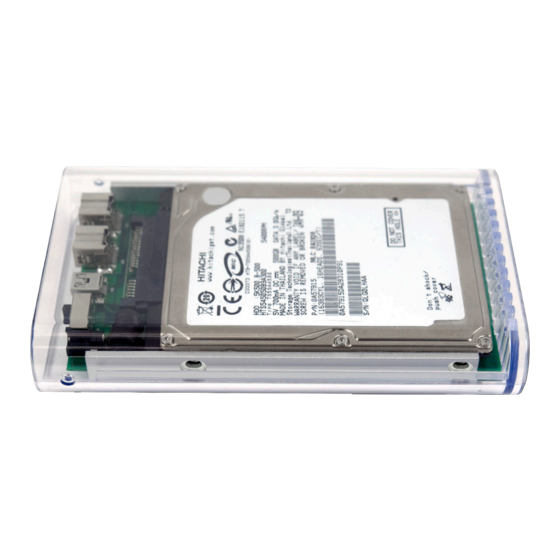
- Page 9 OWC Mercury On-The-Go Pro Chapter 2 - System Setup ➇ Here you see the OWC Mercury On-The-Go Pro drive inserted into the acrylic enclosure, ready to have it’s end cap attached. ➈ Insert the acrylic endcap, fully sliding it over the bridge card ports.
-
Page 10: Formatting
Open the Disk Utility application, which is located in /Applications/Utilities ① Select the device with no volumes attached to it; in this picture, that would be the 320.07 GB OWC device. Click on the picture of the drive icon next to the text. - Page 11 OWC Mercury On-The-Go Pro Chapter 3 - Formatting ② Once you’ve selected the OWC device, you will notice the above change in the Disk Utility application. Click on the “Erase” tab in this picture. ③ ➊ ➋ You then need to name the volume that you want to format, and erase it. Name the volume as you want, choose the Volume Format pulldown (Mac OS Extended (Journaled) is default), and click the Erase button.
- Page 12 Click the erase button to confirm you wish to erase the disk. ⑤ After a few moments, the erase command will complete and the OWC Mercury On-The-Go Pro volume will mount on your desktop. You can quit Disk Utility, you’re all...
- Page 13 Only for XP, 2000, ME and earlier. (XP 64-BIT, Vista & Windows 7 can continue to the next section) Your new OWC Mercury On-The-Go Pro is preformatted for use with a Macintosh. Unfortunately, this is not readable by Windows without special software. If you wish to use your storage solution on a computer running Windows, you will need to repartition and reformat using the following instructions.
- Page 14 OWC Mercury On-The-Go Pro Chapter 3 - Formatting 3.3 Formatting your OWC Mercury On-The-Go Pro on Windows 2000 and later Instructions for other operating systems can be found at http://www.macsales.com/format. WARNING: This procedure will destroy ALL data on the disk you run it on!!! Be sure there is nothing you need to keep on your drive before running any of these commands.
- Page 15 OWC Mercury On-The-Go Pro Chapter 3 - Formatting ④ Your drive will appear similar to how Disk 1 does below. Notice that the space on the lower right reads as “Unallocated.” Right click in this space and choose “New Partition.”...
- Page 16 OWC Mercury On-The-Go Pro Chapter 3 - Formatting ⑧ If you like, you can specify the drive letter designation for your new drive. Otherwise, one will automatically be assigned. Click “Next. ” ⑨ Before you can use the drive, it must be formatted.
- Page 17 OWC Mercury On-The-Go Pro Chapter 3 - Formatting ⑪ Once you have finished with the formatting wizard, you will see that your new drive (represented as “Disk E” in this case) will display a message of “Formatting. ” This should only take a couple of minutes if you chose the quick format option.
- Page 18 OWC Mercury On-The-Go Pro Chapter 3 - Formatting ⑬ At this point, you may close the Computer Management window. Your drive is ready to use and can be found in “My Computer. ” Using your new Storage Solution on both Macs and PCs?
-
Page 19: Troubleshooting & Tips
If they are, and the storage solution is still not working properly, try connecting to another interface such as the USB connection and see if the device works properly. If these suggestions do not work, try the OWC Mercury On-The-Go Pro on a different computer, if available to you. - Page 20 4.2 Tips Identifying the LED indicators on your drive The OWC Mercury On-The-Go Pro has a blue LED at the front of the hard drive enclosure. They will illuminate blue when powered on, and flash on drive activity (both reading and writing).
- Page 21 If you are using an older Macintosh system, or using a PCI FireWire card to interface with your OWC Mercury On-The-Go drive, we recommend using the included Intech® Hard Disk SpeedTools™ to tune the drive for optimum performance. Transfer errors or corruption can be avoided by using this software.
-
Page 22: Appendix
To ensure that your files are protected and to prevent the loss of your data, we strongly suggest that you keep two copies of your data: one copy on your OWC Mercury On-The- Go Pro, and a second copy on either your internal hard drive or another storage medium, such as an optical backup, or on a second external hard drive. -
Page 23: Technical Support
OWC Mercury On-The-Go Pro Chapter 6 - Technical Support 6 TECHNICAL SUPPORT 6.1 Before Contacting Technical Support •Read this manual and review Chapter 4: Troubleshooting & Tips. •Try to confirm the problem is with the hard drive. If you have a second computer, move the enclosure to that system and verify that the solution does not function with that machine. - Page 24 Copyrights: Copyright © 2012 Other World Computing, Inc. All rights reserved. No part of this publication may be reproduced, stored in a retrieval system, or transmitted in any form or by any means, electronic, mechanical, photocopying, recording or otherwise, without the prior written consent of Other World Computing.
Need help?
Do you have a question about the Mercury On-The-Go Pro Series and is the answer not in the manual?
Questions and answers