Advertisement
Quick Links
Advertisement

Related Manuals for OWC Mercury On-The-Go


Summary of Contents for OWC Mercury On-The-Go
- Page 1 OWC Mercury On-The-Go Assembly Manual For PATA and SATA based enclosures...
- Page 2 OWC Mercury On-The-Go SATA Assembly Addendum On page 8 and 9 of the OWC Mercury On-The-Go Assembly Manual, there is a procedure change necessary. Instead of attaching the hard drive to the firewire bridge card as the manual shows, you now need to attach the hard drive to the heatsink and not attach the drive to the bridge card.
- Page 3 Set the aluminum heatsink aside for now. Place your hard drive mechanism onto the bridge card and fully seat the drive onto the connector. Turn the bridge over and look through the screw holes. Make sure they are fully lined up. Do NOT put any screws in!
- Page 4 Slide the bridge card with the hard drive into the aluminum heatsink - there is a notch that the bridge card will slide into. Secure the hard drive using 4 screws from the included plastic bag, through the heatsink, into the hard drive. Don’t overtighten, start all 4 screws before fully tightening.
- Page 5 Here you see the OWC Mercury On-The-Go drive inserted into the acrylic enclosure, ready to have it’s end cap screwed on. Turn to Page 10 in the of the OWC Mercury On-The-Go Assembly Manual to complete.
- Page 6 Memory Upgrades From OWC! OWC has the right memory for your computer! www.macsales.com/memory All memory from OWC meets or exceeds Apple / JEDEC specifications and is backed by a 30 day money-back guarantee and LIFETIME Advance Replacement Warranty. Page 1...
- Page 7 2.5” drive storage enclosure! This guide will get you up and running quickly, demonstrating how to install your own 2.5” hard drive into the OWC Mercury On-The-GO enclosure. Follow the step by step directions for the model of enclosure you have purchased.
-
Page 8: System Requirements
System Requirements: Macintosh with FireWire interface and OS 8.6 and above. PC with FireWire interface and Windows 98 or other OS with FireWire support Macintosh with USB interface, either built in or via 3rd party card. USB 2.0 drivers required for use with Mac OS X, USB 2.0 not supported on any other Macintosh OS. - Page 9 SATA enclosure assembly There are 3 OWC Mercury On-The-Go drive enclosures for SATA based hard drives. They include: • A FireWire 800 / USB 2.0 based model • A USB 2.0 / eSATA based model • A USB 2.0 based model The assembly of these models is virtually identical.
- Page 10 Begin by opening the box your OWC Mercury On-The-Go enclosure arrived in. Remove the contents of the box and lay the items out in front of you. (Note - each model includes different items, see the next page for an itemized contents list for each enclosure variant)
- Page 11 Parts list for each model of On-The-Go SATA enclosure: • OWC Mercury On-The-Go FireWire 800/USB 2.0 Enclosure (Bridge, Case, Cap) • Carrying Case • AC/DC Power Adapter OWCMSTG800U2K • USB 2.0 Cable • FireWire 800 (1394B) Cable • FireWire 800-400 (1394B-1394A) Adapter Cable •...
- Page 12 Assembly Process Begin the assembly process by removing the plastic endcap from the acrylic enclosure. It is easily removed using a screwdriver to lever the cap off of the case. Once the endcap is removed, slide the bridge card out of the acrylic enclosure.
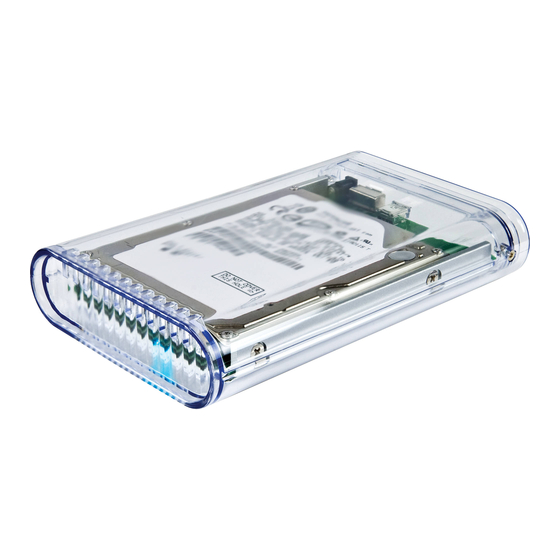
- Page 13 Take your 2.5” Serial ATA hard drive and set it onto the bridge card, firmly sliding it onto the combination power / data connector on the hard drive. There are plastic stops built into the drive and connector to ensure that you fully seat the drive onto the connector.
- Page 14 Here is the bridge card with the 4 screws fully inserted into the hard drive. Take the assembled bridge card / hard drive and slide it into the rails that are built into the aluminum heatsink inside the clear acrylic enclosure. The bridge assembly will fully slide all the way into the enclosure as shown above.
- Page 15 Take the clear acrylic endcap that you removed at the beginning of this process and replace it on the acrylic enclosure as shown above, fully sliding it over the bridge card ports. Once you have the endcap on, attach it to the enclosure using the 2 included small Phillips screws.
- Page 16 PATA enclosure assembly There are 4 OWC Mercury On-The-Go drive enclosures for PATA based hard drives. They include: • A FireWire 800 / USB 2.0 based model • A FireWire 400 / USB 2.0 based model • A FireWire 400 based model •...
- Page 17 Begin by opening the box your OWC Mercury On-The-Go enclosure arrived in. Remove the contents of the box and lay the items out in front of you. (Note - each model includes different items, see the next page for an itemized contents list for each enclosure variant)
- Page 18 Parts list for each model of On-The-Go PATA enclosure: • OWC Mercury On-The-Go FireWire 800/USB 2.0 Enclosure (Bridge, Case, Cap) • Carrying Case OWCMOTG800U2 • USB 2.0 Cable • FireWire 800 (1394B) Cable • Screws & Adhesive Feet for enclosure •...
- Page 19 PATA Enclosure Assembly Process Remove the green bridge board from the anti-static protective bag. Place your 2.5” ATA hard drive on the green bridge board and line up the pins exactly as shown above. There are 4 extra pins that the edge connector does NOT cover - they are at the bottom of the bridge card in this picture.
- Page 20 Take the 4 Phillips machine screws and insert them into the hard drive, through the bridge card in the locations circled in red. Make sure to fully tighten them. Slide the bridge card with the hard drive attached into the clear acrylic enclosure.
- Page 21 Insert the 2 small pointed Phillips screws into the endcap through the acrylic enclosure as shown, one on each side. Fully tighted them. Do not exert too much force while screwing these in, you can accidentally strip the screw head easily. Place the adhesive silicone rubber feet onto the acrylic enclosure in the 4 locations circled in red above.
- Page 22 Formatting the Hard Disk Drive e aware that this will destroy all your existing data on the drive PC running Windows 98 SE or Windows ME 1. Go to the start menu 2. Select “Run” 3. Type in “command” - press OK to confirm. 4.
- Page 23 PC running Windows 2000, Windows XP, or Windows Vista You need to open the Disk Management Program. Go to the Start menu --> Control Panel --> Administrative Tools --> Computer Managment Select “Disk Management” Choose the drive you want to format and right click on it for further commands (Choose New Partition) Follow the Partition Wizard to setup your disk It is recommended that you format the hard drive using the in-...
- Page 24 Mac OS Mac OS 9 does not support creating multiple partitions on an external drive. To do that, you would need to purchase additional third-party software, connect the drive to the internal IDE bus or upgrade to OS X. For Mac OS X, use the Disk Utility to format and create partitions on your external disk.
-
Page 25: General Operation
To use Bus Powered (No AC adapter): FireWire or USB con- nections ONLY: 1. Plug in the FireWire or USB cable into the OWC Mercury On- The-Go hard drive. 2. Plug the FireWire or USB cable into the computer. -
Page 26: Technical Support
Live Chat via internet is also available during those times. Tech Support: 815-338-8685 Customer Service: 800-275-4576 International: 815-338-8658 24hr Fax: 815-338-4332 Customer Service Web address: http://eshop.macsales.com/Service/index.cfm Technical Support Web Address: http://eshop.macsales.com/tech_center/index.cfm Be sure to check our FAQs out here: http://helpcenter.owc.net/index.php?x=&mod_id=2 Page 21... - Page 27 ® The NewerTech USB 2.0 Universal Drive Adapter turns any ATA or SATA drive into a convenient external drive. Easily transfer files from computer or notebook, back up files, or store large file archives on hard drives. The Hi-Speed USB interface provides for easy installation with its Plug and Play design.
- Page 28 Copyrights Copyright © 2007 Other World Computing All rights reserved. No part of this publication may be reproduced, stored in a retrieval system, or transmitted in any form or by any means, electronic, mechanical, photocopying, recording or otherwise, without the prior written consent of Other World Computing. Changes The material in this document is for information only and subject to change without notice.
Need help?
Do you have a question about the Mercury On-The-Go and is the answer not in the manual?
Questions and answers