Table of Contents
Advertisement
Quick Links
Advertisement
Table of Contents

Subscribe to Our Youtube Channel
Related Manuals for Uniden APPCAM PAN/TILT


Summary of Contents for Uniden APPCAM PAN/TILT
- Page 1 APPCAM PAN/TILT User’s Manual Issue A1, April 2015...
-
Page 2: Customer Care
Uniden surveillance products are not manufactured and/or sold with the intent to be used for illegal purposes. Uniden expects consumer’s use of these products to be in compliance with all local, state and federal law. For further information on video surveillance and audio recording legal requirements, please consult your local, state and federal law. -
Page 3: Table Of Contents
MAINTAINING YOUR SYSTEM ....22 FEATURES ...............5 TAKING CARE OF YOUR CAMERA ....22 System ..............5 TROUBLESHOOTING ......... 23 AppCam Pan/Tilt Indoor Camera .....5 Uniden’s AppCam App ........6 HOW TO IMPROVE THE WIRELESS WHAT’S INCLUDED ..........6 SIGNAL QUALITY ........... 23 PARTS OF THE CAMERA ........7... -
Page 4: Please Read Before You Start
IMPORTANT SAFETY PRECAUTIONS Uniden will not assume any liability for damages caused by improper handling or non-compliance with the following safety notices or procedures in this Owner’s Manual! Any warranty claim will be null and void in such cases. -
Page 5: Overview
OVERVIEW Uniden’s AppCam system works with your smartphone or wireless device to create a powerful home security network. No PC interface is needed to view video on your smartphone or wireless devices. Set up the camera network on your mobile device and install the cameras; your network is up and running. -
Page 6: Uniden's Appcam App
Night vision range – 25 feet • Built-in microphone and speaker • microSD card slot • Uniden’s AppCam App Multiple camera viewing and management from single app • Remote access to recorded video • Remote snapshot & recording control •... -
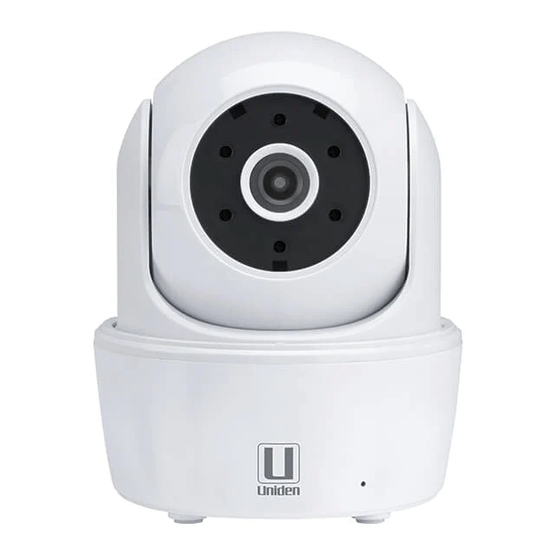
Page 7: Parts Of The Camera
PARTS OF THE CAMERA Front Back Light Sensor Infrared LEDs microSD card Reset slot Ethernet Power LED cable Power jack Antenna jack Microphone... -
Page 8: Network Setup And Camera Installation
• You must have an available WiFi-enabled mobile device (iOS smartphone/ • tablet). The AppCam Pan/Tilt and your mobile device must connect to the same Wi- • Fi router for setup. STEP 1 - SET UP CAMERA AND SMARTPHONE/TABLET 1. Download the Uniden® AppCam™ app from the Apple App Store onto your device. -
Page 9: Step 2 - Connect Camera And Mobile Device
2 in the next section, Connect Camera and Mobile Device. STEP 2 - CONNECT CAMERA AND MOBILE DEVICE 1. From your device’s Settings, go to WiFi. Select the AppCam Pan/Tilt to connect your device to it. The camera listing will be HD-XXXXXX where XXXXXX are the last 6 digits on the camera label. -
Page 10: Step 3 - Connect Camera To Wifi Router
6. Tap the screen image. The Modify Security Code prompt displays. Change the security code and tap Confirm. 7. Tap the screen display again to display the live video screen. STEP 3 - CONNECT CAMERA TO WIFI ROUTER 1. Tap the Back icon, the System icon, and then the System Settings icon. -
Page 11: Step 4 - Set Time Zone/Daylight Savings Time
STEP 4 - SET TIME ZONE/DAYLIGHT SAVINGS TIME It is important to set the correct time zone and daylight savings time indication on your camera to ensure correct date/time stamp on the video files. 1. Access the Advanced Settings list (see Connect Camera to Internet, described previously. - Page 12 The camera is equipped with built-in infrared LEDs so you can use night • vision for 24-hour surveillance. The LEDs will automatically activate at night and the picture viewed will turn to black and white. The night viewing range is up to 25 ft. Avoid pointing the camera lens directly at clear glass; the night vision LEDs will cause a blurred image.
-
Page 13: Operation Overview
OPERATION OVERVIEW To Do This ... Do This: Record Video Tap the Live Video screen. View Recorded Files 1. From the Snapshot screen, tap 2. Tap from the three icons displayed on the snapshot image. 3. Tap your selection from the list of recorded files that now displays. -
Page 14: Using The App
USING THE APP After you’ve set up your system, use the Uniden AppCam app (“Uniden AppCam”) to manage your AppCam operations and to take snapshots and remotely view live or recorded video on your smart phone or tablet device. You can have multiple independant AppCam cameras on the network. Please follow these steps to use the app. -
Page 15: Snapshot Screen Overview
Snapshot Live SNAPSHOT SCREEN OVERVIEW The Snapshot screen displays a snapshot image from the camera and four function icons. Add Another Camera icon allows you to add another camera to your network. See page 9 for details. System Settings icon allows you to configure the advanced settings, remove the camera connection, and play back the recorded video clips. -
Page 16: Update
Accesses System Information screen, from which you can access the Advanced Settings Screen. This screen lets you configure the camera and set notification alerts. See page 17 for details. Deletes the camera from the app. Event List lets you check, play back, and delete recorded events and files. -
Page 17: System Information - Advanced Screen Details
System Information - Advanced Settings Screen Details to display the System Information screen again with a tab for advanced settings. From this screen (see page 10 for an image of this screen), you can set email alerts and event notifications as well as configure specific camera settings. - Page 18 GMT-06:00 - Central Standard — GMT-07:00 - Mountain Standard — GMT-08:00 - Pacific Standard — GMT-09:00 - Yukon Standard — GMT-10:00 - Alaska-Hawaii Standard — Daylight saving: Enable or disable daylight saving time. • Device Security Code: Change the default password (123456) to a security •...
-
Page 19: Delete Camera Connection
SDCard Format/ Overwrite SDCard: Enable or disable the ability to overwrite • the microSD card as space is needed. Update device firmware: Update the device’s firmware. Tap OK at the • confirmation screen to automatically reboot the device after update. Device Information: Check the model, camera’s firmware version, and storage •... - Page 20 LIVE VIDEO SCREEN OVERVIEW The Live Video screen lets you take snapshots, pan and tilt the camera angle, record video, and control the microphone and audio. Viewing Recording Tap this icon to take a snapshot of the current image. Snapshots are saved in your mobile device.
-
Page 21: View Recorded Files
Tap this icon to begin recording live video. A round, red recording button displays. Tap it again to stop recording. Once recording begins, the app continues recording for 2 minutes. You cannot stop recording during this period. When the system starts recording, the video clips will be saved into your camera’s memory card. -
Page 22: Maintaining Your System
MAINTAINING YOUR SYSTEM TAKING CARE OF YOUR CAMERA When dust and grime builds up on the camera lens and glass, it affects night vision capability. The infrared light reflects off of the dust and grime, limiting the camera’s “vision.” Use a microfiber cloth to regularly clean the cameras or when night vision video is cloudy or unclear. -
Page 23: Troubleshooting
TROUBLESHOOTING HOW TO IMPROVE THE WIRELESS SIGNAL QUALITY If possible, remove obstacles in between camera and receiver that might reflect the signal. These could include furniture, cabinets, and walls. If the wireless signal is not improved, relocate the camera closer to the receiver. If... - Page 24 If... Try this... Motion detection is • Make sure the sensitivity setting is not turned OFF. (Set sensitivity through the Advanced Settings screen.) not working • Adjust the sensitivity of the motion sensor. (Set sensitivity through the Advanced Settings screen.) • In motion detection mode, a moving object within the camera viewing angle is necessary to trigger the motion sensor for recording.
- Page 25 If... Try this... My smartphone • Make sure the router is turned on. or wireless device • Refresh the connection. cannot find the • Make sure your smartphone is connected to the same camera during network as the camera. setup.
-
Page 26: Specifications
SPECIFICATIONS General Power 100~240V switching power supply DC 5V 1.5A Power Consumption 650mA max Camera Body Dimension 96mm x 48mm diam. Weight (Main Body) 7.3 oz (210g) Operating Temperature 14° ~ 122°F (-10° ~ 50°C) Network Wireless Technology IEEE 802.11 b/g/n Network Connection Ethernet (10/100 Base-T/Base -TX);... -
Page 27: Microsd Card Approximate Recording Time
Audio/Video Image Compression H.264 Image Resolution HD 1280x720 VGA 640x480 Recording Frame Rate Max 25 FPS Supported Mobile Internet Device iOS Requirement iOS5.0 and above Hardware Requirement • Cortex A6 800MHz or above • 1GB internal memory or above MICROSD CARD APPROXIMATE RECORDING TIME 1GB = 8.75 hours •... -
Page 28: Ic Compliance Information
installations. This equipment generates, uses, and can radiate radio frequency energy, and if not installed and used in accordance with the instructions, may cause harmful interference to radio communications. However, there is no guarantee that interference will not occur in a particular installation. -
Page 29: Ce Compliance Information
Important: Evidence of original purchase is required for warranty service. WARRANTOR: Uniden America Corporation (“Uniden”) ELEMENTS OF WARRANTY: Uniden warrants, for one year, to the original retail owner, this Uniden Product to be free from defects in materials & craftsmanship with only the limitations or exclusions set out below. - Page 30 & a note describing the defect that has caused you to return it. The Product should be shipped freight prepaid, by traceable means, to warrantor at: Uniden America Service C/O Saddle Creek 743 Henrietta Creek Rd., Suite 100 Roanoke, TX ...
Need help?
Do you have a question about the APPCAM PAN/TILT and is the answer not in the manual?
Questions and answers