Table of Contents
Advertisement
Quick Links
Advertisement
Table of Contents

Related Manuals for Uniden App Cam Pano Series


Summary of Contents for Uniden App Cam Pano Series
- Page 1 App Cam Pano Series Quick Start Guide...
-
Page 3: What's In The Box
What’s in the Box App Cam Pano Antenna Waterproof Lid Power Adapter Power Mounting Plate Mounting Hole Ethernet Cable Extension Cable Template Quick Start Guide Pack of Screws Screw Driver... -
Page 4: General Introduction
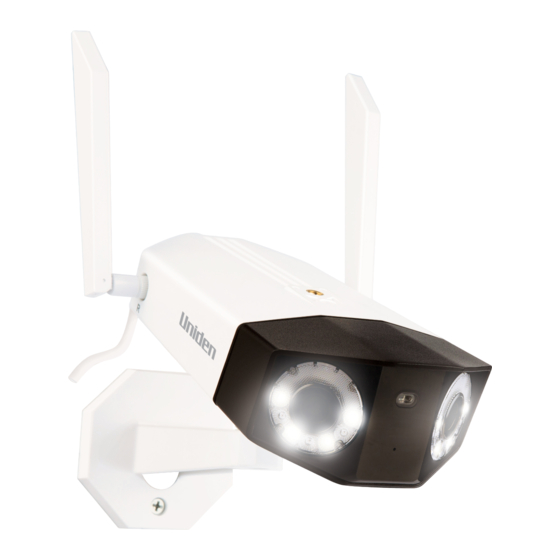
General Introduction Antenna Daylight Sensor Lens Spotlights Infrared Light Mounting Bracket Weatherproof Lid Ethernet Port Power Port... - Page 5 Micro SD Card Slot *Reset Button Use a pin to press. Speaker *Note: Reset: Press and hold the Reset button for 5 seconds or until you hear a beep while the camera is powered on to return your camera to factory default settings...
-
Page 6: Powering The Camera
Powering the Camera For initial setup, please power on the camera with the power adapter and also connect the camera to your router LAN port with an Ethernet cable, and then follow the steps to set up your camera. Please make sure your camera and your phone are on the same network. -
Page 7: Install Uniden Solo App
Install Uniden Solo App There are two ways to get the Uniden Solo App: • Search “Uniden Solo” in App Store (for iOS), download and install the app. • Search “Uniden Solo” in Google Play (for Android), download and install the app. - Page 8 2. Scan the QR code on the 3. Camera starts initialisation 4. Create the login password body of the camera. setup. for the camera and tap Next.
- Page 9 5. Name the camera and tap 6. Choose the WiFi network 7. Enter the password of Next. you want to join. the WiFi network, and then tap Save to save the configuration.
- Page 10 8. Format the SD card inserted 9. Tap Finish to complete the in the camera (optional) and setup. then tap Next to format the SD Card.
-
Page 11: Device Menu
Device Menu Menu Add New Device Device Settings Access Live View... -
Page 12: Wifi Connection
WiFi Connection Here is the steps on how to connect the camera to a WiFi network. If the WiFi was setup in the initialisation stage, remove the Ethernet cable wait for a moment for the camera to reconnect to the network. -
Page 13: Mount The Camera
Mount the Camera Installation Tips • Do not face the camera towards any light sources. • Do not point the camera towards a glass window. Or, it may result in poor image quality because of the window glare by infrared LEDs, ambient lights or status lights. - Page 14 How to Mount the Camera to the Wall 1. Drill holes in accordance with the mounting template and use the drywall anchors included in the package if needed. 2. Secure the mounting plate to the wall with the upper two screws and hang the camera on it.
- Page 15 To get the best field of view, loosen the adjustment screw on security mount and turn the camera. Stiffen the adjustment screw to lock the camera.
- Page 16 How to Mount the Camera to the Ceiling 1. Drill holes in accordance with the mounting template and use the drywall anchors included in the package if needed. 2. Secure the mounting plate to the wall with the upper two screws and hang the camera on it.
- Page 17 To get the best field of view, loosen the adjustment screw on security mount and turn the camera. Stiffen the adjustment screw to lock the camera.
-
Page 18: Troubleshooting
Troubleshooting Camera is not powering on If your camera is not powering on, please try the following solutions: • Plug the camera into a different outlet and see if it works. • Power on the camera with another working 12V 2A DC adapter and see if it works. Failed to Connect to WiFi During Initial Setup Process If the camera fails to connect to WiFi, please try the following solutions: •... - Page 19 Specification Model App Cam Pano Image Sensor 1/3” CMOS Image Sensor Video Resolution 4608 x 1728 (8.0Megapixel) 20 fps Video Compression H.264/H.265 Viewing Angle Horizontal: 170° / Vertical: 60° Night Vision Up to 30 Meters Spotlight Colour 6500K Video Spotlight Brightness 560 Lumens PIR Detecting Angle Horizontal: 100°...
- Page 20 Power DC Power DC 12.0V/2A, <15W Storage SD Card Supports up to 256GB micro SD card, min class 10 Size 195 x 103 x 56 mm Size & Weight Weight 700g Temperature Operating Temperature : -10°C~+55°C Other Parameters Humidity Operating Humidity: 20% ~ 85% Waterproof Level IP66 Weatherproof...
- Page 21 Accessories 6 Month If a warranty claim is made, this warranty will not apply if the Product is found by Uniden to be: A. Damaged or not maintained in a reasonable manner or as recommended in the relevant Owner’s Manual;...
- Page 22 Product does not conform with this warranty, you should deliver the Product, together with satisfactory evidence of your original purchase (such as a legible copy of the sales docket) to Uniden. Please refer to the Uniden website for address details. You should contact Uniden regarding any compensation that may be payable for your expenses incurred in making a warranty claim.
- Page 24 THANK YOU FOR BUYING A UNIDEN PRODUCT © 2022 Uniden Australia Pty Limited V1.0 Printed in PRC...
Need help?
Do you have a question about the App Cam Pano Series and is the answer not in the manual?
Questions and answers