
Related Manuals for Uniden APPCAM23


Summary of Contents for Uniden APPCAM23
- Page 1 Network Camera Installation and Operating Instructions Version 1.0 Model: APPCAM23 These instructions should be retained in a safe place for future reference.
-
Page 2: Table Of Contents
CONTENTS INTRODUCTION ................2 PLEASE READ BEFORE YOU START ........2 WIRELESS DEVICES OPERATING RANGE......2 IMPORTANT SAFETY PRECAUTIONS ........2 KIT CONTENT ..................4 SAFETY AND INSTALLATION TIPS ..........5 Planning your layout ................6 Camera Installation................7 Connection Diagram ................8 CAMERA OVERVIEW..............9 DOWNLOAD AND USE THE APP ..........10 Download the App ................10 App Setup ..................10 App Operation ..................15... -
Page 3: Introduction
1. INTRODUCTION The WIP APP Camera is a wireless security system designed for easily creating your home security network. Downloading the free App, you can view and capture video clips of any motion detected by the wireless camera(s) and store them onto the memory card via smart phones and/or tablets running iOS/Android. - Page 4 (10) Check power cables, do not get crushed or damaged by sharp edges whenever the devices are in operation. FCC Compliance Statement: This Products with CE Marking comply with device complies with Part 15 of the EMC Directive (2004/108/EC); Low FCC rules.
-
Page 5: Kit Content
2. KIT CONTENT App Camera x 1 Camera Stand x 1 Camera Antenna x 1 5V/1A Power Adapter for Camera Ethernet Cable x 1 Screw Bag x 1 Tools Required: Manual x 1 Electric drill 5mm masonry drill bit ... -
Page 6: Safety And Installation Tips
3. SAFETY AND INSTALLATION TIPS Do not attempt to open the units with the power adaptor plug connected to avoid any risk of personal injury. When installing CCTV camera(s), always follow manufacturer's advice when using power tools, steps, ladders, etc. and wear suitable protective equipment (e.g. safety goggles) when drilling holes. -
Page 7: Planning Your Layout
Planning your layout Night Vision The camera has built-in infra-red LEDs to allow you to view at night for 24hrs surveillance. The LEDs will automatically activate at night and the picture viewed will turn to black and white. The night viewing range is up to 5 meters. -
Page 8: Camera Installation
Camera Installation A. Secure camera stand on the wall B. Loosen up the Thumb screw C. Adjust proper view angle then secure the joint with T-bolt. -
Page 9: Connection Diagram
Connection Diagram... -
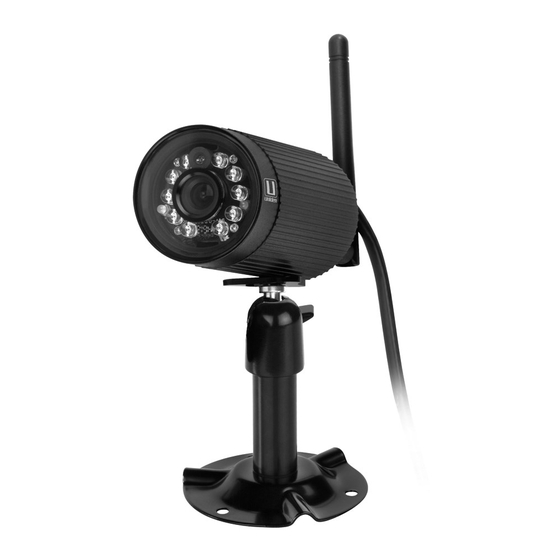
Page 10: Camera Overview
4. CAMERA OVERVIEW... -
Page 11: Download And Use The App
5. DOWNLOAD AND USE THE APP The WAPP CAM is designed to remotely view the live camera video with your smart phone or tablet device. Please follow these steps to download, setup and use the App. Download the App From you Android smart phone or tablet device, click the Android Market. - Page 12 field. 7. Enter the default password 123456 in the PASSWORD field. “Enable Email Alert” option will send an email alert to your smart phone or tablet whenever the motion detection is triggered. “Enable Event Notify” option will notify you whenever any recording event is produced. Note: When you type in the default password, the system will alarm you to change it.
- Page 13 You can also use the SEARCH feature for a quick setup. This feature will automatically search for your camera(s) on your local area network (LAN). Please follow the steps below. 1. Connect your smart phone or tablet device to WiFi which the camera is used.
- Page 14 Once the camera is connected, the App will show the video as below. You can tap the icons to add more cameras or configure the advanced settings. Tap to add more camera(s). Tap to setup the camera configuration. Tap to update the status of camera(s). Tap to enable PIN lock or enter the INFORMATION page.
- Page 15 The INFORMATION icon allows you to enable PIN lock or check the App information. Setup PIN Lock If you enable PIN Lock, the user will be asked to enter the PIN code when you turn on your mobile device. 1. Click the “Enable lock when starting” then type in your PIN code.
-
Page 16: App Operation
App Operation When you launch the App on the smart phone or tablet, the image displayed on the main screen is the latest captured camera image from previously established session. The App then updates the status of all cameras automatically. You can take a snapshot or record a video clip with the icons below. -
Page 17: Advanced Setting
Advanced Setting The Advanced setting allow you to setup the time zone, device password, video setting, WiFi setting, sensitivity setting, and email setting. You can also format the SD card or check the device information here. Tap the CAMERA SETTING icon . - Page 18 Admin Password The Admin Password is a specific security code for your advanced settings. The default password is 123456. Please use this function to change the default password into your personal admin password. For the protection of your system configuration, every time you change the advanced settings, you need to enter the admin password.
- Page 19 Video Setting The video setting section allows you to configure the video quality and environment mode. Video Quality Set up the video format to VGA/QVGA with High/Low resolution. Environment Mode Choose the appropriate option in accordance with local power frequency. WiFi Setting The WiFi setting allows you to choose the WiFi connection...
- Page 20 Sensitivity Setting Set up the sensitivity of motion sensor from OFF, LOW to HIGH. If you set OFF the sensitivity setting, the system will turn off the motion detection function. If you configure the sensitivity setting into LOW or HIGH, the system will start recording when any movement occurs within the viewing angle of the camera.
-
Page 21: Device Information
Device Information This section contains the model number, device version, vendor name, total size and available size of the memory card. -
Page 22: Trouble Shooting
6. TROUBLE SHOOTING IF… SOLUTION Make sure the power adaptor is not damaged No image appears or defective and plugged into an electrical outlet with power. Relocate the camera to obtain the best reception of wireless signals. Make sure the camera is properly configured in App. - Page 23 The camera's infrared LEDs produce invisible Bright white spots light that reflects off surfaces such as glass. appear at night time Install the camera on the other side of windows or place the lens flush against the surface to improve the night vision. It is suggested to install camera(s) under well lit area.
-
Page 24: About Digital Wireless Technology
7. ABOUT DIGITAL WIRELESS TECHNOLOGY This section offers some helpful information to overcome most of the problems you may encounter. We hope this section can help you to enjoy a pleasant setup. About 2.4GHz Digital Wireless Signal This innovative digital wireless solution integrates advance Frequency Hopping Spread spectrum (FHSS) technology. -
Page 25: Production Specification
8. PRODUCTION SPECIFICATION Networking Parameter IEEE 802.11 b/g Wireless Technology Ethernet (10/100 Base-T/Base -TX); Wifi Network Connection TCP/IP, UDP, SMTP, NTP, DHCP, ARP Network Protocols 4 concurrent sessions Simultaneous Viewers Security WPA /WPA2 (TKIP, 128 bit AES) Camera Parameter 1/4” CMOS Image Sensor 3dBi Waterproof Dipole Antenna... -
Page 26: Storage Media Management
-10°~+50°C Operating Temperature 9. STORAGE MEDIA MANAGEMENT Micro SD Card Capacity 640 x 480 (VGA) 60 Minutes 110 Minutes 400 Minutes 950 Minutes 1880 Minutes...
Need help?
Do you have a question about the APPCAM23 and is the answer not in the manual?
Questions and answers
How do I add AppCam23 to my wifi router or modem wireless?
To connect the Uniden AppCam23 to your Wi-Fi router wirelessly, follow these steps:
1. Ensure your smartphone or wireless device is connected to the same Wi-Fi network that the camera will use.
2. Download and install the "Uniden AppCam" app from Google Play (for Android) or the App Store (for iOS).
3. Launch the app and follow the setup instructions.
4. When adding the camera, ensure your network supports the DHCP protocol and that DHCP is enabled.
5. During setup, the camera will attempt to acquire an IP address from the router.
6. Follow the app’s prompts to connect the camera to your Wi-Fi network.
7. Once connected, the camera’s LED should indicate a successful connection.
Ensure the router password is available, and place the camera within the router’s Wi-Fi range for a stable connection.
This answer is automatically generated