Table of Contents
Advertisement
Quick Links
Advertisement
Table of Contents
Troubleshooting

Related Manuals for Oricom Secure 610


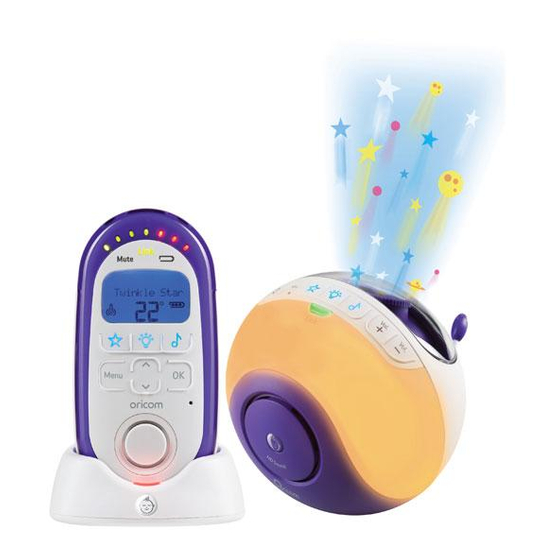
Summary of Contents for Oricom Secure 610
- Page 1 Premium DECT Digital Baby Monitor Secure 610 User Guide...
-
Page 2: Table Of Contents
USING YOUR DIGITAL BABY MONITOR ........... 18 TROUBLESHOOTING ................39 CUSTOMER SUPPORT ................41 WARRANTY ....................42 Need Help? If you need assistance setting up or using your Oricom product now or in the future, call Oricom Support. Australia 1300 889 785 www.oricom.com.au Mon-Fri 8am –... -
Page 3: Important Safety Information
IMPORTANT SAFETY INFORMATION Important Safety Information information you will need to get the most from your Oricom Baby Monitor. If you Customer support team. Our dedicated local team are more likely to be able to help you than the retailer where you made your purchase. - Page 4 IMPORTANT SAFETY INFORMATION Therefore, maintain a distance of at least one meter from other electronic become warm to the touch. This is normal and should not be a concern. Warning frayed or compromised cord. Battery safety If a battery leaks, do not let the battery liquid touch skin or eyes. If this happens, immediately flush the affected areas with water, and seek medical assistance.
- Page 5 IMPORTANT SAFETY INFORMATION battery. Disposal Always dispose of your products at the end of their life in accordance with your local waste disposal requirements.Packaging materials all cardboard and paper packaging should be recycled in accordance with your local council waste regulations.
-
Page 6: Getting Started
GETTING STARTED This User Guide provides you with all the information you need to get the most from your Oricom Digital Baby Monitor. Please read this guide carefully and keep rechargeable batteries for it for future reference. Parent unit (pre-installed) -
Page 7: Oricom Digital Baby Monitor
ORICOM DIGITAL BABY MONITOR Mute Low Mute All Parent unit (on top of unit) (on top of unit) Power on/off Baby sound level LEDs Press to toggle the Press to toggle the (on top of unit) Baby unit microphone Press and hold to switch the power normal and Mute Low. - Page 8 ORICOM DIGITAL BABY MONITOR Parent unit display icons Menu options: Lightshow Nightlight Music Feed Timer Setup Battery status Full charge (75-100%) Medium charge (51-74%) Low charge (25-50%) Empty (8-24%) measured at the Baby unit Flashing (0-7%). Typically you will be able to use your Parent unit for at least one hour after the battery icon starts to flash.
-
Page 9: Parent Unit Charger
ORICOM DIGITAL BABY MONITOR Parent unit charger Front Charging light Red when the Parent unit is correctly placed on the charger. Back Power socket For connection to the mains adaptor cable supplied. -
Page 10: Baby Unit
ORICOM DIGITAL BABY MONITOR Baby unit Temperature sensor Make sure the sensor is placed with clear space around it and not in contact with any surfaces Nightlight Press to switch the Music Nightlight on or off. Press to switch music on at... -
Page 11: Back Of Baby Unit
ORICOM DIGITAL BABY MONITOR Back of Baby unit Lightshow tilt control (see page 25) Lightshow focus control (see page 26) Power socket Auxiliary input socket For connection to the mains source, e.g. MP3 player, so you adaptor cable supplied. can play your own choice of... -
Page 12: Parent Unit Menu Map
ORICOM DIGITAL BABY MONITOR Parent unit menu map Turn (On/Off)? High Brightness Lightshow Medium 5 min 10 min Timer 15 min Constant Turn (On/Off)? High Nightlight Brightness Medium 5 min 10 min Timer 15 min Constant (Play/Stop)? Scroll Options Lullabies... -
Page 13: Setting Up
SETTING UP Parent unit 1. Plug one of the power adaptor cables into the socket marked on the back of the Parent unit charger and plug the other end into the mains power wall socket and switch the power on. unit. - Page 14 Parent until display to indicate that the batteries are being charged. Low battery indicator Battery icon oricom Charging light on) to reach maximum charge. When the batteries are fully charged the battery icon on the display will show a full charge Warning permanently damage your product.
- Page 15 SETTING UP Battery performance Please note that new The charge capacity of rechargeable batteries will reduce with time as they wear out, so reducing the Battery low warning – Parent unit When the batteries are low – approximately within 1 hour of running out – the Parent unit will emit a low battery alert, the low battery indicator will turn red, the display will show Low Battery and the icon will flash.
-
Page 16: Switch On And Link The Parent And Baby Units
SETTING UP Switch on and link the Parent and Baby units 1. Press and hold the button on the Baby unit until the nightlight briefly illuminates and the green Link indicator flashes. 2. Press and hold the briefly illuminate. The green Link indicator will flash and the display will show I’m Linking. - Page 17 SETTING UP If the link is broken: conditions the range is up to 300 metres outdoors and 50m indoors) Positioning your units The Baby unit should ideally be within 1m-2m of your baby for best performance. If you place the Parent and Baby units too close together you will hear a high pitched noise, this is normal.
-
Page 18: Using Your Digital Baby Monitor
USING YOUR DIGITAL BABY MONITOR Switching on/off Switch the Baby unit on 1. Press and hold the button until the nightlight briefly illuminates and the green Link indicator flashes. Once linked the green Link indicator will remain on. Switch the Parent unit on 1. - Page 19 USING YOUR DIGITAL BABY MONITOR Baby sound level LED indicators LEDs 1-2 = Green LEDs 3-4 = Green LEDs 5-7 = Red (or Amber if Mute Low is on) the sound increases. LEDs 1-2 LEDs 3-4 LEDs 5-7 Equivalent sound level examples:...
-
Page 20: Adjust The Loudspeaker Volume
USING YOUR DIGITAL BABY MONITOR Adjust the loudspeaker volume At the Parent unit: 1. Press Volume until the display shows Volume Off. The Mute All indicator will illuminate. At the Baby unit: 1. When Music is being played or Talk back is in progress from the Parent unit, press the 2. - Page 21 USING YOUR DIGITAL BABY MONITOR Mute All feature – Parent unit only loudspeaker. With Mute All on you can still monitor your baby using the Baby 1. To switch Mute All on, press the button located on the top of the unit. The Mute indicator will illuminated red.
-
Page 22: Talk Back
USING YOUR DIGITAL BABY MONITOR then the unit will un-mute so you can hear the sounds. 1. To switch Mute Low on, press the button located on the top of the Parent unit. The Mute indicator will turn amber. 2. To switch Mute Low off, press the button again. - Page 23 USING YOUR DIGITAL BABY MONITOR Find button on the Baby unit to make the Parent unit sound 1. Press on the Baby unit. The paging alert will sound at the Parent unit and the display will show Here I am! 2.
-
Page 24: The Parent Unit Menu
USING YOUR DIGITAL BABY MONITOR The Parent unit menu button on the Parent unit can be used to select and change settings on the 1. Press then press to scroll through the menu options shown on the top of the display. Press when the option you want is displayed. - Page 25 USING YOUR DIGITAL BABY MONITOR Switch lightshow on/off using the Parent unit 1. To switch on, press the button. The display will briefly show Lightshow On and the Baby unit lightshow will turn on. 2. To switch off, press the button.
- Page 26 USING YOUR DIGITAL BABY MONITOR Adjusting the lightshow angle and focus side of the current position. The focus wheel should be used to obtain a clear picture on the wall or ceiling. Nightlight to choose from and you can set a period of time for the nightlight to illuminate. The Baby unit must be switched on for the nightlight to work, but need not be linked to the Parent unit.
- Page 27 USING YOUR DIGITAL BABY MONITOR Select the nightlight brightness level using the Parent unit 1. Press . Lightshow is displayed, press to display Nightlight and press 2. Turn On? is displayed, press to display Brightness and press 3. Press to display either Low, Medium or High and press select.
-
Page 28: Play Music From The Baby Unit
USING YOUR DIGITAL BABY MONITOR Play music from the Baby unit The Baby unit has 19 songs that can be played to gently soothe your baby. The medley of the songs from your selected category. The songs can be set to play play music or audio books of your choice to your baby. - Page 29 USING YOUR DIGITAL BABY MONITOR Turn music on/off using the Parent unit 1. To turn the music on, press the button. The display will briefly show Music On and music will start playing from the Baby unit. 2. To turn the music off, press the button.
-
Page 30: Feed Timer
USING YOUR DIGITAL BABY MONITOR Set a play time for music 1. Press . Lightshow is displayed, press until Music is displayed and press 2. Play? is displayed, press until Timer is displayed and press . buttons to scroll through the options: 5 min, 10 min, 15 min or Constant and press when the option you want is displayed. - Page 31 USING YOUR DIGITAL BABY MONITOR Start the feed timer countdown 1. Press . Lightshow is displayed, press until Feed Timer is displayed and press 2. Start? is displayed, press . The display will briefly show Timer On and then the timer will be shown counting down the seconds from the time you set. 00:00 you will hear an alert beep and the timer and icon will flash.
- Page 32 USING YOUR DIGITAL BABY MONITOR Select the type of feed timer alert 1. Press . Lightshow is displayed, press until Feed Timer is displayed and press 2. Start? is displayed, press until Timer Alert is displayed and press buttons to display either Beep, Beep&Vibe or Vibrate and press to select.
-
Page 33: Temperature Monitor
USING YOUR DIGITAL BABY MONITOR IMPORTANT Baby unit has been placed. temperature reference e.g. your central heating thermostat may not be as accurate, possibly due to tolerances and positioning of the thermostat in relation to the Baby Monitor sensor. Temperature monitor There is a temperature sensor on the Baby unit to constantly monitor the a message on the screen. - Page 34 USING YOUR DIGITAL BABY MONITOR Temperature monitor indicators Temperature On the Parent unit Too Cold Too Warm Too Hot Select the type of temperature alert 1. Press . Lightshow is displayed, press until SetUp is displayed and press 2. Crying Alert is displayed, press until Temp Alert is displayed and press buttons to display either Beep, Beep&Vibe, Vibrate, Screen Only or Off and press...
-
Page 35: Temperature Alert Options
USING YOUR DIGITAL BABY MONITOR Temperature alert options Beep = Parent unit will beep. icon will flash. Beep&Vibe icon will flash. Vibrate icon will flash. Screen Only = icon will flash. Off = No alerts. icon will not be displayed. Too Hot or Too Cold. -
Page 36: Crying Alert
USING YOUR DIGITAL BABY MONITOR Crying alert information on the Mute All feature. With Mute All switched on, if your baby starts to cry you will not be able to hear audible beep but you can select a different alert if you want to. Select the type of crying alert 1. -
Page 37: List Of Tones
USING YOUR DIGITAL BABY MONITOR Backlight default setting is On. 1. Press . Lightshow is displayed, press until SetUp is displayed and press 2. Crying Alert is displayed, press until Backlight is displayed and press buttons to display either On w alerts or Off w alerts and press to select. -
Page 38: Reset The Units
USING YOUR DIGITAL BABY MONITOR Reset the units Resetting either units will return the settings at that unit back to its default settings. feature that ensures your Baby Monitor is returned to its new “out of the box” settings. Reset the Parent unit 1. -
Page 39: Troubleshooting
TROUBLESHOOTING Should you experience difficulties operating the SC610 please refer to the Customer Support on 1300 889 785 for assistance. Troubleshooting Problems Solutions Link light does not come on switched on. installed and that they are charged. switched on at the Baby unit. Link light is flashing to use the Talk Back green... -
Page 40: Trouble Shooting
TROUBLE SHOOTING Battery low on Parent unit the batteries remain charged. unit off if it is not being used while it is charging. Parent unit remains 21-22. pitched noise Talk back feature is not working see page 20. -
Page 41: Customer Support
Importan Please retain your purchase receipt and attach to the back page of this user few moments to register your product online: www.oricom.com.au... -
Page 42: Warranty
(if necessary), together with instructions on how to return the goods for does not qualify for return, this warranty does not apply to your product. Products that are authorised to be returned to Oricom in Australia must include all of the following:... -
Page 43: Important Information
WARRANTY Important Information Repair Notice Please be aware that the repair of your goods may result in the loss of any user-generated data (such as stored telephone numbers, text messages and Please also be aware that goods presented for repair may be replaced by refurbished goods or parts of the same type rather than being repaired. - Page 44 Warranty. Any implied warranties that may be imposed by law are limited in duration to the Warranty Period. Oricom warrants that the product is free from defects in materials or workmanship during the Warranty Period. This Warranty does not extend to any outside of Australia.
- Page 45 Oricom does not warrant that the operation of the product will be uninterrupted or error free. Oricom is not responsible for damage that occurs as a result of your failure to follow the instructions that came with the product. These terms and conditions together with any specific terms and conditions contained in the user guide between you and Oricom regarding the product.
- Page 46 3. an uncontrollable external cause which results in the product not functioning Oricom will not be liable for any damages caused by the product or the failure of or consequential damages. Oricom is not liable for any claim made by a third party or made by you on behalf of a third party.
- Page 48 Phone: 1300 889 785 (Monday to Friday 8am to 6pm AEST) Web: www.oricom.com.au Fax: (02) 4574 8898 Contact details for Oricom Support and Warranty Claims in New Zealand Email: support@oricom.co.nz Phone: 0800 674 266 (Monday to Friday 10am to 8pm NZST) Web: www.oricom.co.nz...
Need help?
Do you have a question about the Secure 610 and is the answer not in the manual?
Questions and answers