Table of Contents
Advertisement
Contact details for Oricom support and warranty claims in Australia
Oricom International Pty Ltd
Locked Bag 658
South Windsor, NSW 2756
Australia
Email: support@oricom.com.au
Phone: 1300 889 785
(Monday to Friday 8am to 6pm AEST)
Web: www.oricom.com.au
Fax: (02) 4574 8898
Contact details for Oricom support and warranty claims in New Zealand
Email: support@oricom.co.nz
Phone: 0800 674 266
(Monday to Friday 10am to 8pm NZST)
Web: www.oricom.co.nz
Ref: 15122011
SC210 User Manual.indd 1
2011-12-15 11:56:07
Advertisement
Table of Contents

Related Manuals for Oricom secure 210


Summary of Contents for Oricom secure 210
- Page 1 Phone: 1300 889 785 (Monday to Friday 8am to 6pm AEST) Web: www.oricom.com.au Fax: (02) 4574 8898 Contact details for Oricom support and warranty claims in New Zealand Email: support@oricom.co.nz Phone: 0800 674 266 (Monday to Friday 10am to 8pm NZST) Web: www.oricom.co.nz...
- Page 2 Baby Monitor Secure 210 User Guide SC210 User Manual.indd 2 2011-12-15 11:56:15...
-
Page 3: Table Of Contents
SETTINGS TROUBLESHOOTING PRODUCT SPECIFICATIONS CUSTOMER SUPPORT WARRANTY Need Help? If you need assistance setting up or using your Oricom product now or in the future, call Oricom Support. Australia 1300 889 785 www.oricom.com.au Mon-Fri 8am – 6pm AEST New Zealand 0800 67 42 66 www.oricom.co.nz... -
Page 4: Safety Information
Never use or place to get the most from your Oricom Baby Monitor. If you your Parent or Baby unit in or near moisture or water have any issues setting up or using your Oricom Baby (e.g. - Page 5 If you believe the battery is damaged, remove product WARNING from the charger and stop using the product. Contact Oricom for assistance. Never use a damaged battery. Do not place the AC Adaptor cable in a high "wear and tear" location. Never use a frayed or compromised cord.
-
Page 6: Getting Started
GETTING STARTED Installation Thank you for choosing this monitor from Oricom. Your Secure 210 Baby Monitor offers the best Digital clip Technology. For the Parent Unit 1. Remove the Belt Clip by lifting INTERFERENCE the clip at the top and sliding it downwards. - Page 7 GETTING STARTED 6. Press [ ] to turn the Parent Unit on. 4. Press and hold [ ] key to turn on the baby unit. • Before first use, or if it has been out of use for a long •...
-
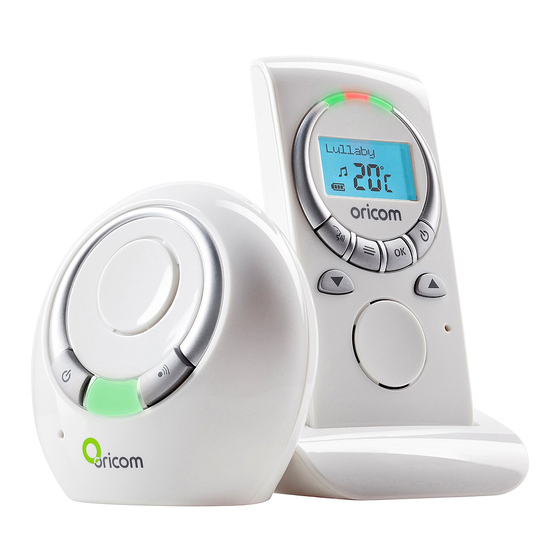
Page 8: Your Baby Monitor
YOUR BABY MONITOR Baby unit (Sender) 1 Power On/Off Key Press to turn ON the Baby unit. Press and hold to turn OFF. 2 Nightlight 3 Microphone Picks up the sounds from your baby's room. 4 Page key Press and hold for 2 seconds to Page the Parent Unit with an audible alert. - Page 9 YOUR BABY MONITOR Parent unit (Receiver) 8 Belt Clip 9 Battery Cover Rechargeable batteries. 10 Power Light 11 Noise level indicators 12 Display Indicates the current settings of your Baby Monitor, including: Battery level, Date and Time, Temperature, Lullaby on/off, Lullaby melody. 13 Talk key Press and hold to talk to your baby or partner in the baby's room via the Baby Unit.
-
Page 10: Lcd Display Of Baby Monitor
LCD DISPLAY OF BABY MONITOR Parent Unit 1. Numbers/Characters indicator 2. Night light indicator 3. Battery level indicator 4. Sensitivity indicator 5. Temperature indicator 6. Feed time Alarm indicator 7. Lullaby on/off indicator SC210 User Manual.indd 7 2011-12-15 11:56:20... -
Page 11: Operation
OPERATION Operation Battery charge indicator and battery low warning The parent unit will work up to 10 hours out of the Once you have set up your baby monitor, you will be able charger pod, but this depends on the level of charge to hear the sounds in your baby's room through the parent in the batteries. - Page 12 OPERATION Parent to parent paging Useful if one parent is in the baby's room and needs to contact the other. Also helps to find a mislaid parent unit. At the baby unit Press and hold the Page Key for 2 seconds. The parent unit will emit a tone.
-
Page 13: Settings
SETTINGS Settings Language Press the Menu key. You can make several settings using the menu. Select Language and press OK. Press the Menu key to open the menu. Select a language and press OK. Use the and key to scroll through the menu. Select another menu item or leave the menu by pressing Press OK to open a submenu or to confirm a setting. - Page 14 SETTINGS To switch the function off press OK. Use and to adjust the upper limit (Up Limit) and press OK. - If the function is switched off On? is shown. Use and to adjust the lower limit (Low Limit) and To switch the function on press OK.
- Page 15 SETTINGS Sound alert Sensitivity Press the Menu key. Note: Select Sensitivity and press OK. You can set your parent unit to give an extra warning Use and to select the desired level and press OK. "beep" should the noise levels in your baby's room activate the sound level LED on the sound sensor.
-
Page 16: Night Light
SETTINGS Night light Press the Menu key. Select Night Light and press OK. - If the function is switched on (lightbulb icon on the display) Off? is shown. To switch the night light off press OK. - If the function is switched off On? is shown. To switch the night light on press OK. -
Page 17: Troubleshooting
TROUBLESHOOTING Problem Possible cause(s) The red power lights do not turn on when you plug in 1. Check if the units are properly connected to the power supply. the power. 2. Check if the power is turned on. If not, Press [ ] to turn on the power. -
Page 18: Product Specifications
PRODUCT SPECIFICATIONS Feature Specifications Operating Frequency DECT 1.8 GHz Up to 300m under optimum conditions. The range is Range reduced in buildings (up to 50m) as a result of walls, doors etc. Input: 100~240 V 50/60Hz Power supply (Baby Unit) Output: 7 V , 420 mA, Non rechargeable batteries, baby unit... -
Page 19: Customer Support
find useful tips and information in the Troubleshooting section of this user guide as well as “Frequently Asked Questions” on our website www.oricom.com.au. If you have further questions about using the product after reviewing the resources above or would like to purchase replacement parts or accessories please call our Customer Support Team. -
Page 20: Warranty
Please also be aware that goods presented for repair may be Products that are authorised to be returned to Oricom in Australia replaced by refurbished goods or parts of the same type rather must include all of the following: than being repaired. - Page 21 Competition and Consumer Act 2010 or any other similar least equivalent to your product in performance. legislation. Oricom does not warrant that the operation of the product will be The Warranty Period will be 3 years from the date of purchase of uninterrupted or error free.
- Page 22 WARRANTY Oricom will not be in breach of a warranty expressly set out in this Oricom products come with guarantees that cannot be excluded User Guide or under the Competition and Consumer Act 2010 under the Australian Consumer Law. You are entitled to a...
Need help?
Do you have a question about the secure 210 and is the answer not in the manual?
Questions and answers