Table of Contents

Related Manuals for Oricom Secure 710


Summary of Contents for Oricom Secure 710
- Page 1 Baby Monitor Secure 710 User Guide KEEP THIS USER GUIDE FOR FUTURE REFERENCE Always retain your proof of purchase in case of warranty service and register your product on line at: AUSTRALIA: www.oricom.com.au NEW ZEALAND: www.oricom.co.nz...
-
Page 2: Table Of Contents
TrOuBLE ShOOTING CuSTOmEr SuppOrT EXprESS wArrANTy Need Help? If you need assistance setting up or using your Oricom product now or in the future, call Oricom Support. Australia 1300 889 785 or 02 4574 8888 www.oricom.com.au Mon-Fri 8am – 6pm AEST... -
Page 3: Safety Information
Oricom baby monitor. If you have • Never place the baby unit or parent unit inside your any issues setting up or using your Oricom baby monitor baby’s cot, bed or playpen. - Page 4 • Use only the battery supplied with the product. Improper use, or use of unapproved batteries may present a risk of fire, explosion, or other hazard, and may invalidate any approval or warranty. • If you believe the battery is damaged, remove product from the charger and stop using the product. Contact Oricom for assistance. Never use a damaged battery.
-
Page 5: Parent Unit Overview
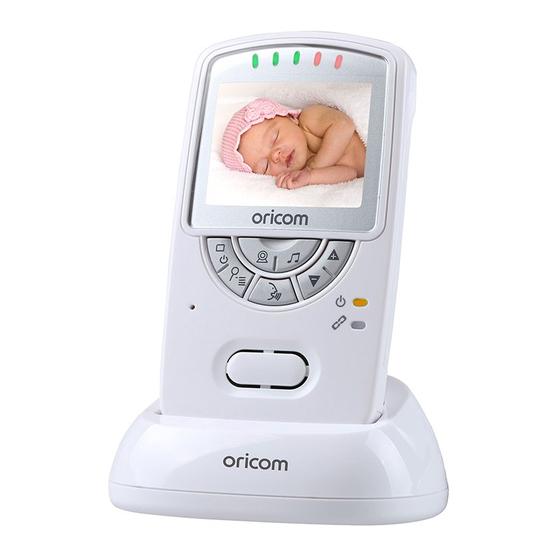
OvErvIEw OF FuNCTIONAL COmpONENT pOSITIONS 2 Your Baby Monitor Antenna (fold-out) Sound level LEDs Parent Unit Camera select Power and display On/Off Menu / zoom Talk button Lullaby On/Off and selector Increase volume / menu options selection Reduce volume / menu options selection Power LED Link LED... - Page 6 1 AC adaptor for the baby unit 2 AC adaptors for the baby units 1 parent unit 1 Li-ion Polymer rechargeable battery pack for the parent unit 1 Charging cradle with AC adaptor for the parent unit If any items are missing contact Oricom customer support.
-
Page 7: Getting Started
GETTING STArTED 3 Getting Started be used as a backup, and removed from the unit when not required. When powered by batteries, the unit can last up to 2 hours, but will depend on the quality of batteries used. 3.1 Baby unit power supply During power failure, the Power LED on the baby unit will flash. In this event, replace or insert 4 x AAA batteries (not (1) Connect the small plug of the power adaptor to the... - Page 8 GETTING STArTED (4) Press and hold the < > key for 2 seconds again to turn Attaching or removing the belt clip/desk stand OFF the parent unit. Prize the latch (see figure) with a suitable tool (such as a NOTE: small screwdriver) a little bit away from the chassis and When the battery level is low, the power LED will flash move the belt clip down simultaneously.
- Page 9 LED will flash slowly. At this point you You can purchase Battery packs (Model No: BPCK1500LI) need to return the parent unit to its charging cradle. charging cradles and extra camera units from www.oricom. When charging, the battery status indicator on the parent com.au...
-
Page 10: Multi-Camera Registration
Switching on the Parent Unit To re-register your baby unit, or register a new baby unit, Press and hold the power button until the Oricom logo follow the procedure below: appears on the parent unit. The camera image will then (1) Switch on the parent unit. -
Page 11: Temperature Display
uSING ThE BABy mONITOr NOTE: 4.4 Out of range indication The lullaby will stop playing if the Talk function is activated. When the distance between the parent unit and baby unit is too far, [Out of Range] will display on the parent unit and 4.2 Adjusting the volume of the parent unit the link LED will flash. Move the parent unit closer to the Press <▲>... -
Page 12: Night Light
Hi] to set the high temperature trigger point. being activated. The Temperature sensor used in this Oricom baby monitor Under such conditions appropriate actions should be taken is intended as a guide, to provide parents with an indication by the parent or guardian to ensure the health and safety... -
Page 13: Zoom Mode
uSING ThE BABy mONITOr the sensitivity level can be increased so that minor (2) The live viewing area will change to x2 zoom mode disturbances can be detected and transmitted to the parent immediately. At the same time four direction arrows will unit. - Page 14 pACK CONTENTS uSING ThE BABy mONITOr (6) If only one camera is registered, then a short press of this key will have no response. (7) If more than one camera is registered then when that camera is selected if the UP/Down button is pressed it will turn on (C ) or turn off (CX) the camera during the √...
-
Page 15: Troubleshooting
TrOuBLEShOOTING 5 Customer Support Should you experience difficulties operating the SC710 please refer to the troubleshooting guide below. If you still experience difficulties please contact Oricom Customer Support on 1300 889 785 for assistance. Troubleshooting Problems Solutions Equipment does not function − Check both parent unit and baby unit are turned on Check parent unit is charged or placed in charger Check baby unit is connected to power. - Page 16 − Check the battery is connected to the battery connection in the battery compartment. − After a period of time, the battery may need to be replaced due to everyday usage. Please visit www.oricom.com.au to purchase replacement batteries. Parent unit beeping Move the parent unit closer to the baby unit until they are within the range.
-
Page 17: Technical Specifications
Up to 150 meters under optimum conditions. Range is reduced in buildings through walls, doors etc. Frequency range 2.4 GHz Digital FHSS Permissible ambient temperature 0°C to 40°C Note For a replacement battery pack or other spare parts please contact Oricom. -
Page 18: Customer Support
Troubleshooting section of this user guide as well as “Frequently Asked Questions” on our website www.oricom.com.au. If you have further questions about using the product after reviewing the resources above or would like to purchase replacement parts or accessories please call our Customer Support Team. -
Page 19: Express Warranty
(30) days or for the remainder of the Express Warranty Oricom warrants that the product is free from defects in Period of the Oricom branded product in which they are materials or workmanship during the Express Warranty installed, whichever is longer. - Page 20 3. any external cause beyond our control, including but not limited to power failure, lightning or over voltage; or 4. modification to the product or services carried out on the product by anyone other than Oricom or Oricom’s authorised service provider.
- Page 21 Send the approved returns to: Oricom International Pty Ltd in Australia Locked Bag 658 Oricom has a simple warranty process for you to follow: South Windsor NSW 2756 Australia • P lease call or email our Customer Support Team, 1300 889 785 or support@oricom.com.au. Please note that this Express Warranty excludes expenses • A Customer Support Team member will verify after...
- Page 22 Contact details for Oricom Support and Express Warranty Claims in Australia Oricom International Pty Ltd Unit 1, 4 Sovereign Place South Windsor, NSW 2756 Australia (Monday to Friday 8am to 6pm AEST) Email: support@oricom.com.au Phone: 1300 889 785 or (02) 4574 8888 Web: www.oricom.com.au...
Need help?
Do you have a question about the Secure 710 and is the answer not in the manual?
Questions and answers