
Subscribe to Our Youtube Channel
Related Manuals for Oricom SECURE 200


Summary of Contents for Oricom SECURE 200
- Page 1 Baby Monitor Secure 200 User Guide...
-
Page 2: Table Of Contents
TABLE OF CONTENTS WARNINGS AND SAFETY INFORMATION GETTING STARTED YOuR BABY MONITOR LCD DISpLAY OF BABY MONITOR BASIC OpERATION MENu SETTINGS TROuBLEShOOTING pRODuCT SpECIFICATIONS GuARANTEE... -
Page 3: Warnings And Safety Information
Please read this user guide thoroughly before use. Never use or place your Parent or Baby units in or near Your ORICOM Baby Monitor is designed to be an aid and moisture or water (e.g. near bath or pool). Immersing in should not be used as a substitute for responsible and water can cause electric shock and even death. - Page 4 Should your product go faulty; contact aggressive solvents. Apart from occasional cleaning of the Oricom Support 1300 889 785 or 02 4574 8888. case, no other care is necessary. • Released electrolyte from the battery is corrosive and can cause damage to the eyes or skin.
-
Page 5: Getting Started
GETTING STARTED Thank you for choosing this monitor from Oricom. Installation Your Secure 200 Baby Monitor offers the best Digital clip Technology. For the Parent Unit 1. Remove the Belt Clip by lifting INTERFERENCE the clip at the top and sliding it FREE FREQUENCY downwards. - Page 6 GETTING STARTED 6. Press [ ] to turn the Parent Unit on. 4. Press and hold [ ] key to turn on the baby unit. • Before first use, or if it has been out of use for a long •...
-
Page 7: Your Baby Monitor
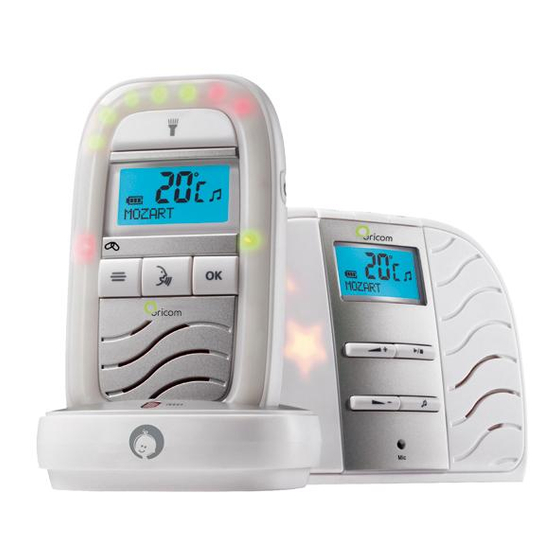
YOuR BABY MONITOR Baby unit (Sender) 1 Temperature Sensor 9 Microphone Picks up the temperature in your baby's room. Picks up the sounds from your baby's room. 2 Battery Cover 10 Volume Up/Down Keys For non rechargeable batteries (not supplied). Volume −: Reduces the lullaby volume. - Page 8 YOuR BABY MONITOR Left view of baby unit Parent unit (Receiver) 11 DC 6V input 12 Battery Cover Connecting to Power Adaptor. Rechargeable battery pack. 13 Belt Clip 14 Volume Up/Down Keys Adjust the volume at which you hear the sounds in your Baby's room, and scroll through the menu during setting.
-
Page 9: Charger Pod
YOuR BABY MONITOR 16 Menu key, [OK] key 19 Noise level indicators Press to adjust the features of your Baby Monitor. 20 Torch key Press [ ] key to enter the menu options, use [ Press and hold to emit a soft beam of light from the top keys to scroll through the menu choices and [OK] key to of the Parent Unit. -
Page 10: Lcd Display Of Baby Monitor
LCD DISpLAY OF BABY MONITOR Baby Unit Parent Unit 1. Battery level indicator 1. Sensitivity indicator 2. Numbers/Characters indicator 2. Night light indicator 3. Temperature indicator 3. Battery level indicator 4. Lullaby on/off indicator 4. Numbers/Characters indicator 5. Temperature indicator 6. -
Page 11: Basic Operation
BASIC OpERATION Once you have set up your Baby Monitor, you will be able and 3 red). The more audio is picked up, the more to hear the sounds in your baby's room through the Parent lights will be lit. When no audio is picked up, all 8 Unit. -
Page 12: Baby Alert
BASIC OpERATION Baby alert! Night light You can set your Parent Unit to give an extra warning The Baby Unit has a night light which emits a soft starry "beep" when the noise levels in your baby's room is glow, providing comfort and reassurance for your baby and high and the red lights on the sound sensor are lit. - Page 13 BASIC OpERATION 2. Press [ ] key to scroll to the different lullabies, or to Temperature select [Play all?]. It is very important for your baby's health to ensure that 3. Press [ ] key again to start or stop the lullaby. they are kept at a safe temperature.
-
Page 14: Talk To Your Baby
BASIC OpERATION Talk to your Baby will be shown on both units LCD display. When the units are linked, the green Link light will be steadily lit. You can speak to your baby from the Parent Unit, perhaps to reassure them that you are on your way. Torch Press and hold [ ] key and speak into the front of the... - Page 15 BASIC OpERATION Charging the Battery Running the rechargeable battery right down at least once a week will help it last as long as possible. The charge capacity of a rechargeable battery will reduce with time as Depending on the usage; the Parent Unit will work for up they age, so reducing the performance time of the parent to 10 hours with a fully charged battery.
-
Page 16: Menu Settings
MENu SETTINGS Note: All Menu settings operations are only available on the Parent unit. During setting, press [ ] key to exit. Night light Setting Start playing You can turn on or off the night light on the baby unit via Press [ OK ] key, "Play?"... - Page 17 MENu SETTINGS 1. Press [ ] key on the parent unit and use [ ] keys Set On or Off to select "Sensitivity". The display is shown below: 1. Press [ OK ] key, "On?" or "Off?" is shown on the display, press [ OK ] key to select Sound Alert on or off and "Saved"...
- Page 18 MENu SETTINGS Press [ ] key on the parent unit and use [ ] keys to Set degree Centigrade or Fahrenheit select "Temperature". The display is shown below: You can choose whether to view the temperature of your baby's room in degrees Centigrade or degrees Fahrenheit. Your monitor is pre-set to Centigrade, but if you wish to change it, follow the steps below: 1.
- Page 19 MENu SETTINGS Set the time baby's feeds are due. You have the choice to either set an alert just for your baby's next feed time, or for your baby's 2. Press [ OK ] key and "Set time" is shown on the display. next feed time plus subsequent feeds based on the interval Press [ OK ] key.
- Page 20 MENu SETTINGS Set the first or next feed time Language Setting 1. Press [OK] key, "Set Time" is shown on the display. The displayed information can be set in different 2. Press [ OK ] key, then follow the procedures in the Set languages.
-
Page 21: Troubleshooting
TROuBLEShOOTING Problem Possible cause(s) The red power lights do not turn on when you plug 1. Check if the units are properly connected to the power supply. in the power. 2. Check if the power is turned on. If not, Press [ ] to turn on the power. -
Page 22: Product Specifications
pRODuCT SpECIFICATIONS Feature Specifications Operating Frequency DECT 1.8 GHz Up to 300m under optimum conditions. The range is Range reduced in buildings (up to 50m) as a result of walls, doors etc. Input: 100~240 V 50/60Hz Power supply (Baby Unit) Output: 6 V , 500 mA, Non rechargeable batteries, baby unit... -
Page 23: Guarantee
Oricom. purchased outside of Australia. Oricom will not be in breach of a warranty expressly set out in this User This warranty in no way affects your statutory warranty rights under the Guide or under the Competition and Consumer Act 2010 and excludes any Competition and Consumer Act 2010 or any other similar legislation. -
Page 24: Customer Support
If you have any problems setting up or using this product you will find use-full tips and information in the Troubleshooting section of this user guide as well as “Frequently Asked Questions” on our website www.oricom.com.au. If you have further questions about using the product after reviewing the resources above or would like to purchase replacement parts or accessories please call our Customer Support Team.
Need help?
Do you have a question about the SECURE 200 and is the answer not in the manual?
Questions and answers