Advertisement
Contact Details for Oricom Support and Express Warranty Claims in Australia
Oricom International Pty Ltd
Locked Bag 658
South Windsor, NSW 2756
Australia
Email: support@oricom.com.au
Phone: 1300 889 785 or (02) 4574 8888
(Monday to Friday 8am to 6pm AEST)
Web: www.oricom.com.au
Fax: (02) 4574 8898
Contact Details for Oricom Support and Express Warranty Claims in New Zealand
Email: support@oricom.co.nz
Phone: 0800 674 266
(Monday to Friday 10am to 8pm NZST)
Web: www.oricom.co.nz
Ref: 27042016
OR006417 SC110 user manual_04-27-16.indd 1
2016/4/27 17:30:44
Advertisement

Related Manuals for Oricom Secure 110


Summary of Contents for Oricom Secure 110
- Page 1 Phone: 1300 889 785 or (02) 4574 8888 (Monday to Friday 8am to 6pm AEST) Web: www.oricom.com.au Fax: (02) 4574 8898 Contact Details for Oricom Support and Express Warranty Claims in New Zealand Email: support@oricom.co.nz Phone: 0800 674 266 (Monday to Friday 10am to 8pm NZST) Web: www.oricom.co.nz...
- Page 2 Baby Monitor Secure 110 User Guide OR006417 SC110 user manual_04-27-16.indd 2 2016/4/27 17:30:45...
-
Page 3: Table Of Contents
OpERATION TROuBLEShOOTING pRODuCT SpECIFICATIONS CuSTOMER SuppORT WARRANTY Need Help? If you need assistance setting up or using your Oricom product now or in the future, call Oricom Support. Australia 1300 889 785 www.oricom.com.au Mon-Fri 8am – 6pm AEST New Zealand 0800 67 42 66 www.oricom.co.nz... -
Page 4: Warnings And Safety Information
(e.g. near bath or pool). Immersing in water could cause carefully as it contains detailed information you will need electric shock and even death. to get the most from your Oricom Baby Monitor. If you have any issues setting up or using your Oricom Baby • T he installation location plays an important role in monitor please call our Customer support team. - Page 5 WARNINGS AND SAFETY INFORMATION • I f you believe the battery is damaged, remove product WARNING from the charger and stop using the product. Contact Oricom for assistance. Never use a damaged battery. Do not place the AC Adaptor cable in a high "wear and tear" location. Never use a frayed or compromised cord. Disposal Always dispose of your products at the end of their life in Battery safety accordance with your local waste disposal requirements.
-
Page 6: Getting Started
GETTING STARTED Thank you for choosing this monitor from Oricom. Installation Your Secure 110 Baby Monitor offers the best Digital clip Technology. For the Parent Unit 1. Remove the Belt Clip by lifting INTERFERENCE the clip at the top and sliding it downwards. FREE FREQUENCY 2. Then remove the battery cover... - Page 7 GETTING STARTED 6 Press [ ] to turn the Parent Unit on. Note: • B efore first use, or if it has been out of use for a long If you place the Parent and Baby units too close together time, the Parent Unit will need to be charged for 16 you will hear a high pitched noise called "feedback", this is hours before use. After this time, the Parent Unit will normal.
-
Page 8: Operating Elements
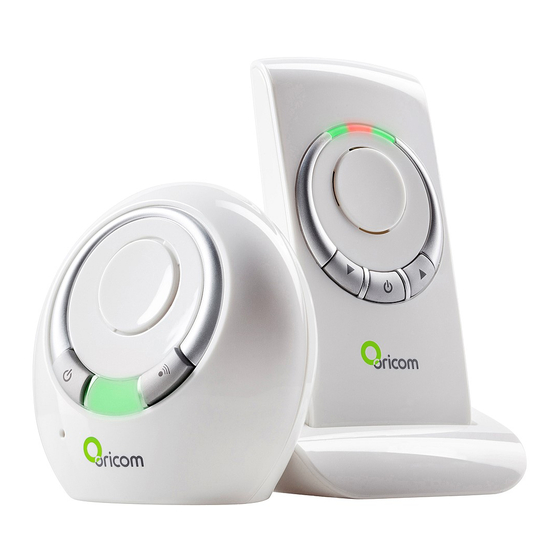
OpERATING ELEMENTS Operating Elements Sender (Baby unit) 1 On/Off key Press to switch on the unit. Press and hold down for approx. 2 seconds to switch off the unit. 2 Power on LED / Night light 3 Paging key Press and hold for 2 seconds to “page” the parent unit with an audible alert. Useful to call for assistance or to locate a missing parent unit. - Page 9 OpERATING ELEMENTS Operating Elements 1 Noise indicator Flashes when noise is detected. 2 Power LED Receiver (Parent unit) Lights steady when power is on. Flashes during charging the batteries. 3 Link indicator Green light ON means “Linked” to the baby unit. A flashing light means the “Link” has been lost. 4 key - Volume down 5 On/Off key Press and hold down for approx.
-
Page 10: Operation
OpERATION Operation Volume You can adjust the volume at which you hear your Once you have set up your baby monitor, you will be baby by using the keys and on the parent able to hear the sounds in your baby´s room through unit. This will not effect the sensitivity of your baby the parent unit. You will also be able to see those monitor, only the volume at which you hear those sounds as the green sound sensor lights around the sounds through the parent unit. - Page 11 OpERATION Paging Useful if one parent is in the baby’s room and needs to contact the other. Also helps to find a mislaid parent unit. At the baby unit Press Page Key briefly. The parent unit will emit a tone. The tone can be switched off by pressing any key on the parent unit or by pressing the page key on the baby unit once again. Night light The baby unit has a night light which emits a soft glow, providing comfort and re−assurance for your...
-
Page 12: Troubleshooting
TROuBLEShOOTING Problem Possible cause(s) The red power lights do not turn on when you plug in the 1. Check if the units are properly connected to the power supply. power. 2. Check if the power is turned on. If not, Press [ ] to turn on the power. -
Page 13: Product Specifications
pRODuCT SpECIFICATIONS Feature Specifications Operating Frequency DECT 1.8 GHz Up to 300m under optimum conditions. The range is Range reduced in buildings (up to 50m) as a result of walls, doors etc. Input: 100~240 V 50/60Hz Power supply (baby unit) Output: 7 V , 420 mA, Transmitting power Average: 10 mW Maximum: 250 mW Input: 100~240 V 50/60Hz Power supply (parent unit) Output: 7 V , 420 mA Rechargeable batteries (parent unit) -
Page 14: Customer Support
PACK CONTENTS Customer Support If you have any problems setting up or using this product you will find useful tips and information in the Troubleshooting section of this user guide as well as “Frequently Asked Questions” on our website www.oricom.com.au. If you have further questions about using the product after reviewing the resources above or would like to purchase replacement parts or accessories please call our Customer Support Team. Our dedicated local support team are more likely to be able to help you than the retailer where you made your purchase. -
Page 15: Warranty
(30) days or for the remainder to a major failure. Oricom warrants that the product is free of the Express Warranty Period of the Oricom branded product in from defects in materials or workmanship during the Express which they are installed, whichever is longer. - Page 16 WARRANTY Oricom will not be liable under this Express Warranty, and to How to make a claim under your Express the extent permitted by law will not be liable forany defect, loss, Warranty in Australia damage or injury arising out of or in connection with a: Oricom has a simple warranty process for you to follow: 1.
- Page 17 WARRANTY Send the approved returns to: Oricom International Pty Ltd Locked Bag 658 South Windsor NSW 2756 Australia Please note that this Express Warranty excludes expenses incurred by you in returning any faulty product to us. You must arrange and pay any expenses incurred (including postage, delivery, freight, transportation or insurance of the product) to return the faulty product to us, however, we will arrange delivery of the repaired or replaced faulty product to you.
- Page 18 OR006417 SC110 user manual_04-27-16.indd 15 2016/4/27 17:30:47...
Need help?
Do you have a question about the Secure 110 and is the answer not in the manual?
Questions and answers