Table of Contents
Advertisement
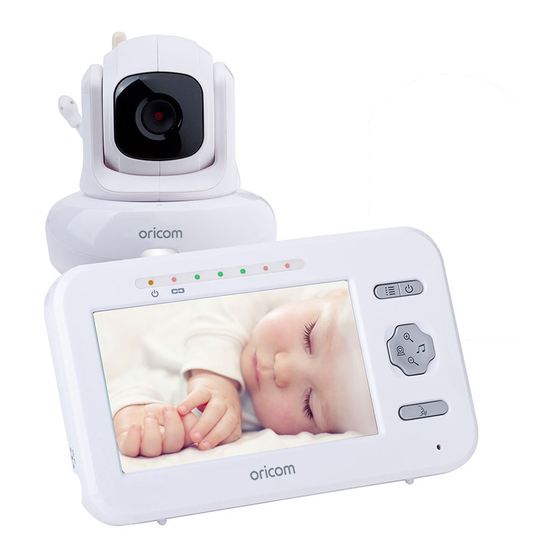
Baby Monitor
Secure 850
User Guide
KEEP THIS USER GUIDE FOR FUTURE REFERENCE
Always retain your proof of purchase in case of warranty service and register your product on line at:
AUSTRALIA: www.oricom.com.au
NEW ZEALAND: www.oricom.co.nz
OR013248 - Amend SC850 User Guide_01-26-16.indd 1
2016/1/28 8:37:47
Advertisement
Table of Contents

Related Manuals for Oricom Secure 850


Summary of Contents for Oricom Secure 850
- Page 1 Baby Monitor Secure 850 User Guide KEEP THIS USER GUIDE FOR FUTURE REFERENCE Always retain your proof of purchase in case of warranty service and register your product on line at: AUSTRALIA: www.oricom.com.au NEW ZEALAND: www.oricom.co.nz OR013248 - Amend SC850 User Guide_01-26-16.indd 1...
-
Page 2: Table Of Contents
TrOuBLE ShOOTING CuSTOmEr SuppOrT EXprESS wArrANTy Need Help? If you need assistance setting up or using your Oricom product now or in the future, call Oricom Support. Australia 1300 889 785 or 02 4574 8888 www.oricom.com.au Mon-Fri 8am – 6pm AEST... -
Page 3: Safety Information
• Your Oricom baby monitor is designed to be an aid and • The installation location plays an important role in should not be used as a substitute for responsible and ensuring proper operation. - Page 4 • If you believe the battery is damaged, remove product from the charger and stop using the product. Contact Oricom for assistance. Never use a damaged battery. OR013248 - Amend SC850 User Guide_01-26-16.indd 2 2016/1/28 8:37:47...
-
Page 5: Overview Of Functional Component Positions
OvErvIEw OF FuNCTIONAL COmpONENT pOSITIONS 2 Overview of your Baby Monitor Your Parent Unit 1 Power LED 8 Play/Stop 1 Stand (Select Melody) 2 Link LED 2 Battery compartment 9 Volume Down 3 Lowest level 3 Antenna (Down Arrow) (x1 Zoom) 4 Highest level 4 Speaker 10 Microphone 5 Menu (Pan/Tilt) - Page 6 1 Li-ion Polymer rechargeable battery pack for the parent unit PAIR 1 AC adaptor for the parent unit 1 AC adaptor for the baby unit If any items are missing contact Oricom customer support OR013248 - Amend SC850 User Guide_01-26-16.indd 4 2016/1/28 8:37:48...
-
Page 7: Getting Started
GETTING STArTED 3 GETTING STARTED (2) Close the battery compartment. (3) Press and hold <Power> key for 2 seconds to switch on the parent unit. It will take a few seconds for the unit to 3.1 Baby unit power supply start up. - Page 8 For added convenience you may wish to purchase additional When charging, the battery status indicator on the parent unit chargers online at www.oricom.com.au. screen will change to the charging icon OR013248 - Amend SC850 User Guide_01-26-16.indd 6...
- Page 9 GETTING STArTED Optimisation of Range The parent unit has a fold out antenna, extend the antenna vertically to achieve optimal range from your monitor. OR013248 - Amend SC850 User Guide_01-26-16.indd 7 2016/1/28 8:37:48...
-
Page 10: Using The Baby Monitor
] appears on the LCD screen. There are 5 levels can 4.1 Switching on the parent unit be adjusted. Press and hold the power button until the Oricom logo 4.4 Playing a lullaby for your baby appears on the parent unit. The camera image will then appear. - Page 11 (2) Press <▲> and <▼> to adjust the LCD brightness level The Temperature sensor used in this Oricom baby monitor is to 1, 2, 3, 4 or 5. intended as a guide, to provide parents with an indication of the room temperature in which the baby unit has been placed.
- Page 12 uSING ThE BABy mONITOr 4.9 Night Light 2. The LCD screen on the parent unit will be switched back on when the sound level of the baby reaches the (1) Press <Menu> repeatedly until [Moon] icon appears on VOX threshold or when any key on the parent unit is the LCD screen.
- Page 13 uSING ThE BABy mONITOr (6) U ser can also press <Menu> button once to exit the (5) It is also effective not only in scan mode function, pan/tilt mode. but also applies to single camera view mode. In other words, if you switch to that camera channel, 4.12 Selecting a Camera Channel or scan you must turn that video to on by <Up>...
- Page 14 pACK CONTENTS uSING ThE BABy mONITOr The On/off ( ) button also activates VOX mode by pressing (7) If registration is completed, camera video appears on the button once during video monitor mode. The unit then LCD screen and return to normal mode. Baby unit will goes to VOX mode immediately without waiting for 1 minute return to normal mode too.
-
Page 15: Troubleshooting
TrOuBLEShOOTING TrOuBLEShOOTING 5 Troubleshooting Should you experience difficulties operating the SC850 please refer to the troubleshooting guide below. If you still experience difficulties please contact Oricom Customer Support on 1300 889 785 for assistance. Troubleshooting Problems Solutions Equipment does not function − Check both parent unit and baby unit are turned on Check parent unit is charged or plugged into charger Check baby unit is connected to power. “Out of Range” displaying on parent − Move the parent unit closer to the baby unit. unit Try resetting your monitor to avoid busy channels: 1. -
Page 16: Technical Specifications
− Check the battery is connected to the battery connection in the battery compartment. − After a period of time, the battery may need to be replaced due to everyday usage. Please visit www.oricom.com.au to purchase replacement batteries. Parent unit beeping Move the parent unit closer to the baby unit until they are within the range. - Page 17 Range is reduced in buildings through walls, doors etc. Frequency range 2.4 GHz Digital FHSS Permissible ambient temperature 0°C to 40°C Note For a replacement battery pack or other spare parts please contact Oricom. OR013248 - Amend SC850 User Guide_01-26-16.indd 15 2016/1/28 8:37:49...
-
Page 18: Customer Support
If you have any problems setting up or using this product you will find useful tips and information in the Troubleshooting section of this user guide as well as “Frequently Asked Questions” on our website www.oricom. com.au. If you have further questions about using the product after... -
Page 19: Express Warranty
Spare parts are warranted to and the failure does not amount to a major failure. Oricom be free from defects in material or workmanship for thirty... - Page 20 3. Any external cause beyond our control, including but not limited to power failure, lightning or over voltage; or 4. Modification to the product or services carried out on the product by anyone other than Oricom or Oricom’s authorised service provider. OR013248 - Amend SC850 User Guide_01-26-16.indd 18...
- Page 21 Oricom International Pty Ltd Express Warranty in Australia Locked Bag 658 South Windsor NSW 2756 Australia Oricom has a simple warranty process for you to follow: • P lease call or email our Customer Support Team, 1300 Please note that this Express Warranty excludes expenses 889 785 or support@oricom.com.au. incurred by you in returning any faulty product to us. You must arrange and pay any expenses incurred (including • A Customer Support Team member will verify after...
-
Page 22: Important Information
EXprESS wArrANTy Important Information Repair Notice Please be aware that the repair of your goods may result in the loss of any user-generated data (such as stored telephone numbers, text messages and contact information). Please ensure that you have made a copy of any data saved on your goods before sending for repair. - Page 23 OR013248 - Amend SC850 User Guide_01-26-16.indd 21 2016/1/28 8:37:49...
- Page 24 Phone: 1300 889 785 or (02) 4574 8888 (Monday to Friday 8am to 6pm AEST) Web: www.oricom.com.au Fax: (02) 4574 8898 Contact Details for Oricom Support and Express Warranty Claims in New Zealand Email: support@oricom.co.nz Phone: 0800 674 266 (Monday to Friday 10am to 8pm NZST) Web: www.oricom.co.nz...
Need help?
Do you have a question about the Secure 850 and is the answer not in the manual?
Questions and answers