Table of Contents
Advertisement
Quick Links
Visit us online at
www.uswatersystems.com
Aquapurion 5 Stage Pump RO System
Professional RO System with American made filters and Membrane.
Owners Manual
Models:
200-APRO-XXXX, 200-APRO-XXXX-P
REVISION #
1.2
REVISION DATE
May 11, 2015
US Water Systems Corporate Office
1209 Country Club Road
Indianapolis, IN 46234
1-800-608-8792
info@uswatersystems.com
Advertisement
Table of Contents

Related Manuals for US Water Systems Aquapurion 200-APRO Series


Summary of Contents for US Water Systems Aquapurion 200-APRO Series
- Page 1 Visit us online at www.uswatersystems.com Aquapurion 5 Stage Pump RO System Professional RO System with American made filters and Membrane. Owners Manual Models: 200-APRO-XXXX, 200-APRO-XXXX-P US Water Systems Corporate Office 1209 Country Club Road Indianapolis, IN 46234 1-800-608-8792 REVISION # info@uswatersystems.com REVISION DATE...
-
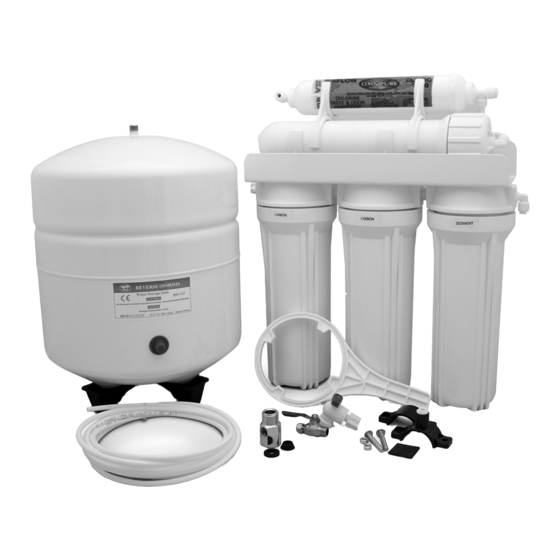
Page 2: Parts Checklist
Parts Check List PRE CARBON POST CARBON RO Module Tubing Bundle PRE SEDIMENT MEMBRANE Filter Wrench Drain Saddle Tank Valve Angle Stop Feed Valve Tank and Side Mount Tank Stand Faucet and Mounting Kit ... -
Page 3: Reverse Osmosis Membrane
Installation Instructions Residential Reverse Osmosis Drinking Water System Components of the RO System PRE-FILTER (sediment filter) removes larger particles such as sand, silt, rust and scale, (activated carbon filters) remove chlorine in the feed water to protect the reverse osmosis membrane. REVERSE OSMOSIS MEMBRANE... -
Page 4: Storage Tank
Installation Instructions Residential Reverse Osmosis Drinking Water System Tools The following tools may be necessary, depending on each particular installation: 3/8” Drill and ¼” drill bit and Faucet Drill bit (Standard Faucet use a 7/16” drill bit, Air Gap Faucet uses a 7/8” mini- mum and 1 1/8”... -
Page 5: Feed Water Connection
Installation Instructions Residential Reverse Osmosis Drinking Water System FEED WATER CONNECTION is accomplished with an angle stop feed water valve. This valve will be installed in the cold water line between the sink cold water shutoff valve and the sink faucet tubing. Connect to a potable, cold wa- ter supply line only. -
Page 6: Mounting The Faucet
Installation Instructions Residential Reverse Osmosis Drinking Water System B. Mounting the faucet 4. If an air gap faucet is being used continue to the next steps. Push the 1/4” drain line from the RO module on to 1. Install the faucet as shown in Fig. 1 on the previous page. the smaller brass barb on the bottom of the faucet. - Page 7 Installation Instructions Residential Reverse Osmosis Drinking Water System C. Feed Water Angle Stop Valve and Tubing 3. Be sure the blue handle on the angle stop valve is in the Installation closed position (as pictured). Now open the sink shutoff 1.
- Page 8 Installation Instructions Residential Reverse Osmosis Drinking Water System D. Drain Saddle Installation Prior to drain saddle installation it is important to inspect the condition of drain pipes to make sure they are not thin and frail. Drain saddle valves are designed to be installed on standard 1 -1/2”...
-
Page 9: Final Tubing Connections
Installation Instructions Residential Reverse Osmosis Drinking Water System 3. Once the valve is installed, connect the green 3/8” tubing to the tank valve. Leave the other end of the tubing loose for now, it will be connected later in the installation. NOTE: Tanks are pre-pressurized at 7 psi. - Page 10 Installation Instructions Residential Reverse Osmosis Drinking Water System 3. Tighten the far right sump hand tight and secure it 3. Once the valve is installed, connect the green 3/8” tubing with the supplied filter wrench by turning it an to the tank valve install the locking clip. Leave the other additional 1/4 - 1/2 turn.
- Page 11 Installation Instructions Residential Reverse Osmosis Drinking Water System 4. Remove the center sump and install the carbon filter 6. Remove the far left sump and install the carbon filter in the sump. BE SURE that the rubber gasket is in in the sump.
- Page 12 Installation Instructions Residential Reverse Osmosis Drinking Water System Membrane Installation 3. Remove membrane from protective packaging and install it in the membrane housing. 1. Remove the 1/4” tubing from the membrane housing cap There are two O-rings on end of the middle by pressing the collet on the elbow fitting toward the fitting.
- Page 13 Installation Instructions Residential Reverse Osmosis Drinking Water System H. RO unit installation 5. Lubricate the O-ring on the membrane housing and install the cap hand tight. Tighten the cap an additional 1/8 - 1/4 The RO unit is normally mounted to the sink cabinet sidewall, turn.
- Page 14 Installation Instructions Residential Reverse Osmosis Drinking Water System 2. BE SURE the storage tank shutoff valve is in the closed Permeate Pump Installation position. Use the supplied syringe and add 5ml of the If the system is equipped with a permeate pump, clip the pump supplied sanitizing solution to the Green tank tubing to the membrane housing using the supplied mounting bracket attached to the storage tank.
-
Page 15: System Start-Up
Installation Instructions Residential Reverse Osmosis Drinking Water System Icemaker hookup (optional) The RO drinking water device can be connected to any NOTE: When the system is first turned on, water may standard refrigerator ice maker or ice maker/water dispenser. intermittently “spurt” from the air gap opening on the side of air 3/8”... -
Page 16: Maintenance
Installation Instructions Residential Reverse Osmosis Drinking Water System the wrench, turn an additional ¼ turn, but do not over Maintenance tighten. The RO system contains filters and membranes which must 7. The carbon block filter(s) are installed into the next be replaced periodically for proper operation. - Page 17 Installation Instructions Residential Reverse Osmosis Drinking Water System Why the regular use of Sani-System is important. Flushing system and checking operation To make sure RO system is operating correctly, follow these A reverse osmosis system should be sanitized regularly to simple procedures: maintain quality service levels.
-
Page 18: Water Production
Installation Instructions Residential Reverse Osmosis Drinking Water System Water quality Water quality from an RO system is normally determined with Reject Rate Reject Ratio = a TDS Meter, which measures total dissolved solids in water, Product Rate measuring conductivity. The results are normally measured in PERCENT RECOVERY parts per million or milligrams per liter. -
Page 19: Quick Connect Fittings
Installation Instructions Residential Reverse Osmosis Drinking Water System Disconnecting Quick connect fittings Push in Collet and remove tube Many RO systems utilize Quick Connect fittings. These user- friendly fittings provide superior performance and may be provided with this system. Proper use of these push-in fittings is shown below. - Page 20 Installation Instructions Residential Reverse Osmosis Drinking Water System (Green Tube) Page 20...
- Page 21 Installation Instructions Residential Reverse Osmosis Drinking Water System (Green Tube) Page 21...
- Page 22 Installation Instructions Residential Reverse Osmosis Drinking Water System Ice Maker Kit Installation Instructions 1. Cut the 3/8" line that goes to the faucet and insert the 3/8" tee fitting. 2. Attach the 3/8" tubing that came with the kit to the open port on the tee. 3.
- Page 23 Installation Instructions Residential Reverse Osmosis Drinking Water System Page 23...
-
Page 24: General Provisions
OWNER WITH WRITTEN APPROVAL WATER circumstances beyond the control of US WATER SYSTEMS, INC. SYSTEMS, INC. AND PAYMENT OF STANDARD TRANSFER FEE. US WATER O OBTAIN WARRANTY SERVICE CALL OR WRITE SYSTEMS, INC.
Need help?
Do you have a question about the Aquapurion 200-APRO Series and is the answer not in the manual?
Questions and answers