Advertisement
Quick Links
Download this manual
See also:
Installation Manual
WARNING! FAILURE TO READ THESE INSTRUCTIONS MAY LEAD TO A TEMPER TANTRUM, A FAILED INSTALLATION AND AN UPSET
CUSTOMER. MOST LIKELY ALL. PLEASE DO US AND YOUR CUSTOMER A FAVOR AND READ THESE FABULOUS INSTRUCTIONS!!!!
UCI-11C & UCI-11C + NTX54 Navigation kit
Rear view camera & Navigation solution for Dodge, Chrysler & Fiat UConnect Touch 4.3" &
Overview:
Adds touch screen controlled navigation to vehicles without factory navigation
Provides a rear view camera solution for both the 4.3" and 8.4" UConnect Touch radios (camera not included)
Allows DVD video to be viewed while the vehicle is in drive (only on 8.4" DVD equipped systems)
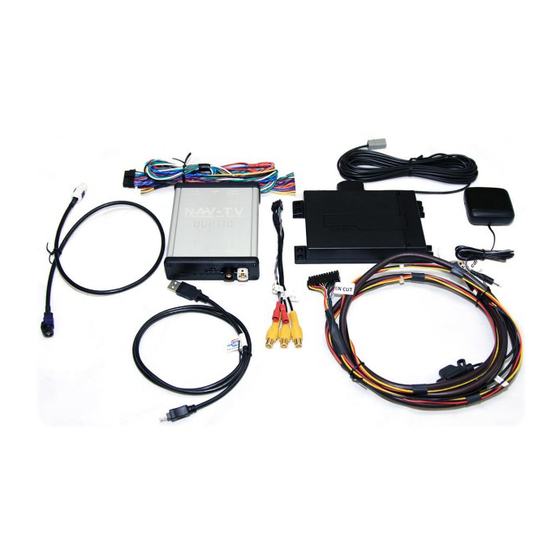
1
UCI-11C interface module
3
Included aftermarket LVDS cable
5
Rear view camera input cable
7
Navigation to UCI harness*
9
th
100 NW 11
Street, Boca Raton, FL 33432 TEL 561-955-9770 FAX 561-955-9760
www.nav-tv.com
Product Description
GPS antenna*
info@nav-tv.com
8.4" systems
2
4
6
8
*
*These items only included with the navigation option
Radio T-harness
USB update cable
NTX54 navigation module*
External speaker*
Advertisement

Related Manuals for Nav TV UCI-11C


Summary of Contents for Nav TV UCI-11C
-
Page 1: Product Description
100 NW 11 Street, Boca Raton, FL 33432 TEL 561-955-9770 FAX 561-955-9760 www.nav-tv.com info@nav-tv.com UCI-11C & UCI-11C + NTX54 Navigation kit Rear view camera & Navigation solution for Dodge, Chrysler & Fiat UConnect Touch 4.3” & 8.4” systems Overview: ... - Page 2 Connector pin out Rev. 3 board (external speaker only) Navigation Radio T-Harness USB update port harness (24 pin (18 pin plug) plug) Rear view camera input (8 pin plug) White connector: Black connector: Plug the factory Plug the included white cable taken aftermarket black from the back of LVDS end in here.
- Page 3 * The connectors are viewed from the wire insertion side. Both REV3 and REV5 boards have the same 8 Pin Video IN Connector Shield RCA 3 Shield 5 Video Signal 7 Video Signal Shield RCA 4 Video + Twisted 6 Video Signal Video - Pair 24 pin Navigation Connector...
- Page 4 UCI Installation OOLS REQUIRED Phillips head screwdriver Plastic pry tool Small pocket screwdriver *Refer to online document for vehicle specific installation* 1. Detailed disassembly instructions for the 300, Charger, Dart and Journey are available at http://navtv.com/page/17/manuals.html under the Video Input and Backup Camera section. The Dart has three separate disassembly documents and takes longer than the other 3.
- Page 5 6. Using the plastic pry tool, gently pry around the dash panel surrounding the monitor to release the locking tabs. Take extra care when releasing these tabs, they may fall from the dash panel and into the dash. 7. Gain access to the rear of the screen & disconnect the 3 cables that are attached. PAY ATTENTION TO THE WHITE CIRCULAR 4 PIN PLUG.
- Page 6 4. Plug the routed cable from the UCI into the NTX54 navigation unit at the power connector. 5. If installing a REV5 product and the vehicle has FACTORY BLUETOOTH, skip to step 8. If you are installing a REV3 product OR if the vehicle does not have FACTORY BLUETOOTH continue with step 6.
- Page 7 o Press the “Exit” soft key. Adjusting Contrast: o Touch the “Contrast” soft key. o Press the “-“or “+” soft key to adjust the image in 10% increments. o Press the “Exit” soft key. Adjusting the Saturation: o Touch the “Saturation” soft key. o Press the “-“or “+”...
- Page 8 o NTX54-1: There is a white sticker on the NTX54 designating it as an NTX54-1. Select NTX54-1 with this navigation system. The NTX54-1 can ONLY be used with the 4.3" monitor. The loop on the plug that plugs in at the NTX54 navigation brain MUST BE CUT when using a 4.3" monitor o NTX54-2: The NTX54-2 is a resolution and communication setting only.
- Page 9 8.4” Monitor Adjusting the rearview camera settings PRIOR TO ADJUSTING ANY SETTING AFTER THE INITIAL INSTALLATION, TURN THE VEHICLE OFF, CLOSE ALL DOORS, THE HOOD AND TRUNK AND LOCK THE VEHICLE WITH THE FACTORY KEY FOB OR LOCK IT WITH THE KEY. WAIT ONE MINUTE AND THEN UNLOCK THE VEHICLE AND PROCEED WITH THE FOLLOWING STEPS.
- Page 10 INSTALLING A REAR VIEW CAMERA YOU SHOULD USE THE UCT84/NTV-KIT 297 and the UCT differential camera adapter/NTV-KIT314 instead. Adjusting the navigation settings (if installed) Press the “Navigation input settings” soft key. Adjusting the input: o Touch the “Navigation” soft key o Every press of the icon will change the input: OFF &...
- Page 11 o KNA-G610: Select this setting when using a Kenwood KNA-G610 navigation system. The loop on the plug that plugs in at the KNA-G610 navigation brain MUST BE INTACT and NOT CUT when using an 8.4" monitor o WP: Select this setting when using a Directus, Intraphex or Wonde Proud Navigation system. Adjusting brightness: o Touch the “Brightness”...
-
Page 12: Operation
Completing the Setup Procedure: VERY IMPORTANT!!!! After you have setup the rear view camera, navigation and verified that the software in the UCI is current you will be back at the main screen. This screen shows UCI by NAV-TV, Camera input settings, navigation input setting, video in motion and about. - Page 13 FAQ: P1: I installed the piece and now the radio does not come on and the HVAC does not work. A1: Check to make sure that the T-harness is plugged in securely and that the mini molex is plugged into the UC1.
- Page 14 A5: You attached the factory-fit camera wires backwards. Correct and retest P6: The factory-fit camera works but it has a wavy line at the bottom of the screen. A1: You grounded the drain wire . Cut it loose and retest. A2: Do a CAN reset and retest BUT this time with the car RUNNING to check for a low voltage condition.