Mitel 5212 User Reference Manual
Hide thumbs
Also See for 5212:
- User manual (70 pages) ,
- Installation manual (12 pages) ,
- Quick reference manual (2 pages)

Related Manuals for Mitel 5212


Summary of Contents for Mitel 5212
- Page 1 Mitel IP Phone User Reference Guide Release 4.0 Final toll free: 1-888-500-VASPIAN | 266 Oak St. Buffalo, NY 14203...
-
Page 2: Table Of Contents
Using volume control ................... 53 Using the Mitel 5212 IP Phone ............54 Initial set-up for Mitel 5212 IP phone service ............55 Answering a call on the 5212 IP phone .............. 56 Making a call on the 5212 IP phone ..............58 Using features via the 5212 IP phone .............. -
Page 3: Web Pages
To make a call ..................92 Switching to the handset ................92 Using a Programmable Key Module ........... 92 Mitel 5310 IP Conference Unit ............93 Using other phones ..............94 Personalizing phone usage via the web ............ 94 Web login ................. 94 To stop the security alert at log in .............. - Page 4 Feedback on Documentation ............... 131 Final Contents...
- Page 5 Contents Final...
-
Page 6: Introduction
This document is provided as a reference guide for the use and configuration of your Mitel 5212 IP Phone, Mitel 5020 IP Phone, Mitel 5220 IP Phone, Mitel 5224 IP phone, Mitel 5340 IP phone, and Telematrix 3000 phone and the phone system features. -
Page 7: Setting Your Language For The Phone Text
Replace the bold part with "select_language" to create the Select Language URL: https://<Name or IP Address>/webadmin/select_language/company For example, if your Login URL is: https://78.1.2.3/webadmin/login/MyCompany then the Select Language URL will be https://78.1.2.3/webadmin/select_language/MyCompany To change your language for the web interface, follow these steps: Start your web browser. -
Page 8: What's New In Release 4.0 3
The setup and operation of these phones are described in “Using the Mitel 5020/5220/5224 IP phone” on page 29. The Mitel 5212 IP Phone has a smaller set of memory and feature keys than the others. This phone’s setup and operation are described in “Using the Mitel 5212 IP Phone”... -
Page 9: Using Mitel 5340 Ip Phones
“Initial setup for 5340 phone service” on page 5. For a description 5340 IP of your phone, see “Mitel 5340 IP phone” on page 4. Other topics covered in phones this section are: “Answering a call on the 5340 phone” on page 6, “Making a call on the 5340 phone”... -
Page 10: Initial Setup For 5340 Phone Service
The Information Area Display shows information about the current telephone call (such as name and number). There are six softkeys (the three on the right are currently not used). The meaning of each softkey is displayed directly beside the key. There are three pages of 16 memory keys. -
Page 11: Answering A Call On The 5340 Phone
Line Appearance key, pressing the ANSWER softkey, or by pressing key. Because the Mitel 5340 IP phone has multiple pages of programmable memory keys, it is possible that the call could appear on a Line Appearance key located on a different page from the one being displayed. In this case,... - Page 12 Replace the handset. To end a call while using the speakerphone, choose one of the following: • Press the END softkey. • Press the key. Switch from speakerphone to handset on the 5340 phone To switch from the speakerphone to the handset during a call, pick up the handset.
-
Page 13: Making A Call On The 5340 Phone
Making a call on the 5340 phone To make a call, follow these steps: Lift the handset. This will select the next available Line Appearance. You can also start dialing the number without lifting the handset. This will automatically select the next available Line Appearance and operate in speakerphone mode. -
Page 14: Using Features Via The 5340 Phone
To switch between two active calls, press the flashing Line Appearance key. This puts the active call on hold, and activates the other call. Ending one call keeps the second call on hold. To reconnect to the second call, press the flashing Line Appearance key. Using features via the 5340 phone This section explains the features available from your phone. - Page 15 While on an active call, press the CONF softkey. Select the Line Appearance of the person on hold that is to be connected. Press the CONF softkey again. The 3-Way Call is now activated. Account codes on the 5340 phone Users can enter account codes against incoming and outgoing calls to associate those calls with a particular client or account.
- Page 16 last account code entered is the account code that will be assigned to the call. To cancel the account code entry, press the QUIT softkey. If you enter an account code with an invalid length, the Information Area Display briefly shows "Invalid Account Code". Contact your system administrator to determine the valid account code length for your business.
- Page 17 a number from your incoming call list if it is supported by your service provider. To view the list of incoming calls received, follow these steps: Press the CALLS softkey on your phone. If you have programmed one of your programmable keys as Incoming Calls List, you can press this key instead.
- Page 18 Redial on the 5340 phone Using Redial you can view a list of calls that were made and also redial a number in that list without using the keypad. The maximum amount of numbers in your redial list is typically ten but is dependant on your service provider.
- Page 19 Directory on the 5340 phone Using the Directory, you can view the Internal Directory on your phone's LCD screen and make calls. You can access the directory with the phone on-hook or off-hook. To view the directory, follow these steps: Press the MENU softkey.
- Page 20 Forwarding your 5340 phone to co-worker Using Forward to Co-worker, you can send all incoming calls to a selected co- worker. Press the Forward to Co-worker key once to turn the feature on. Press the key a second time to turn the feature off. The LED on the programmed key indicates when the phone is being forwarded.
- Page 21 Forwarding your 5340 phone to prompt Using Forward to Prompt, you can send all incoming calls to a phone number that you have entered via your phone. The LED on the programmed key indicates when the phone is being forwarded. To forward to prompt, follow these steps: Press the Forward to Prompt key on your phone.
- Page 22 Hold on the 5340 phone Using Hold, you can put an active call on hold, and make other calls. The LED of the Line Appearance key flashes to indicate the call is on hold. To place a call on hold, follow these steps: While on an active call, press the key.
- Page 23 configured and activated, then you will also be able to hear your co-worker speak. (See “Handsfree answerback on the 5340 phone” on page 16). To use this feature, you must have a key programmed with Intercom to Prompt. See “Program memory keys” on page 101. Internal 5340 phone settings To configure internal 5340 phone settings (such as display brightness and contrast), select the...
- Page 24 Login on the 5340 phone Using Login, you can enter your extension into any phone and take ownership of that phone. By doing this, you can direct all incoming calls for your extension to that phone. You must have the appropriate privileges to log out of a phone.
- Page 25 Your call coverage still applies when you are in a monitor group. A Monitor Phone key also acts a speed dial to the monitored extension. Monitor Groups is only applicable to users who are using Mitel IP phones. Using the phone system...
- Page 26 Monitor call on the 5340 phone Using the Monitor Call or Monitor Call Silent feature, you can monitor and pick up calls occurring on another user's phone. To use this feature, • You must be a member of a Monitor group. A Monitor group defines the user that is being monitored (primary group member) and which users can monitor calls for the primary group member (secondary group members).
- Page 27 Note: By putting a call on hold, either the primary group member or other Monitor phones can pick up the call. Monitor phone on the 5340 phone Using the Monitor Phone feature, your phone can be monitored by other users. To enable the Monitor Phone feature, contact your administrator and provide a list of users that you would like to have monitor your phone.
- Page 28 When the system is ready for you to begin your page, you will hear an alert tone and the Information Area Display shows the number of phones being paged. Speak into the handset or the speakerphone. To end the page, you have the following options: •...
- Page 29 Notes: To cancel the retrieval of the parked call, press the QUIT softkey. If you enter a park location where there is no caller on hold, the Information Area Display will briefly show "No Parked Call". There are nine park locations available (1 through 9). If all park locations are in use when you try to park a call, the Information Area Display will briefly show "Park Locations Full"...
- Page 30 TRANSFER softkey. Transfer to voice mail from the 5340 phone If your administrator has configured an auto attendant for voice mail deposit, you can transfer a caller directly to a co-worker's voice mail box. To transfer a call to voice mail, follow these steps: While on an active call, press the key or the TRANS softkey.
-
Page 31: Voice Mail On The 5340 Phone
Voice mail on the 5340 phone Using the key, you can connect directly to voice mail to retrieve messages or manage voice mail options such as changing your voice mail greeting. The Message Waiting Lamp on the phone will light up if messages are waiting. -
Page 32: Using The Mitel 5020/5220/5224 Ip Phone
“Initial set-up for phone service” on page 27. For Mitel 5020/ a description of your phone, see “Mitel 5224 IP phone” on page 27, and Mitel 5220/5224 5020/5220 IP phone” on page 28. Other topics covered in this section are: “Answering a call”... -
Page 33: Mitel 5020/5220 Ip Phone
Figure 2: Mitel 5224 IP Phone Mitel 5020/5220 IP Phone The Mitel 5020/5220 IP phone has the following features: • Handsfree speakerphone operation (half duplex) • Two-line, 20-character backlit LCD display. • Three context-sensitive softkeys for additional features • 14 programmable multi-function memory keys with color LEDs •... -
Page 34: Initial Set-Up For Phone Service
Perform a Quick Set-up through the web interface. See “Quick set-up” on page 95. Activating a phone To activate a Mitel phone you need (1) an extension number, (2) a phone, and (3) a PIN. Your administrator can provide you with an extension number and initial PIN. -
Page 35: Answering A Call
Connect one end of the phone power pack into your phone and the other end into a power outlet. Note: If your network is configured with Power Over Ethernet (POE), the above step is not necessary. Wait for the phone to display the following (this may take 30 seconds or more): Logged Out ACTIVATE... -
Page 36: Using The Handset
321: Robin Jones ANSWER You can pull back a call that has been answered by a twinned target phone by pressing the corresponding Line Appearance key. See “Twinned calls” on page 53. Using the handset To answer your phone using the handset, follow these steps: Lift the handset. -
Page 37: Making A Call
• Press the END softkey. • Replace the handset. Answering a second call A second incoming call causes three things to happen: (1) the phone rings once, (2) a line appearance flashes, and (3) the LCD displays the number and name of the caller, if known. - Page 38 To make an internal call, dial the extension. To make an external call, dial the prefix required for external dialing (usually “9”) followed by the number you want to call. When you finish dialing, the number the call will be placed. Calling: Robin Jones If you place an internal call, your LCD displays the extension and name of the connected party once the call is answered.
-
Page 39: Using Features Via The Phone
Calling: Robin Jones If you place an internal call, your LCD screen displays the extension and name of the connected party once the call is answered. If you place an external call, the LCD displays the name of the connected party, or if the name is unknown, just the phone number. -
Page 40: Account Codes
Until the CONF softkey is pressed a second time, the first party will remain on hold and you can talk with the second party privately. By putting a 3-Way Call on hold, the other parties can continue talking. You can use the key on a 5224 IP phone instead of the CONF softkey. -
Page 41: Account Code
Account Code: CALL QUIT Enter the account number using the phone keypad. The LCD displays the account code entered: Account Code: 1234 CALL QUIT Press the CALL softkey to start your call. The next available line appearance is selected, dial tone is heard and your phone LCD updates. Proceed with making your call. -
Page 42: Using Call Lists
REDIAL CALLS Proceed with making your call. To enter a pre-programmed account code during a call, follow these steps: • Select the Account Code key. The LCD briefly displays the account code that has been pre-programmed: Account Code: 45678 You can re-enter an account code for a call multiple times. The last account code entered is the account code that will be assigned to the call. - Page 43 Use the Scroll Up and Scroll Down keys on a 5020/5220 IP phone or use the keys on a 5224 IP phone to navigate the list . Press the TIME softkey if you wish to display time and date of the call. Press the NUMBER softkey if you wish to display the number of the caller.
-
Page 44: Company Speed Dial
numbers in your redial list is typically ten but is dependent on your service provider. To use Redial, follow these steps: Press the REDIAL softkey on your phone, or if you have a 5224 IP phone press The number that you most recently dialed is displayed. *1: 9-605-223-7865 DIAL TIME... - Page 45 Directory Using the Directory, you can view the Internal Directory of your company on your phone’s LCD screen and make calls. You can access the directory with the phone on-hook or off-hook. To view the directory, follow these steps: Press the MENU softkey. The phone displays the menu options.
-
Page 46: Forwarding Your Phone
Forwarding your phone You can forward your phone by using any of the forwarding features. In each case, you must program a memory key with the appropriate feature. See “Program memory keys“ on page 101. You can forward your phone by following the procedure described in the following sections: •... - Page 47 feature off. The LED on the programmed key indicates when the phone is being forwarded. To use this feature, you must have a memory key programmed with Forward to Coverage. If you have this feature turned on when you log out of your phone all your calls will be forwarded to coverage.
-
Page 48: Handsfree Answerback
Press the FWDOFF softkey. To use this feature, you must have a key programmed with Forward to Prompt. The system stores internal extensions, therefore you do not need to press the ENTER softkey. If you forward a phone to an external phone number, you must have permission to make that external call and Redirect Inbound Call to External Number permission. -
Page 49: Intercom Calls
Intercom Calls Intercom to co-worker Using Intercom to Co-worker, you can make a page to a selected co-worker that is broadcast through the speaker on your co-worker's phone. Pick up the handset or select a Line Appearance key, then press the Intercom to Co- worker key to start the page to your co-worker. -
Page 50: Line Appearance
To use this feature, you must have a key programmed with Join/Leave Group. Line appearance Line Appearance keys are required in order to receive incoming calls and to make outgoing calls. The LED on the programmed key indicates the status of the Line Appearance. - Page 51 Enter your PIN. PIN: ***** ENTER QUIT Press the # key or the ENTER softkey once you have finished entering your PIN. The system verifies that the PIN is valid and then it logs you into the phone. Extension: 314 REDIAL CALLS MENU...
-
Page 52: Monitored Groups
Your call coverage still applies when you are in a monitor group. A Monitor Phone key also acts a speed dial to the monitored extension. Monitor Groups is only applicable to users who are using Mitel IP phones. Final Using the phone system 47... -
Page 53: Monitor Call
Monitor call Using the Monitor Call or Monitor Call Silent feature, you can monitor and pick up calls occurring on another user’s phone. To use this feature, • You must be a member of a Monitor group. A Monitor group defines the user that is being monitored (primary group member) and which users can monitor calls for the primary group member (secondary group members). - Page 54 By putting a call on hold, either the primary group member or other Monitor phones can pick up the call. Monitor Phone Using the Monitor Phone feature, your phone activity can be monitored by other users. To enable the Monitor Phone feature, contact your administrator and provide a list of users that you would like to have monitor your phone.
-
Page 55: Park And Retrieve
Calling: Site Page When the system is ready for you to begin your page, you will hear an alert tone and the phone LCD screen displays the number of phones being paged. Paging: 7 of 10 Speak into the handset or the speakerphone. To end the page, you have the following options: •... -
Page 56: Transfer Call
From an idle phone, lift the handset. This will select the next available Line Appearance. Select a memory key programmed with the Park/ Retrieve feature. The phone LCD screen displays: Park Location: QUIT Enter the required park location using the phone keypad. The system connects you with the caller who was on hold at the park location. -
Page 57: Transferring A Call To Voice Mail
screen displays the message “Transfer Complete” for approximately five seconds before returning to an idle state. If you enter an invalid extension during a transfer, the LCD screen displays “Invalid Extension”. To reconnect with the caller, follow these steps: Press the END softkey. Press the flashing Line Appearance key. -
Page 58: Using Voice Mail
Twinned calls If you have configured your phone to be twinned to another phone (the twinning target), then incoming calls will ring at the same time on the other phone. If you answer the call on your desk phone, the twinning target phone will stop ringing. -
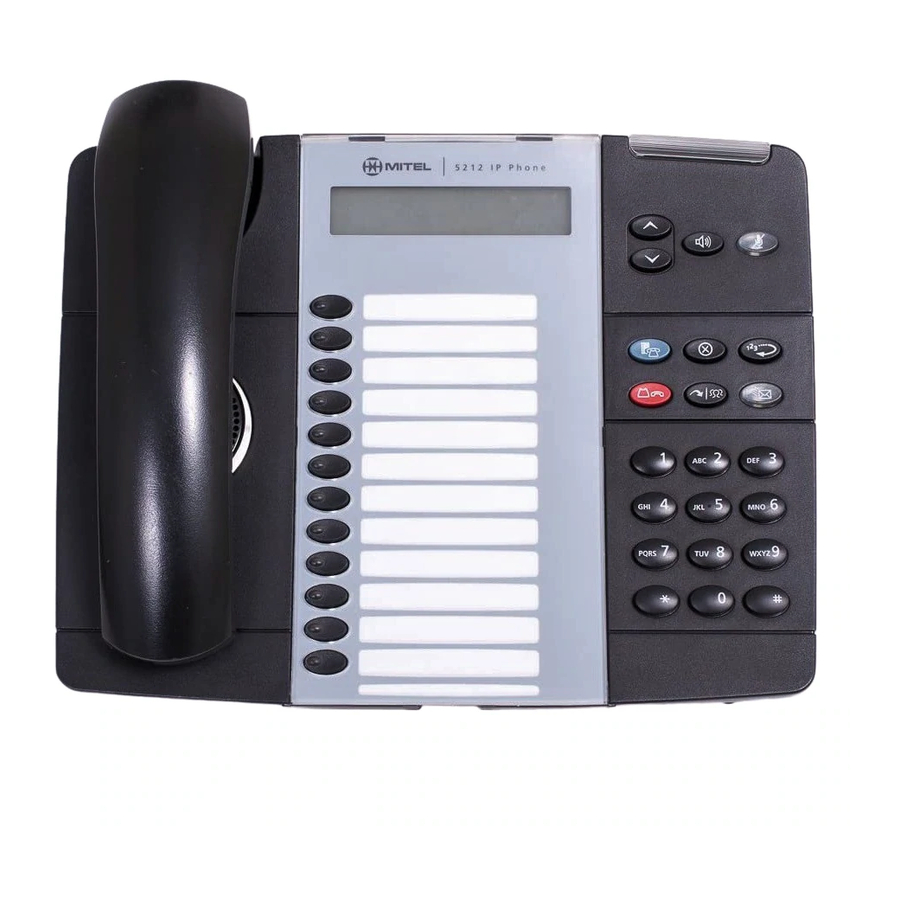
Page 59: Using The Mitel 5212 Ip Phone
5224 IP phone press the keys until the volume is at the level you want. Using the This section describes the setup, activation, and use of the Mitel 5212 IP phone. Mitel 5212 The Mitel 5212 IP phone has the following features: IP Phone •... -
Page 60: Initial Set-Up For Mitel 5212 Ip Phone Service
Perform a Quick Set-up. See “Quick Set Up” on page 95. Activating a Mitel 5212 IP phone To activate a 5212 phone you must physically connect the phone, then log in with your extension and PIN number. To activate your phone, follow these steps: Unplug your computer from the network. -
Page 61: Answering A Call On The 5212 Ip Phone
Extension: 314 You have now successfully activated the phone, and can make calls. Answering a call on the 5212 IP phone When an incoming call is received on a phone, several things happen: (1) the phone rings, (2) a Line Appearance flashes, and (3) the LCD displays the phone number of the caller and, if know, the name of the caller. - Page 62 To end a call while using the speakerphone, press the key on the 5212 IP phone. Switch from speakerphone to handset on the 5212 IP phone To switch from the speakerphone to the handset during a call, pick up the handset.
-
Page 63: Making A Call On The 5212 Ip Phone
If the display shows )) prior to the number calling, this indicates that it is a second call. Making a call on the 5212 IP phone To make a call, follow these steps: Lift the handset. This will select the next available Line Appearance. You can also start dialing the number without lifting the handset. -
Page 64: Using Features Via The 5212 Ip Phone
Line Appearance key. Using features via the 5212 IP phone This section explains the features available from your 5212 IP phone. Some of these features must be pre-programmed in order to be available. To learn how to program features to keys, see “Program memory keys” on page 101. -
Page 65: Account Codes On The 5212 Ip Phone
Once the 3-Way Call is established, you can use the transfer feature to transfer both parties to another party. Joining two calls on the 5212 IP phone The 3-way call feature allows you to conference together two calls on your phone's Line appearances. - Page 66 You cannot assign an account code to a call once it has been completed. Account code speed entry on the 5212 IP phone Account code entry is accepted before a call is placed or during a call. To use...
-
Page 67: Call List On The 5212 Phone
You can redial any calls that you made from the call list. See “Redial on the 5212 IP phone” on page 63. You may be able to dial a number from your incoming call list if it is supported by your service provider. - Page 68 The * symbol beside the position of the call means that the call was not answered. Redial on the 5212 IP phone Using the key, you can view a list of calls that were made and also redial a number in that list without using the keypad. The maximum amount of numbers in your redial list is typically ten but is dependent on your service provider.
-
Page 69: Directory On The 5212 Ip Phone
Company speed dial on the 5212 IP phone Using Company Speed Dial, you can call a number from the External Directory by pressing a single memory key on your phone. To use this feature, you must have a phone key programmed with Company Speed Dial. -
Page 70: Forwarding Your 5212 Ip Phone
“Program memory keys“ on page 101. You can forward your phone by following the procedure described in the following sections: • “Forward your 5212 IP phone to auto attendant” on page • “Forward your 5212 IP phone to co-worker” on page •... - Page 71 If you have this feature turned on when you log out of your phone all your calls will be forwarded to coverage. Forward your 5212 IP phone to number Using Forward to Number, you can send all incoming calls to a preset phone number.
-
Page 72: Handsfree Answerback On The 5212 Phone
Using Handsfree answerback, you can have intercom calls automatically answered so that you have a two-way speech connection. See “Intercom calls on the 5212 Phone” on page 67. Press the Handsfree answerback key to turn the feature on. Press the key a second time to turn the feature off. - Page 73 If your co-worker has the Handsfree Answerback feature configured and activated, then you will also be able to hear your co- worker speak. See “Handsfree Answerback on the 5212 phone” on page To use this feature, you must have a key programmed with Intercom to Prompt.
-
Page 74: Line Appearance On 5212 Ip Phone
Line appearance on 5212 IP phone Line Appearance keys are required in order to receive incoming calls and to make outgoing calls. The LED on the programmed key indicates the status of the Line Appearance. • Key is unlit - the Line Appearance is available for an incoming or outgoing call. - Page 75 Your call coverage still applies when you are in a monitor group. A Monitor Phone key also acts a speed dial to the monitored extension. Monitor Groups is only applicable to users who are using Mitel IP phones. Monitor Call on 5212 IP phone Using the Monitor Call or Monitor Call Silent feature, you can monitor and pick up calls occurring on another user's phone.
- Page 76 Mute. The LED on the key indicates when Mute is active. One touch speed dial on 5212 IP phone Using One Touch Speed Dial, you can make a call to a pre-programmed number. To use this feature, a programmable key must be programmed as a One Touch Speed Dial.
-
Page 77: Park And Retrieve On The 5212 Ip Phone
Your phone displays "Calling: Site Page" and you hear ringing while you are waiting. Park and retrieve on the 5212 IP phone Using Park and Retrieve, you can put a call on hold at a park location so that it can be retrieved from any other phone at your business. To use this feature, a memory key must be programmed as a Park/Retrieve key. -
Page 78: Transfer Call On The 5212 Ip Phone
Using Speaker, you can turn the speakerphone on your phone on and off. To use Speaker, press the key. Transfer call on the 5212 IP phone Using Transfer, you can transfer a call from one phone to another. To transfer a call, follow these steps:... -
Page 79: Transfer To Voice Mail From The 5212 Ip Phone
Line Appearance key to retrieve the original call. Transfer to voice mail from the 5212 IP phone If your administrator has configured an auto attendant for voice mail deposit, you can transfer a caller directly to a co-worker's voice mail box. -
Page 80: Voice Mail On 5212 Ip Phone
"Transfer Complete" for approximately five seconds before returning to an idle state. Twinned Calls on the 5212 IP phone If you have configured your phone to be twinned to another external phone (the twinning target), then incoming calls will ring the other phone as well. -
Page 81: Using The Telematrix 3000 Phone
The ring, handset, and speaker volumes return to their default settings if the phone loses power. Change ring volume on the 5212 IP phone To change the ring volume on your phone, follow these steps: From another phone, make a call to your extension. -
Page 82: Telematrix 3000 Phone
• “Answering a second call on the Telematrix 3000” on page • “Making a call on the Telematrix 3000” on page • “Using features via the Telematrix 3000” on page • “Volume control on the Telematrix 3000” on page • “Voice mail on the Telematrix 3000”... -
Page 83: Initial Setup For Telematrix 3000 Phone
Initial setup for Telematrix 3000 phone To set up your new phone service, follow these steps: • Activate your phone. See “Activating a Telematrix 3000 phone” on page • Perform a Quick Set-up. See “Quick set-up” on page 95. Activating a Telematrix 3000 phone To activate a Telematrix 3000 phone you must physically connect the phone, then log in with your extension and PIN number. -
Page 84: Making A Call On The Telematrix 3000
• Press the speaker key on the Telematrix 3000 phone. You have now answered the call. If you choose to ignore the incoming call and select a different line appearance, the line appearance continues to flash, but the phone stops ringing. -
Page 85: Using Features Via The Telematrix 3000
You can also start dialing the number without lifting the handset. This will automatically select the next available Line Appearance and operate in speakerphone mode. To make an internal call, dial the extension. To make an external call, dial the prefix required for external dialing (usually 9) followed by the number you want to call. -
Page 86: Joining Two Calls On The Telematrix 3000
While on an active call, press the conference key. This places the first call on hold, and selects an available Line Appearance. Enter the phone number of the third party. The system dials the number. Wait for the third party to answer the call. Press the conference key again. -
Page 87: Redial On The Telematrix 3000
To enter a pre-programmed account code during a call, follow this step: • Select the Account Code key. You can re-enter an account code for a call multiple times. The last account code entered is the account code that will be assigned to the call. To cancel account code entry before the call is placed, replace the handset (or press the speaker key if using the speakerphone). - Page 88 feature on. Press the key a second time to turn the feature off. The LED on the programmed key indicates when the phone is being forwarded. To use this feature, you must have a key programmed with Forward to AA. See “Program memory keys”...
-
Page 89: Handsfree Answerback On The Telematrix 3000
If you forward your phone to an external phone number, you must have permission to make that external call and Redirect Inbound Call to External Number permission. For instructions about how to view your call permissions, see “Permissions” on page 99. If you have this feature turned on when you log out of your phone all your calls will be forwarded to the number defined. -
Page 90: Line Appearance On The Telematrix 3000
If your co-worker has the Handsfree Answerback feature configured and activated, then you will also be able to hear your co-worker speak. See “Handsfree answerback on the Telematrix 3000” on page 84. To use this feature, you must have a key programmed with Intercom to Co- worker. -
Page 91: Monitor Groups On The Telematrix 3000
Your call coverage still applies when you are in a monitor group. A Monitor Phone key also acts a speed dial to the monitored extension. Monitor Groups is only applicable to users who are using Mitel IP phones or the Telematrix 3000. - Page 92 incoming or outgoing calls at a time and so on. There is no direct correspondence between a Monitor Call/Monitor Call Silent key and a Line Appearance key on the Monitor Primary's phone. The Line Appearance that the first call occurs on (not necessarily the first Line Appearance) will be monitored by the first Monitor Call/Monitor Call Silent key, the Line Appearance that the second call occurs on (not necessarily the second line appearance) will be monitored by the second Monitor Call/Monitor Call...
-
Page 93: Mute On Telematrix 3000
Mute on Telematrix 3000 Using Mute, you can silence any sound from the phone. This does not prevent incoming sound from being heard. Press the Mute key during a call to activate Mute. The LED on the key indicates when Mute is active. One touch speed dial on the Telematrix 3000 Using One Touch Speed Dial, you can make a call to a pre-programmed number. -
Page 94: Transfer Call On The Telematrix 3000
Transfer call on the Telematrix 3000 You can transfer a call from one phone to another by using the Conference key. To transfer a call, follow these steps: While on an active call, press the Conference key. The system places the call on hold. -
Page 95: Voice Mail On The Telematrix 3000
If you answer the call on your twinning target phone, the Line Appearance key on your desk phone will remain lit. To pull back the call to your desk phone, simply press the corresponding Line Appearance key. The call will be disconnected from the twinning target phone and you will be connected on your desk phone. -
Page 96: Using A Headset
Some headsets are all supplied with a control switch that can be used to mute the microphone. Connect and configure the headset To connect the headset to the Mitel 5224 or 5020/5220 IP phone, follow these steps: Plug the headset into the headset jack on the back of the 5224/5220 set. -
Page 97: Answer A Call
The system supports the Mitel 5412 PKM Programmab which provides an extra 12 additional memory keys and the Mitel 5448 PKM le Key which provides an additional 48 memory keys. If required you can have up to two 5448 PKM units on one phone. -
Page 98: Mitel 5310 Ip Conference Unit
Mitel 5310 The Mitel 5310 IP Conference Unit connects to the headset port of the Mitel 5224 IP Phone and is designed to provide optimal performance in any office to a maximum of 15 feet by 25 feet (4.5 meters by 7.6 meters). -
Page 99: Using Other Phones
Using other This phone system supports usage of other phones using the SIP protocol. Not all features are supported on other phones. Consult the other phone’s phones documentation. Personalizing phone usage via the web Using Internet Explorer 6 or later or Mozilla Firefox 1.5.0.4 or later, individual phone users can personalize their phone systems using the web administration interface. -
Page 100: To Stop The Security Alert At Log In
time you log in. To disable this option, deselect the Remember my User ID check box. Type your PIN. Select the Login button. If you are logged into the application and attempt to log in again, the application logs you out of the first session and logs you in to a new session. -
Page 101: Change Pin
email address on your Personal Details page or if your company has not been configured for email PIN notification. Contact your system administrator to request a new PIN. Change PIN To change your PIN, follow these steps: Select My Personal Details in the Navigation pane. Select the Save and Change PIN button at the bottom of the page. -
Page 102: Quick Set-Up
The Logout page will be displayed, with the message, “You are now successfully logged out of application name.” A link to the Login page is provided. Closing all browser windows automatically logs you out of the Web. You will be logged out of the Web if your computer is idle for 30 minutes or more. -
Page 103: Change User Details
Select My Call Coverage in the navigation pane. Select one of the following options: My Voice Mail, My Auto Attendant, My Co-worker, or Another Phone Number. If you selected My Auto Attendant, choose an auto attendant from the drop-down list. If you selected My Co-Worker, choose a co-worker from the drop-down list. -
Page 104: Permissions
Select the Record button in the Automated Attendant Prompt section. A Record Prompt pop-up window is displayed. Confirm that the extension displayed matches the phone you want to use. If the extension is not the same, enter an alternate extension. Select the Call button. -
Page 105: Permission Types
Permission types The permission types are shown in Table 1. Table 1: Permission types Call Type Definition Emergency (911) Calls to the number used to report an emergency. In North America, this number is 911. This permission is active for all users at all times. -
Page 106: Program Memory Keys
(such as the Mitel 5224 IP phone), and then log in to a model that has fewer programmable memory keys (such as the Mitel 5212 IP Phone), then some of the keys (the left hand column) will not be visible to you (although any of the programmed memory keys could be active). -
Page 107: Program Memory Keys On Pkm
The My Phone page appears. Select the PKM module from the Phone Model drop-down list. Your options include Mitel 5412 PKM, Mitel 5448 PKM - 1, or Mitel 5448 PKM - 2. If you are programming one 5448 PKM choose the Mitel 5448 PKM - 1 option. -
Page 108: Programmable Memory Key Features
Your phone key profile is updated. Repeat steps 3-6 for each memory key to be programmed. The LEDs on the PKM are the same as on the phone except that they are always red. Programmable memory key features Table 1 shows the features available to program on a memory key by a user and a description of the fields required. - Page 109 Table 2: Programmable memory key options Feature Description Default Details Status Label Forward Assign the Forward to AA (Auto Forward to Select one of the Auto Select to AA Attendant) option to a memory key to (AA number) Attendants from this list Active (LED) forward all incoming calls to the Auto...
- Page 110 Table 2: Programmable memory key options Feature Description Default Details Status Label Forward Assign the Forward to Prompt option to a Forward to Type the phone number Select to Prompt memory key to forward all incoming calls *****(number that you want to have Active (LED) to a user defined phone number.
- Page 111 Line bottom to top, right to left. Incoming calls Appearance on pages will be presented on the first available two or three of a Mitel Line Appearance based on the above 5340 IP Phone. order. Personalizing phone usage via the web...
- Page 112 . For the 5212 phone, option is not displayed monitored) see “Monitor call on 5212 IP phone” on if you are not a member page . For the Telematrix 3000, see of a monitor group. “Monitor Call on the Telematrix 3000” on page .
- Page 113 Call on page . For the 5212 phone, a key. see “Monitor Call on 5212 phone” on Note : The Monitor page . For the Telematrix 3000, see Call Silent option is not “Monitor Call on the Telematrix 3000”...
-
Page 114: Select Key Mapping Profile
Table 2: Programmable memory key options Feature Description Default Details Status Label Park/Retrieve Park/ Assign the Park/Retrieve option to a None Retrieve memory key to put a call on hold at a park location such that it can be retrieved from any other phone at your business that has a memory key configured with the Park/Retrieve option. -
Page 115: Call Coverage
Customize the labels and select the Print icon. You can cut out the labels and insert them under the plastic covers on your phone. You can save the file to your local drive for future use. Close the browser window. Call Using Call Coverage, you can decide how your calls should be handled when you cannot answer them, including when you are logged out of your phone. -
Page 116: Twinning
Twinning If the option is allowed by your administrator, you can configure twinning which allows you to ring another phone (such as your cell phone) simultaneously with your desk phone. To view your Twinning options, select the My Call Coverage option in the Navigation pane. Follow these steps to set your twinning parameters: Select the Activate Twinning checkbox In the Twinning Target field, enter the phone number of the phone you... -
Page 117: Join/Leave Call Groups
Join/leave call groups You can join and leave a call group of which you are a member if the call group has been configured to allow joining and leaving. Only the phones of members who are joined in the group will ring when the call group is called. To join or leave a call group of which you are a member using the web interface, follow these steps: Select My Call Groups in the Navigation pane. -
Page 118: Find A Person In The Internal Directory
To sort a list, select the column header of the field that you want to sort on. To reverse the sorting order, select the column header a second time. Find a person in the internal directory To find a person, follow these steps: Select Internal Directory in the Navigation pane. -
Page 119: Print A Directory
A Calling pop-up window is displayed with the Originating Extension set to your extension. Confirm that the Destination Number displayed matches the phone number you want to use. If the number is not the same, enter an alternate number. Select the Call button. The call is initiated on the selected phone in speaker mode. -
Page 120: Create A Dynamic Site
long as you are connected. If your phone is disconnected, the site will persist for a certain amount of time (typically 1 hour after the phone is disconnected and a minimum of 2 hours after the site was created). When you select the button to release a dynamic site, the system deletes that site and logs out any user logged in at that site. -
Page 121: View Dynamic Site Information
Select My Dynamic Site in the left menu. Select the Release Dynamic Site button. This will delete your current dynamic site regardless of where you are currently connected. It will also log you out from your phone. View dynamic site information To view your current dynamic site information, select My Dynamic Site in the left menu. -
Page 122: My Personal Details
• View the internal directory - See “View the internal directory” on page 112. • View the external directory - See “View the external directory” on page 112. • View my call groups - See “Call groups” on page 111. My personal details Using the My Personal Details page, you can perform the following tasks: •... -
Page 123: Company Directories
• Create a dynamic site. See “Create a dynamic site” on page 115. • Release a dynamic site. See “Release a dynamic site” on page 115. • View current dynamic site information. See “View dynamic site information” on page 116. See Dynamic Site on page for more information about dynamic sites. - Page 124 Phone Message Cause Resolution The device called is busy on Try the call again at a later time. Busy a different call User will hear a busy tone. The extension dialed is not Check the number and dial the Invalid Extension valid.
- Page 125 Phone Message Cause Resolution This will normally be seen Try the page again at a later time All Phones Busy when trying to page. and/or contact your system administrator. User will hear a busy tone. User dialed the same Own Number extension number as that of the device they are dialing from.
- Page 126 Glossary Auto Attendant An automated system that directs incoming calls to the appropriate extensions. Asynchronous Transfer Mode. This is a protocol used for high speed data connections CallP Server Call Processing Server. This is a piece of software that provides much of the intelligence for the silhouette system Class of Service an identifier that indicates a type of telephone call.
- Page 127 HTML Hyper Text Markup Language. This is a system of tagging documents with context information allowing them to be displayed by web browsers. HTTP Hyper Text Transfer Protocol. This is the protocol used to send information (usually HTML pages) over networks. ICMP Internet Control Messaging Protocol.
- Page 128 Primary Rate ISDN. This is a service that provides 23 digital voice channels plus 1 signaling channel on a standard T1 interface in a telephone network. PRI Group a grouping of PRI channels used for routing information. Product DHCP Server The DHCP Server provided as part of the silhouette product PSAP Public Safety Answering Point A facility equipped and staffed to receive...
- Page 129 Transmission Control Protocol. This is a layer added onto the IP protocol (shown as TCP/IP) to provide reliable communication. telco Telephone Company. This is a company that purchases the silhouette solution and sells voice over IP telephone service to tenants tenant a customer of the service provider tenant administrator...
-
Page 130: Index
68 3-way call company speed dial 64 5020/5220 IP phones 34 directory 64 5212 IP phone 59 forward to auto attendant 65 5224 IP phones 34 forward to coverage 65 Telematrix 3000 IP phone 80 forward to coworker 65... - Page 131 5220 IP phones 36 internal 118 speed entry on 5224 IP phones 36 printing 114 speed entry on the 5212 IP phone 61 Company speed dial Activating IP phones 5020/5220 IP phones 39 5020/5220 IP phone 29...
- Page 132 5020/5220 IP phone 40 using on Telematrix 3000 IP phone 78 5224 IP phone 40 Handset volume Directory on the 5212 IP phone 64 5020/5220 IP phone 54 Dynamic site support 114 5212 IP phone 76 creating 115 5224 IP phone 54...
- Page 133 5224 IP phone 49 5020/5220 IP phone 32 definition 108 5224 IP phone 32 Telematrix 3000 IP phone 88 Making a call on the 5212 IP phone 58 Making a second call Page 108 5020/5220 IP phone 33 5020/5220 IP phone 49...
- Page 134 Select key mapping profile 109 one touch speed dial 88 servers 124 page 88 Seting up redial 82 5212 IP phone service 55 second call answering 79 Setting up second call, making 80 5020/5220 IP phone 27 setting up 78...
- Page 135 Volume Two-way calls (joining) ring on 5020/5220 IP phone 53 5020/5220 IP phones 35 ring on 5212 IP phone 76 5212 IP phone 60 ring on 5224 IP phone 53 5224 IP phone 35 ring on Telematrix 3000 IP phone 90...
-
Page 136: Feedback On Documentation
Feedback on Documentation We strive to continuously improve our documentation. If you find any errors or omissions in this document or if you find something which you really like, please let us know about it. Please be specific (section header, page number, etc) about the part of the document you wish to tell us about. Please provide the following information: How can we contact you? Name _____________________________________________... - Page 137 NOTES 132 Notes...