Table of Contents
Advertisement
Thank you very much for purchasing the ZOOM
Please read this manual carefully to learn about all the functions of the
be able to use it fully for a long time.
Keep this manual in a convenient place for reference when necessary.
Usage and safety precautions ............... 2
Introduction ....................................... 3
Terms used in this manual ..................... 3
Part names ....................................... 4
Turning the power on ........................... 7
Adjusting effects ................................. 9
Using the Z-Pedal ................................. 12
Selecting patches ................................. 14
Storing Patches .................................... 16
Setting patch-specific parameters ............ 18
Changing Various Settings ..................... 20
Using the Tuner .................................... 24
Using Rhythms .................................... 26
Copying or reproduction of this document in whole or in part without permission is prohibited.
OPERATION MANUAL
Contents
© ZOOM CORPORATION
.
Using the Looper ................................. 28
Using the TUBE BOOSTER ..................... 34
Using Audio Interface Functions ............ 35
Updating the firmware ........................... 36
.............................. 37
Adjusting the Z-Pedal ........................... 38
Effect Types and Parameters .................. 40
Z-Pedal Effect Types and Parameters ...... 59
Troubleshooting ................................. 62
Specifications .................................... 63
Rhythm List ....................................... 63
so that you will
Advertisement
Table of Contents

Related Manuals for Zoom G5


Summary of Contents for Zoom G5
-
Page 1: Table Of Contents
OPERATION MANUAL Thank you very much for purchasing the ZOOM Please read this manual carefully to learn about all the functions of the so that you will be able to use it fully for a long time. Keep this manual in a convenient place for reference when necessary. -
Page 2: Usage And Safety Precautions
Operation using an AC adapter If the unit becomes broken or malfunctions, immediately Use only a ZOOM AD-16 AC adapter with this unit. disconnect the AC adapter, turn the power OFF and disconnect Do not use do anything that could exceed the ratings of outlets and other cables. -
Page 3: Introduction
Use our free Edit&Share editor and librarian computer software with this pedal to back up patches and drag and drop effects to change their order. See the ZOOM website (http://www.zoom.co.jp/) for further information about Edit&Share. Terms used in this manual Patch The ON/OFF and parameter settings of effects are stored as “patches. -
Page 4: Part Names
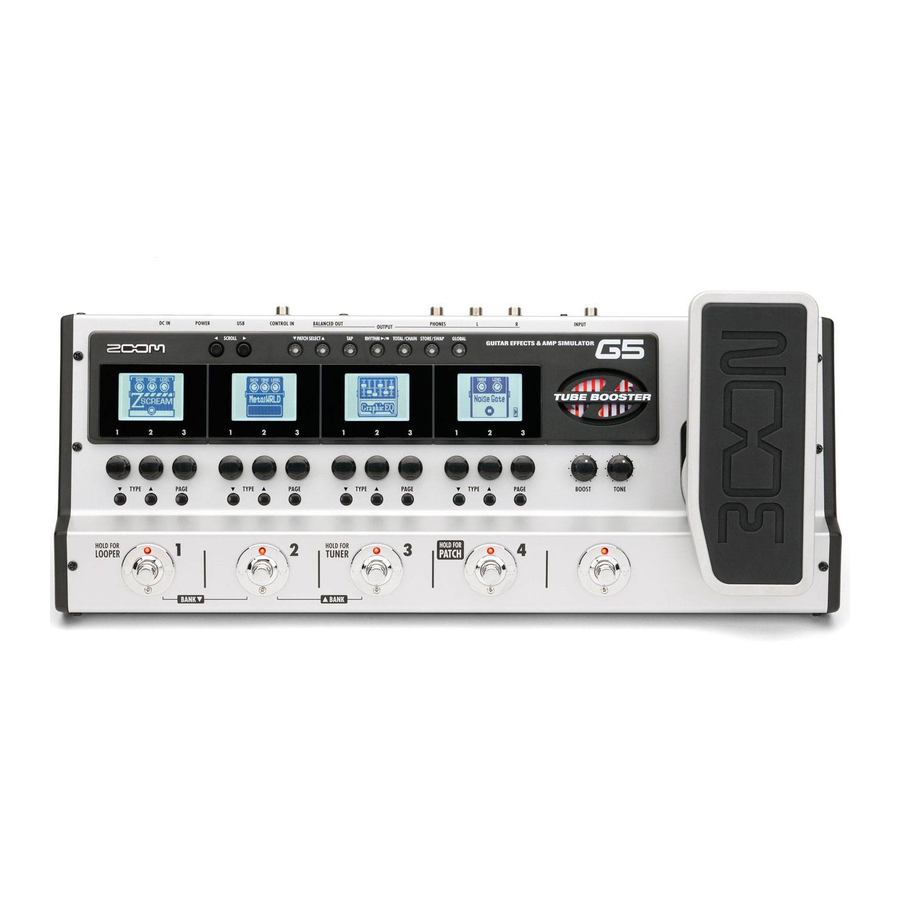
Part names Front panel TAP key RHYTHM [ ] key TOTAL key PATCH SELECT keys STORE/SWAP key SCROLL keys Displays (From left to right, these are called “Effect 1” to “Effect 4” in this manual.) Parameter knobs1–3 (These are shown in this manual.) TYPE keys PAGE key... - Page 5 “PRE” (not pushed in) to output the signal before the effects. GROUND switch Use this switch to connect or ZOOM AD-16 AC adapter disconnect the BALANCED OUT Computer connector with the ground. Set it to “LIFT” (pushed in) to separate the signal path from the grounding pin.
-
Page 6: Using The Tube Booster
Part names Using the Z-Pedal In addition to up and down, the new Z-Pedal can also be moved left and right. By using it with a Z-Pedal effect, you can control effects intuitively. HINT • See page 12 for how to set the Z-Pedal, and see page 38 for how to adjust it. -
Page 7: Turning The Power On
Turning the power on To turn the power on • Lower the amplifier’s volume all the way. • Connect the AC adapter before setting the POWER switch to ON. • Turn the amplifier’s power on and raise its volume. Using the POWER switch eco setting When set to eco, if the is not used for 10 hours, its power will automatically turn off. - Page 8 Turning the power on Display information Home Screens show the current patch Graphic for selected effect Virtual knob HINT • The positions of the virtual knobs change with the parameter values. Edit Screens show parameters being edited Page tabs Parameter names Parameter values HINT • If there are 4 or more parameters that can be adjusted, multiple page tabs will be shown.
-
Page 9: Adjusting Effects
Adjusting effects Confirm that the Home Screens are shown. To turn an effect ON and OFF • Press • This turns that effect ON/OFF . NOTE • The effect shown on a display is ON when the LED on the footswitch below it is lit. • The effect shown on a display is OFF when the LED on the footswitch below it is not lit. - Page 10 Adjusting effects To adjust parameters • Turn • The editing screen opens where you can adjust parameters. NOTE • T i m e , r a t e a n d s o m e o t h e r e ffe c t parameters can be set in note durations that are synchronized to the tempo.
- Page 11 EDIT To scroll through the effects shown HINT • Press You can also scroll using the footswitches. • Left: Press simultaneously. • Right: Press simultaneously. Example: If you press This shows there are more effects in this direction This shows the number of effects hidden in this direction. About scrolling the effects With the , you can arrange and use up to nine effects—eight regular effects and one Z-Pedal...
-
Page 12: Using The Z-Pedal
Using the Z-Pedal To select a Z-Pedal effect • Press to show the Z-Pedal Effect. HINT • A Z-Pedal mark appears on Z-Pedal effects. • Press • See “Z-Pedal Effect Types and Parameters” for information about the Z-Pedal effect types. • This changes the effect type. Z-Pedal mark To set the Z-Pedal effect • Select a Z-Pedal effect. - Page 13 Z-PEDAL To choose the pedal direction to be set • Press to choose the pedal direction. Up and down Left Right HINT • The up and down direction can be used to turn an effect ON/OFF with the pedal switch. To select the controlled parameter • Turn • The effect parameters that can be assigned are shown. HINT • INPUT VOL: Controls the input level. • OUTPUT VOL: Controls the output level. (Does not affect the volume of the rhythm or looper). • NO ASSIGN: No function is assigned to the current direction.
-
Page 14: Selecting Patches
Selecting patches Confirm that the Home display is shown. To activate patch selection • Press and hold for a second. • Effect 1–3 show patch numbers and names, and Effect 4 shows the bank number. To change the patch HINT • Press • You can also change patches using • That patch changes. Selected patch... - Page 15 PATCH SELECT To change the bank • Press simultaneously to open the lower bank. • Press simultaneously to open the higher bank. • Turn of Effect 4. • The bank number changes. NOTE • When pressing two footswitches at the same time, the sound could be affected by the footswitch that is pressed slightly earlier. To avoid this, do not make sound when switching banks. To return to the Home Screens • Press and hold for a second.
-
Page 16: Storing Patches
Storing Patches automatically saves settings when parameters are adjusted. To store a patch or swap with a different patch • Press • blinks and the screens appear as below. Selected patch Saved/swapped patch destination To select whether to store or swap the patch • Turn on Effect 1. - Page 17 STORE/SWAP To set where to store or swap the patch To change the patch number where stored/swapped NOTE • The currently selected • Turn of Effect 4. patch cannot be set as the destination. • The current setting values are automatically saved. Change the patch number To change the bank where stored/swapped • Turn of Effect 4.
-
Page 18: Setting Patch-Specific Parameters
Setting patch-specifi c parameters To activate the TOTAL menu NOTE • Press • Settings made for TOTAL parameters are saved separately for each patch. • See page 19 for how to use the CHAIN function (effect reordering). NAME/PATCH LEVEL/ CHAIN CONTROL SWITCH To change the patch name • Turn of Effect 1. : Turn to move the cursor. : Turn to change the type of character/symbol. : Turn to change the character. - Page 19 TOTAL To set an optional footswitch function • Press and turn of Effect 1. • Effect functions that can be assigned are shown. HINT • BYPASS/MUTE: Use to bypass or mute the effect. • TAP TEMPO: Press the footswitch repeatedly at the desired tempo to set the tempo used for rhythms, the looper and effects. • NO ASSIGN: No function is assigned to the footswitch. • If the selected parameter has multiple functions, use to select one. NOTE • In order to use the function set, the corresponding effect must also be ON.
-
Page 20: Changing Various Settings
Changing Various Settings To activate the GLOBAL menu • Press MASTER LEVEL SIGNAL PATH USB AUDIO OUTPUT MASTER TEMPO VERSION LCD CONTRAST NOTE • Global parameter settings affect all patches. To adjust the master level • Turn of Effect 1. NOTE • The setting range is 0–120. - Page 21 GLOBAL To set the master tempo • Turn of Effect 1. NOTE • The setting range is 40–250. • This tempo setting is used by every effect, rhythms and the looper. To set the tempo by tapping • Press two or more times at the desired tempo. HINT • You can also set the tempo using an FS01 footswitch (sold separately).
- Page 22 Changing Various Settings To change the direction of the signal flow • Turn of Effect 2. • This changes the signal fl ow direction. To adjust the USB audio monitoring balance • Turn of Effect 3. NOTE • This adjusts the balance between the signal from a connected computer (DAW) and the signal input and processed through the unit (DIRECT).
- Page 23 • Press of Effect 3. HINT • Check the ZOOM website (http:// w w w. z o o m . c o . j p ) f o r t h e l a t e s t firmware versions.
-
Page 24: Using The Tuner
Using the Tuner To activate the tuner • Press and hold for a second. HINT • Press to switch between BYPASS and MUTE settings. To change the tuner’s standard pitch • Turn of Effect 2. NOTE • The standard pitch for middle A can be set to 435–445 Hz. • The standard pitch is remembered even when the POWER is OFF . To select the tuner type • Turn of Effect 2. -
Page 25: Chromatic Tuner
TUNER String number/Note name Display Meaning GUITAR Standard tuning for guitars, including 7-string guitars OPEN A In open A tuning, the open strings make an A chord OPEN D In open D tuning, the open strings make a D chord OPEN E In open E tuning, the open strings make an E chord OPEN G... -
Page 26: Using Rhythms
Using Rhythms To activate a rhythm HINT • Press • You can use a rhythm pattern while using the looper. • Rhythm pattern playback starts and the rhythm setting screen opens. PATTERN LEVEL TEMPO To select the rhythm pattern • Turn of Effect 1. NOTE • See page 63 for types of patterns. To adjust the tempo • Turn of Effect 2. HINT • You can also set the tempo using NOTE • The setting range is 40–250. - Page 27 RHYTHM To adjust the rhythm volume • Turn on Effect 3. NOTE • The setting range is 0–100. To stop the rhythm HINT • Press • Press again to start playback of the rhythm again. To complete setting the rhythm To stop the rhythm and return to the previous screen • Press To select a patch while keeping the rhythm playing • Press...
-
Page 28: Using The Looper
Using the Looper To activate the Looper • Press and hold for a second. LOOPER LEVEL TIME RHYTHM LEVEL TEMPO SETTING To set the recording time • Turn of Effect 1. Manual Use the footswitch to start and stop recording. Note mark Set the recording time by setting the tempo and the number of quarter notes. - Page 29 LOOPER To record a phrase and play it back • Press Recording standby Recording Loop playing If set to “Manual” • When is pressed again or the maximum recording time is reached, loop playback starts (and “PLAY” appears on the display). If set to a note mark • Recording continues for the set time and then loop playback starts (and “PLAY”...
- Page 30 Using the Looper To overdub a recorded loop To start overdubbing • During loop playback, press Loop playing Overdubbing To end overdubbing • Press again. Overdubbing Loop playing To erase the loop • Press and hold for a second. • “CLEAR” appears on the display.
- Page 31 LOOPER To adjust the loop volume To adjust the volume of the looped phrase • Turn of Effect 3. NOTE • The setting range is 0–100. To adjust the volume of the rhythm • Turn of Effect 4. NOTE • The setting range is 0–100. To view other screens You can select patches while a loop is playing • Press To return to the Home Screens while a loop is playing...
- Page 32 Using the Looper To change the looper settings • Press of Effect 3. To activate the UNDO function • Turn on Effect 3. NOTE • When Undo is ON, the maximum loop recording time is limited to 30 seconds. HINT • When UNDO is ON, you can cancel (undo) the last overdubbing by pressing for a second. After undoing, you can recover the cancelled overdub (redo) by pressing for a second again.
- Page 33 LOOPER To select the STOP MODE • Turn of Effect 3. STOP MODE How loop playback stops STOP Playback stops immediately FINISH Playback stops after the loop plays to its end FADE OUT Playback stops after fading out HINT • E v e n w h e n s e t t o F I N I S H o r FA D E O UT, y o u c a n s t o p l o o p p l a y b a ck i m m e d i a t e l y b y p r e s s i n g a g a i n .
-
Page 34: Using The Tube Booster
Using the TUBE BOOSTER To turn the TUBE BOOSTER ON/OFF • Press of the TUBE BOOSTER. • This turns the TUBE BOOSTER ON or OFF . NOTE • While the tube is warming up, the TUBE BOOSTER might not make any sound for about 5 seconds. • Signals recorded by USB Audio cannot be amplifi ed by the TUBE BOOSTER. -
Page 35: Using Audio Interface Functions
Using Audio Interface Functions This unit can be used with computers running the following operating systems Compatible OS Windows ® Windows XP SP3 (32bit) or newer ® Windows Vista SP1 (32bit, 64bit) or newer ® Windows 7 (32bit, 64bit) ® ®... -
Page 36: Updating The Firmware
Updating the fi rmware To download the latest fi rmware • Visit the ZOOM Website (http://www.zoom.co.jp). HINT • Open the GLOBAL menu to check the current fi rmware versions. (See page 23.) To use the version updating function • Confi rm that the POWER switch is set to OFF and the AC adapter is connected. • Connect the to a computer using a USB cable. -
Page 37: Restoring The To Its Factory Default Settings
VERSION UPDATE To complete updating • When the has fi nished updating, “COMPLETE!” appears on its display. • Set the POWER switch to OFF . HINT • Updating the fi rmware version will not erase saved patches. Restoring the to its factory default settings 1. To use the All Initialize function • While pressing , set the POWER switch to ON. • The All Initialize screen appears. -
Page 38: Adjusting The Z-Pedal
Adjusting the Z-Pedal To calibrate its sensitivity • While pressing , set the POWER switch to ON. NOTE • Calibrate the pedal if: - Pressing the pedal does not have much effect. - The volume or tone changes too much even when only pressing the pedal lightly. • Operate the Z-Pedal in the following order, pressing after each step. - Page 39 To adjust the torque You can use a 5mm hex key (Allen wrench) to adjust the vertical and horizontal torque of the Z-Pedal. To adjust the vertical torque • Insert the hex key into the vertical torque adjustment screw on the side of the pedal. Turn it clockwise to tighten the pedal, and turn it counterclockwise to loosen the pedal.
-
Page 40: Effect Types And Parameters
Effect Types and Parameters Effect number Parameter Parameter range Effect type Effect explanation Footswitch function This dynamic delay adjusts the volume of the effect sound DynaDelay InputMute according to the input signal level. Knob1 Knob2 Knob3 Time 1–2000 Sense -10– -1, 1–10 P Mix 0–100 Page01... - Page 41 ZOOM's unique noise reduction cuts noise during pauses in playing without affecting the tone. Knob1 Knob2 Knob3 THRSH 1–25 P DETCT GtrIn, EfxIn Level 0–150 Page01 Adjusts the effect sensitivity. Sets control signal detection level. Adjusts the output level. Page02 NoiseGate This is a noise gate that cuts the sound during playing pauses.
- Page 42 Effect Types and Parameters AutoWah This effect varies wah in accordance with picking intensity. Knob1 Knob2 Knob3 Sense -10–-1, 1–10 P Reso 0–10 P Level 0–150 Page01 Adjusts the intensity of the resonance Adjusts the sensitivity of the effect. Adjusts the output level. sound.
- Page 43 RndmFLTR This filter effect changes character randomly. Knob1 Knob2 Knob3 Speed 1–50 P Range 0–100 P Reso 0–10 Page01 Sets modulation speed. Adjusts frequency range affected. Sets effect resonance. Type HPF, BPF, LPF Chara 2Pole, 4Pole 0–100 Page02 Adjusts the balance between original Sets filter type.
- Page 44 Gain 0–100 P Tone 0–100 Level 0–150 Page01 Adjusts the gain. Adjusts the tone. Adjusts the output level. Page02 Z Clean ZOOM original unadorned clean sound. Knob1 Knob2 Knob3 Gain 0–100 P Tone 0–100 Level 0–150 Page01 Adjusts the gain.
- Page 45 A high gain sound for lead playing based on the Mesa Boogie Road King Series II Lead Z Dream channel. Knob1 Knob2 Knob3 Gain 0–100 P Tone 0–100 Level 0–150 Page01 Adjusts the gain. Adjusts the tone. Adjusts the output level. Page02 Z Scream An original high gain sound balanced from low to high frequencies.
- Page 46 Effect Types and Parameters DELUXE-R This models the sound of a Fender Deluxe Reverb made in 1965. Knob1 Knob2 Knob3 Gain 0–100 P Tube 0–100 Level 0–150 Page01 Adjusts the gain. Adjusts tube amp compression. Adjusts the output level. Trebl 0–100 Middl 0–100...
- Page 47 MATCH 30 Modeled sound of a DC-30 (channel 1), the Matchless flagship combo amp. Knob1 Knob2 Knob3 Gain 0–100 P Tube 0–100 Level 0–150 Page01 Adjusts the gain. Adjusts tube amp compression. Adjusts the output level. Trebl 0–100 Middl 0–100 Bass 0–100 Page02...
- Page 48 Effect Types and Parameters B-BREAKER This models the sound of a Marshall 1962 Bluesbreaker combo amp. Knob1 Knob2 Knob3 Gain 0–100 P Tube 0–100 Level 0–150 Page01 Adjusts the gain. Adjusts tube amp compression. Adjusts the output level. Trebl 0–100 Middl 0–100 Bass...
- Page 49 The 3-channel high gain sound of a Diezel Herbert, which is a handmade German guitar DZ DRIVE amplifier that allows control of three independent channels. Knob1 Knob2 Knob3 Gain 0–100 P Tube 0–100 Level 0–150 Page01 Adjusts the gain. Adjusts tube amp compression. Adjusts the output level.
- Page 50 Effect Types and Parameters Phaser This effect adds a phasing variation to the sound. Knob1 Knob2 Knob3 4 STG, 8 STG, Rate 1–50 P Color Level 0–150 inv 4, inv 8 Page01 Sets the speed of the modulation. Sets the tone of the effect type. Adjusts the output level.
- Page 51 Ensemble This is a chorus ensemble that features three-dimensional movement. Knob1 Knob2 Knob3 Depth 0–100 Rate 1–50 P Mix 0–100 Page01 Adjusts the amount of effected sound Sets the depth of the modulation. Sets the speed of the modulation. that is mixed with the original sound. Tone 0–10 Level...
- Page 52 Effect Types and Parameters MonoPitch This is a pitch shifter with little sound variance for monophonic (single note) playing. Knob1 Knob2 Knob3 Shift -12 – 12 , 24 Tone 0–10 0–100 Page01 Adjusts the pitch shift amount in semitones. Adjusts the balance between original Adjusts the tone.
- Page 53 This effect produces the sound of a monophonic (single-note playing) guitar synthesizer MonoSynth that detects the pitch of the input signal. Knob1 Knob2 Knob3 Synth 0–100 P Dry 0–100 P Level 0–150 Page01 Adjusts synthesizer sound level. Adjusts level of original sound. Adjusts the output level.
- Page 54 Effect Types and Parameters This analog delay simulation has a long delay with a maximum AnalogDly Hold, InputMute length of 5000 mS. Knob1 Knob2 Knob3 Time 1–5000 F .B 0–100 P Mix 0–100 Page01 Adjusts the amount of effected sound Sets the delay time.
- Page 55 PhaseDly This effect applies a phaser to a delayed sound. InputMute Knob1 Knob2 Knob3 Time 1–2000 F .B 0–100 P Mix 0–100 Page01 Adjusts the amount of effected sound Sets the delay time. Adjusts the feedback amount. that is mixed with the original sound. 4 STG, 8 STG, Rate 1–50...
- Page 56 Effect Types and Parameters This reverb effect simulates the acoustics of a large enclosure Arena InputMute such as a sports arena. Knob1 Knob2 Knob3 Decay 1–30 P Tone 0–10 0–100 Page01 Adjusts the amount of effected sound Sets the duration of the reverberations. Adjusts the tone. that is mixed with the original sound.
- Page 57 Cho+Rev This effect combines chorus and reverb. Knob1 Knob2 Knob3 ChoRt 1–50 P ChoMx 0–100 P RevMx 0–100 Page01 Adjusts chorus rate. Adjusts chorus mix. Adjusts reverb mix. Level 0–150 Page02 Adjusts the output level. FLG+VCho This effect combines flanger and vintage chorus. Knob1 Knob2 Knob3...
- Page 58 Effect Types and Parameters Table 1 Type Modeled cabinet and speakers FD COMBO 2x12 Fender Twin Reverb ('65) cabinet with 2x12-inch Jensen speakers DELUXE-R 1X12 Fender Deluxe Reverb cabinet with 1x12-inch Jensen speaker FD VIBRO 2x10 Fender Vibroverb ('63) cabinet with 2x10-inch Jensen speakers US BLUES 4x10 Fender Tweed Bassman cabinet with 4x10-inch Jensen speakers VX COMBO 2x12...
-
Page 59: Z-Pedal Effect Types And Parameters
Z-Pedal Effect Types and Parameters Z-Pedal Effect Types and Parameters VolBoostZ This effect provides a clean boost without changing frequency characteristics. Knob1 Knob2 Knob3 Slow1,Slow2, VPosi 0–100 P HPosi L100–CNTR–R100 P Curve NRML,Fast Page01 Sets the starting position value. Sets the starting position value. Selects the type of curve used for After the pedal is moved, the actual After the pedal is moved, the actual... - Page 60 Z-Pedal Effect Types and Parameters TalkPDL-Z This effect can make a guitar sound like a human voice. Knob1 Knob2 Knob3 VPosi 0–100 P HPosi 0–100 P Voice 0–100 Sets the starting position value. Sets the starting position value. Page01 After the pedal is moved, the actual After the pedal is moved, the actual Sets the voice quality.
- Page 61 ChaosDLY This chaos effect uses filter and echo. Knob1 Knob2 Knob3 Chaos 0–100 P Time x2– P Level 0–150 Page01 Sets the depth of the filter and echo. Sets the echo time. Sets the output level. FltOs 0–100 Page02 Sets the minimum frequency of the filter. Starship This effect makes a sound like a flying spaceship.
-
Page 62: Troubleshooting
• Confirm that unit is not in mute mode • Check the recording level setting ( → P22). → P24). There is a lot of noise • Check shielded cables for defects. • Use only a genuine ZOOM AC adapter. The sound distorts strangely/has an odd timbre • Set the OUTPUT parameter according to the output equipment ( P23). → • Set the ACTIVE/PASSIVE switch according to the type of guitar pickups or the device connected directly to the P5). -
Page 63: Specifications
100 Ω (HOT-GND, COLD-GND), 200 Ω (HOT-COLD) PRE/POST (switch selectable) GND LIFT (switch selectable) Control input For FP01/FP02/FS01 Power AC adapter DC9V (center minus plug), 500 mA (ZOOM AD-16) Dimensions 190mm(D) x 470mm(W) x 90mm(H) USB Audio Weight 3.1kg Options FP01/FP02 expression pedal and FS01 foot switch • 0dBm = 0.775Vrms... - Page 64 BANK PATCH NAME COMMENT PATCH NAME COMMENT PATCH NAME COMMENT MS EchoZ TremoloZ W-ShiftDrv Move jet-Z TalkingZ Wah&Pitch ShuffleAT BoostZ MultiMod BG Filter FunkyMute BGN Chaos DriveA-Wah Taste-AC Fripper HotSpice Horn Volume Pad TRM&PHSR RotaryZ GranuRevo Cho&Rev GoodFuzz RNDM Talk Fast Filt ExciteSurf Fuzz+A.Pan...
- Page 65 G5 Patch List-E-2 Manufacturer names and product names mentioned in this patch list are trademarks or registered trademarks of their respective owners and do not indicate any affiliation with ZOOM CORPORATION. All product and artist names are intended only to illustrate sonic characteristics that were used as reference in the development of this product.