Table of Contents
Advertisement
Thank you very much for purchasing the ZOOM
Please read this manual carefully to learn about all the functions of the
you will be able to use it fully for a long time.
Keep this manual in a convenient place for reference when necessary.
Usage and safety precautions ....................... 2
Introduction ................................................... 3
Terms Used in This Manual ............................ 3
Part Names .................................................... 4
Turning the power on ..................................... 6
Adjusting effects ............................................ 8
Selecting Patches ........................................ 12
Storing Patches ............................................ 14
Setting patch-specific parameters ............... 16
Changing Various Settings ........................... 20
Using the Tuner ............................................ 26
Copying or reproduction of this document in whole or in part without permission is prohibited.
OPERATION MANUAL
Contents
© ZOOM CORPORATION
/
.
Using Rhythms ............................................ 28
Using the Looper ......................................... 30
Using Audio Interface Functions ....................... 36
Adjusting the expression pedal.................... 37
Updating the firmware ................................. 38
/
default settings. ....................................... 39
Effect Types and Parameters ....................... 40
Troubleshooting ........................................... 58
Specifications .............................................. 59
Rhythm List ................................................. 59
/
so that
Advertisement
Table of Contents

Related Manuals for Zoom G3


Summary of Contents for Zoom G3
-
Page 1: Table Of Contents
OPERATION MANUAL Thank you very much for purchasing the ZOOM Please read this manual carefully to learn about all the functions of the so that you will be able to use it fully for a long time. Keep this manual in a convenient place for reference when necessary. -
Page 2: Usage And Safety Precautions
Use only a ZOOM AD-16 AC adapter with this unit. device and to minimize external electromagnetic interference. Do not use do anything that could exceed the ratings of outlets and other electrical wiring equipment. -
Page 3: Introduction
Edit & Share software, which is a patch editor and librarian, on a computer to back up patches and change the order of effects. See the ZOOM website (http://www.zoom.co.jp/) for further information about Edit & Share. Terms Used in This Manual Patch The ON/OFF status and the parameter settings of each effect are stored as "patches."... -
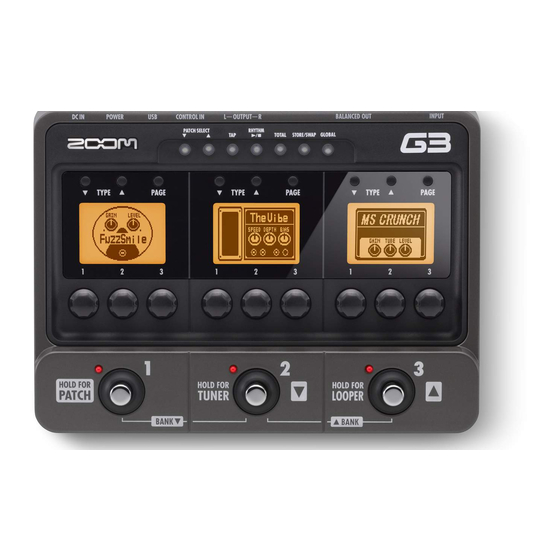
Page 4: Part Names
Part Names Top Panel TOTAL key STORE/SWAP key RHYTHM [ ] key TAP key SCROLL keys TYPE keys Display INPUT jack Rear Panel Pedal switch BALANCED OUT connector Headphones OUTPUT jack Guitar amplifier Guitar... - Page 5 GROUND switch Use this switch to connect or disconnect the ZOOM AC adapter (AD-16) BALANCED OUT connector with the ground. USB connector Set it to “LIFT” (pushed in) to separate the signal path from the grounding pin. Set it to “CONNECT”...
-
Page 6: Turning The Power On
Turning the power on To turn the power on When using batteries When using an adapter Insert batteries into the battery compartment Connect the AC adapter and set the and set the POWER switch to ON. POWER switch to ON. Bottom of the unit Using the POWER switch eco setting If the... - Page 7 Display information Home Screens show the current patch Graphic for selected effect Virtual knob HINT Edit Screens show parameters being edited Page tabs Parameter names Parameter values HINT...
-
Page 8: Adjusting Effects
Adjusting effects Confirm that the Home screens are shown. To turn effects ON and OFF NOTE... - Page 9 EDIT To select an effect type HINT types and parameters. function is ON, changes made will be saved automatically. (See page 24.) To adjust parameters NOTE Time, rate and some other effect parameters can be set in note durations that are synchronized to the tempo. NEXT...
- Page 10 Adjusting effects To change the page Effect processing capacity allows you to combine six effects as you like. However, if you combine effect types that require great amounts of processing power (amp models, for example), the available processing capacity might not be enough. If the processing required for an effect exceeds the available capacity, the effect is bypassed and a “DSP Full!”...
- Page 11 EDIT To scroll through the effects shown HINT You can also scroll using the footswitches. Left: Press simultaneously. Right: Press simultaneously. Example: If you press This shows there are more effects in this direction. This shows the number of effects hidden in this direction. About scrolling the effects With the , you can arrange and use up to six effects simultaneously.
-
Page 12: Selecting Patches
Selecting Patches Confirm that the Home display is shown. To activate patch selection Bank names Patch number Patch names To change the patch HINT by pressing as you press and hold... - Page 13 PATCH SELECT To change the bank Press at the same time to select the next lower bank. Press at the same time to select the next higher bank. NOTE When pressing two footswitches at the same time, the sound could be affected by the footswitch that is pressed slightly earlier.
-
Page 14: Storing Patches
Storing Patches When the AUTO SAVE function is ON, settings are saved automatically after parameters are adjusted. To store a patch or swap Saved/swapped patch Selected patch destination To select whether to store or swap the patch Store Swap... - Page 15 STORE/SWAP To set where to store or swap the new patch To change the patch number where stored/swapped Change the patch number To change the bank where stored/swapped NOTE When the GLOBAL menu AUTO SAVE function is ON, the currently active patch cannot be selected as the destination.
-
Page 16: Setting Patch-Specific Parameters
Setting patch-specific parameters To activate the TOTAL menu NOTE CHAIN/ NAME/PATCH CTRL SW/PDL To change the patch name of the left effect. : Turn to move the cursor. : Turn to change the type of character/symbol. : Turn to change the character. NOTE ! # $ % &... - Page 17 TOTAL To change the order of the effects Turn of the middle and right effects to change effect positions. HINT To set an optional footswitch function and turn of the middle effect. HINT to set the tempo used for rhythms, the looper and effects. to select one.
- Page 18 Setting patch-specific parameters To set an expression pedal function Using the built-in expression pedal of the or an optional external expression pedal (ZOOM FP01/FP02) connected to a , you can control volume and effect parameters in real-time. To select the controlled parameter of the middle effect and turn of the right effect.
- Page 19 TOTAL Set the parameter range that the pedal can adjust of the right effect to set the minimum value. of the right effect to set the maximum value. HINT When set this way, pushing the pedal down decreases the effect, while letting it up increases the effect.
-
Page 20: Changing Various Settings
Changing Various Settings To activate the GLOBAL menu NOTE affect all patches. MASTER/SIG. PATH BATTERY/LCD/SAVE USB AUDIO/VERSION To adjust the master level NOTE... - Page 21 GLOBAL To set the master tempo NOTE Setting the tempo by tapping HINT footswitch (sold separately). (See page 17 .) To select the connected equipment Parameter value Meaning DIRECT Use when connected to headphones or monitor speakers COMBO FRONT Use when connected to an ordinary combo amp input STACK FRONT Use when connected to an ordinary stack amp input COMBO POWER AMP...
- Page 22 Changing Various Settings To change the direction of the signal flow To set the amount of time until the backlight dims NOTE HINT The amount of power consumed can be reduced by dimming the backlight.
- Page 23 GLOBAL To select the battery type (nickel-metal hydride). : Operating on batteries : Operating on adapter power : Operating on USB bus power NOTE charge to be shown accurately. To check the eco mode status To adjust the display contrast : Left display : Center display : Right display...
- Page 24 Changing Various Settings To set the auto save function HINT (See page 14.) To adjust the USB audio monitoring balance NOTE software (computer) and the DIRECT signal from the unit (after effects). DAW (computer) output signal.
- Page 25 PATCH SELECT To adjust the recording level NOTE (computer). To view the firmware versions of the right effect. HINT co.jp) for the latest firmware versions. To exit the GLOBAL menu...
-
Page 26: Using The Tuner
Using the Tuner To activate the tuner for 1 second. NOTE Turn of the left effect to switch between BYPASS and MUTE. To change the tuner’s standard pitch of the right effect. NOTE The standard pitch setting is saved even when the power is turned OFF . To select the tuner type of the right effect. -
Page 27: Chromatic Tuner
TUNER String number/Note name Display Meaning GUITAR Standard tuning for guitars, including 7-string guitars OPEN A In open A tuning, the open strings make an A chord OPEN D In open D tuning, the open strings make a D chord OPEN E In open E tuning, the open strings make an E chord OPEN G... -
Page 28: Using Rhythms
Using Rhythms To activate a rhythm HINT You can use a rhythm pattern while using the looper. RHYTHM PATTERN TEMPO LEVEL To select the rhythm pattern of the left effect. NOTE To adjust the tempo of the middle effect. HINT NOTE... - Page 29 RHYTHM To adjust the rhythm level of the right effect. NOTE To stop the rhythm HINT To complete setting the rhythm The rhythm stops and the previous screen reappears To select a patch (and keep the rhythm playing) To return to the Home Screens (and keep the rhythm playing)
-
Page 30: Using The Looper
Using the Looper To activate the Looper for 1 second. TIME TEMPO LOOPER LEVEL SETTING To set the recording time on the left effect. Manual Use the footswitch to start and stop recording. Note mark Set the recording time by setting the tempo and the number of quarter notes. - Page 31 LOOPER To record a phrase and play it back Recording standby Recording Loop playing back If set to “Manual” When is pressed again or the maximum recording time (about 40 seconds) is reached, loop playback starts (and “PLAY” appears on the display). If set to a note mark appears on the display).
- Page 32 Using the Looper To overdub a recorded loop To start overdubbing Loop playing back Overdubbing To end overdubbing Overdubbing Loop playing back To erase the loop...
- Page 33 LOOPER To adjust the loop volume To adjust the volume of the looped phrase of right effect. NOTE To adjust the volume of the rhythm of the right effect and turn NOTE To return to the Home Screens HINT You can return to the Home Screens while the loop is playing. NOTE NEXT...
- Page 34 Using the Looper To change the Looper settings To activate the Undo function NOTE limited to 20 seconds. HINT After undoing, you can also redo by pressing for 1 second again, restoring the last overdubbing.
- Page 35 LOOPER To select the STOP MODE STOP MODE How loop playback stops STOP Playback stops immediately FINISH Playback stops after the loop plays to its end FADE OUT Playback stops after fading out HINT holding down...
-
Page 36: Using Audio Interface Functions
Using Audio Interface Functions This unit can be used with computers running the following operating systems. Compatible OS Windows ® Windows XP SP3 (32bit) or newer ® Windows Vista SP1 (32bit, 64bit) or newer ® Windows 7 (32bit, 64bit) ® ®... -
Page 37: Adjusting The Expression Pedal
Adjusting the expression pedal To calibrate its sensitivity While pressing , set the POWER switch to ON. NOTE - Pressing the pedal does not have much effect. - The volume or tone changes too much even when only pressing the pedal lightly. Following the instructions shown, operate the pedal and press each time. -
Page 38: Updating The Firmware
Updating the firmware To download the latest firmware Update application: HINT To prepare to update the firmware USB cable. To update the firmware Launch the firmware update application on your computer, and execute the update. NOTE HINT firmware is being updated. how to use the application. -
Page 39: Restoring The / To Its Factory Default Settings
FIRMWARE UPDATE To complete updating has finished updating, “Complete!” appears on the display. HINT Restoring the to its factory default settings 1. To use the All Initialize function 2. To execute the All Initialize function NOTE HINT , including its patches, to factory defaults. -
Page 40: Effect Types And Parameters
0–150 Page01 Set the curve of volume change during Adjusts the attack time. Adjusts the output level. attack. Page02 ZOOM's unique noise reduction cuts noise during pauses in playing without affecting the tone. Knob1 Knob2 Knob3 THRSH 1–25 P DETCT... - Page 41 NoiseGate This is a noise gate that cuts the sound during playing pauses. Knob1 Knob2 Knob3 THRSH 1–25 P Level 0–150 Page01 Adjusts the effect sensitivity. Adjusts the output level. Page02 DirtyGate This vintage style gate features a characteristic way of closing. Knob1 Knob2 Knob3...
- Page 42 Effect Types and Parameters This effect varies the sound like a talking modulator. Knob1 Knob2 Knob3 Range 1–10 P Reso 0–10 P Sense -10–-1, 1–10 Page01 Adjusts the frequency range processed Adjusts the intensity of the modulation Adjusts the sensitivity of the effect. by the effect.
- Page 43 Simulation of the Ibanez TS808, which is loved by many guitarists as a booster and has T Scream inspired numerous clones. Knob1 Knob2 Knob3 Gain 0–100 P Tone 0–100 Level 0–150 Page01 Adjusts the gain. Adjusts the tone. Adjusts the output level. Page02 Governor Simulation of the Guv'nor distortion effect from Marshall.
- Page 44 Gain 0–100 P Tone 0–100 Level 0–150 Page01 Adjusts the gain. Adjusts the tone. Adjusts the output level. Page02 Z Clean ZOOM original unadorned clean sound. Knob1 Knob2 Knob3 Gain 0–100 P Tone 0–100 Level 0–150 Page01 Adjusts the gain.
- Page 45 Lead Lead a bright and smooth distortion sound. Knob1 Knob2 Knob3 Gain 0–100 P Tone 0–100 Level 0–150 Page01 Adjusts the gain. Adjusts the tone. Adjusts the output level. Page02 ExtremeDS This distortion effect boasts the highest gain in the world. Knob1 Knob2 Knob3...
- Page 46 Effect Types and Parameters VX COMBO Modeled sound of a British combo amplifier representing the 1960s Liverpool sound. Knob1 Knob2 Knob3 Gain 0–100 P Tube 0–100 Level 0–150 Page01 Adjusts the gain. Adjusts tube amp compression. Adjusts the output level. Trebl 0–100 Middl...
- Page 47 TONE CITY This models the sound of a Sound City 50 Plus Mark 2, a legendary British amplifier. Knob1 Knob2 Knob3 Gain 0–100 P Tube 0–100 Level 0–150 Page01 Adjusts the gain. Adjusts tube amp compression. Adjusts the output level. Trebl 0–100 Middl...
- Page 48 Effect Types and Parameters MS DRIVE The high gain sound of a JCM2000 Marshall stack amp. Knob1 Knob2 Knob3 Gain 0–100 P Tube 0–100 Level 0–150 Page01 Adjusts the gain. Adjusts tube amp compression. Adjusts the output level. Trebl 0–100 Middl 0–100 Bass...
- Page 49 Tremolo This effect varies the volume at a regular rate. Knob1 Knob2 Knob3 Depth 0–100 P Rate 0–50 P Level 0–150 Page01 Adjust the depth of the modulation. Adjusts the rate of the modulation. Adjusts the output level. UP 0–UP 9, Wave DWN 0–DWN 9, Page02...
- Page 50 Effect Types and Parameters VintageCE This is a simulation of the BOSS CE-1. Knob1 Knob2 Knob3 Comp 0–9 Rate 1–50 P Mix 0–100 Page01 Adjusts the amount of effected sound Sets the sensitivity of the compressor. Sets the speed of the modulation. that is mixed with the original sound.
- Page 51 PitchSHFT This effect shifts the pitch up or down. Knob1 Knob2 Knob3 Shift -12–12 , 24 Tone 0–10 0–100 Page01 Adjusts the pitch shift amount in semitones. Adjusts the balance between original Adjusts the tone. Selecting “0” gives a detuning effect. and effect sounds.
- Page 52 Effect Types and Parameters This effect produces the sound of a monophonic (single-note playing) guitar synthesizer MonoSynth that detects the pitch of the input signal. Knob1 Knob2 Knob3 Synth 0–100 P Dry 0–100 P Level 0–150 Page01 Adjusts synthesizer sound level. Adjusts level of original sound.
- Page 53 MultiTapD This effect produces several delay sounds with different delay times. InputMute Knob1 Knob2 Knob3 Time 1–2500 PTTRN 1–8 0–100 Page01 Sets the tap pattern, which varies from Adjusts the amount of effected sound Sets the delay time. rhythmical to random patterns. that is mixed with the original sound.
- Page 54 Effect Types and Parameters HD Reverb This is a high-definition reverb. InputMute Knob1 Knob2 Knob3 Decay 0–100 Tone 0–10 0–100 Page01 Adjusts the amount of effected sound Sets the duration of the reverberations. Adjusts the tone. that is mixed with the original sound. PreD 1–200 0–10...
- Page 55 This effect reproduces the ambience of a room, to create spatial depth. Knob1 Knob2 Knob3 Size 1–100 Tone 0–10 0–100 Page01 Adjusts the amount of effected sound Sets the size of the space. Adjusts the tone. that is mixed with the original sound. 0–10 P Level 0–150...
- Page 56 Effect Types and Parameters PedalVx This simulates a vintage British wah pedal. Knob1 Knob2 Knob3 Freq 1–50 P DryMX 0–100 P Level 0–150 Page01 Adjusts the emphasized frequency. Adjusts the mix with the unaffected sound. Adjusts the output level. Page02 PedalCry This simulates a vintage CRYBABY wah pedal.
- Page 57 Table 1 Type Modeled cabinet and speakers FD COMBO 2x12 Fender Twin Reverb ('65) cabinet with 2x12-inch Jensen speakers DELUXE-R 1X12 Fender Deluxe Reverb cabinet with 1x12-inch Jensen speaker FD VIBRO 2x10 Fender Vibroverb ('63) cabinet with 2x10-inch Jensen speakers US BLUES 4x10 Fender Tweed Bassman cabinet with 4x10-inch Jensen speakers VX COMBO 2x12...
-
Page 58: Troubleshooting
Troubleshooting The unit will not turn ON An effect is not working Confirm that the POWER switch is set I f t h e ef fe c t p ro c e s s i n g c a p a c i t y i s to "ON". -
Page 59: Specifications
PRE/POST (switch selectable) GND LIFT (switch selectable) Control input For FP01/FP02/FS01 Power AC adapter DC9V (center minus plug), 500 mA (ZOOM AD-16) Batteries 6 hours of continuous operation using 4 AA alkaline batteries Bus power Dimensions G3 170mm(D) x 234mm(W) x 54mm(H) - Page 60 Manufacturer names and product names mentioned in this patch list are trademarks or registered trademarks of their respective owners and do not indicate any affiliation with ZOOM CORPORATION. All product and artist names are intended only to illustrate sonic characteristics that were used as reference in the development of this product.