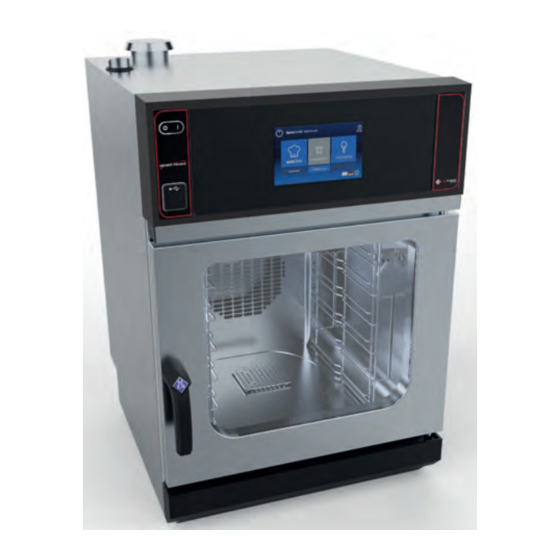
Henny Penny FlexFusion FSEN610 Operating Manual
Electric spacesaver (plus)
Hide thumbs
Also See for FlexFusion FSEN610:
- Installation manual (48 pages) ,
- Service instructions manual (82 pages)
Table of Contents
Advertisement
Quick Links
Read the operating instructions prior to commissioning
FlexFusion® ELECTRIC
SPACE$AVER (PLUS)
FM05-161-G
en-US
Operating
manual
Model
FSEN
610
FSEN605
Unit
M
En
Versio
od
er
n
el
gy
ty
pe
Spa
S
El
HandCl
ceC
K
ec
ean
omb
E
tri
WaveCl
i
C
c
ean
Mag
O
icPil
D
4-point
ot
61
core
0T
temper
G
ature
2
controll
er
E
K
Softwar
E
e
C
version:
O
2.0
D
61
0T
G
2
Advertisement
Table of Contents

Related Manuals for Henny Penny FlexFusion FSEN610


Summary of Contents for Henny Penny FlexFusion FSEN610
- Page 1 Operating manual Read the operating instructions prior to commissioning FlexFusion® ELECTRIC SPACE$AVER (PLUS) Model FSEN FSEN605 Unit Versio HandCl WaveCl icPil 4-point core temper ature controll Softwar version: FM05-161-G en-US...
- Page 2 Operating and display elements a On Off "I O" button f "Manual cooking" button b Unit controller button g "Unit functions" button c Information strip h "Automatic cooking" button d Help button i Operating element with touchscreen e Language selection button j USB port Operating instructions...
- Page 3 Henny Penny Corporation P.O.Box 60 Eaton,OH 45320 Phone +1 937 456-8400 Fax +1 937 456-8402 Toll free in USA Phone +1 937 417-8417 Fax +1 937 417-8434 www.hennypenny.com Operating instructions...
-
Page 4: Table Of Contents
Directory of contents 1 Introduction ................. 9 1.1 About this manual ................ 9 1.1.1 Explanation of signs ................ 10 1.2 Intended use ................... 11 1.3 Warranty .................. 11 2 Safety instructions ............ 12 3 Description of the unit ............. 15 3.1 Overview of the unit ............... 15 3.2 Features .................. 15 3.2.1 Characteristics .................. - Page 5 Directory of contents 4.5 Unit functions menu ............... 27 4.5.1 Accessing the main menu ............... 28 4.5.2 Opening the Unit functions menu ............ 28 4.5.3 Changing the basic settings .............. 29 4.5.4 Retrieving unit information ............... 31 4.5.5 Setting the date and time ................ 31 4.5.6 Presetting the language selection ...
- Page 6 Directory of contents 4.9 Creating and managing your own cooking programs .... 63 4.9.1 Creating a cooking program .............. 63 4.9.2 Saving the cooking program .............. 64 4.9.3 Exporting a cooking program .............. 67 4.10 Automatic cooking (autoChef) ............ 68 4.10.1 Opening the Automatic cooking menu .......... 68 4.10.2 Finding and opening a cooking program ...
- Page 7 Directory of contents 5.12.5 Starting cleaning .................. 85 5.12.6 Drying the cooking chamber .............. 85 5.13 Removing and installing the air diverter ........ 85 5.14 Inspecting the unit ................ 86 5.14.1 Performing a visual inspection .............. 86 5.14.2 Using CombiDoctor to run the self-diagnosis program (optional) .. 86 6 Troubleshooting ...
-
Page 8: Directory Of Contents
Directory of contents Operating instructions... -
Page 9: 1 Introduction
Introduction 1 Introduction 1.1 About this manual The operating instructions are part of the unit and contain information: • on safe operation, • on cleaning and care • on remedial actions in case of faults. Observe the following notes and adhere to them: •... -
Page 10: Explanation Of Signs
Introduction 1.1.1 Explanation of signs Imminent danger DANGER Failure to comply will lead to death or very severe injuries. Potential danger WARNING Failure to comply can lead to death or very severe injuries. Dangerous situation CAUTION Failure to comply can lead do slight to moderately severe injuries. Property damage NOTICE Failure to comply can cause property damage. -
Page 11: Intended Use
Introduction 1.2 Intended use This unit is intended to be used solely for commercial purposes, particularly in commercial kitchens. This unit may only be used with suitable accessories and for the cooking of food. It is forbidden to use the unit for other purposes, which include the following: •... -
Page 12: 2 Safety Instructions
Safety instructions 2 Safety instructions The unit complies with applicable safety standards. Residual risks associated with operation or risks resulting from incorrect operation cannot be ruled out and are mentioned specifically in the safety instructions and warnings. The operator must be familiar with regional regulations and observe them. - Page 13 Safety instructions Fire prevention Risk of fire from dirt and grease deposits • Clean the unit when finished using it. • Do not use the unit as a deep fat fryer. • Clean cooking chamber regularly and remove collected grease. Risk of fire from overheating •...
- Page 14 Safety instructions • Do not clean the housing with highly abrasive sponges. • Follow the instructions of the cleaning agent manufacturer. • Do not shock the unit by cooling it abruptly. • Clean the cooking chamber carefully. The cooking chamber sensor protrudes into the cooking chamber.
-
Page 15: 3 Description Of The Unit
Description of the unit 3 Description of the unit The unit is a hot-air steamer suitable for most cooking methods used in commercial kitchens. Selectable use of hot air, unpressurized live steam, individually, in succession or combined with moist and dry heat. -
Page 16: Barcode Scanner
Description of the unit Software • Cooking programs import function • Cooking program protection • Favorites • ChefsHelp • QualityControl • VideoAssist • FamilyMix • Time2Serve • PerfectHold • ClimaSelect plus • GreenInside • Eco mode • Steam Exhaust System (SES) •... -
Page 17: Videoassist
Description of the unit 3.2.5 VideoAssist VideoAssist can be used to display videos with additional explanations regarding operation. 3.2.6 WaveClean automatic cleaning With WaveClean automatic cleaning, the cooking chamber is cleaned with the aid of a cleaning cartridge intended specifically for the program and then rinsed clean. -
Page 18: Expanded Cooking Functions
Description of the unit Perfection (regeneration) Perfection is a cooking mode, in which cooled food to be cooked can be kept warm and prepared in a short time in a temperature range of 30 °C (86 °F) to 180 °C (356 °F). Delta-T cooking Delta-T cooking is a cooking mode where the cooking temperature depends on the core temperature of the food being cooked. - Page 19 Description of the unit With Ready2Cook, the cooking chamber can automatically be heated or cooled to the correct starting temperature. A screen-filling display gives information during the procedure about the status. Start-time selection When using start time selection, temperatures that promote the growth of INFORMATION harmful microorganisms on the food being cooked can occur in the cooking chamber.
- Page 20 Description of the unit FamilyMix With the expanded cooking function FamilyMix, the appropriate cooking programs are displayed in the Automatic cooking (autoChef) menu for the currently set cooking mode. The cooking programs displayed have the same cooking climate and an identical or shorter cooking time.
-
Page 21: Core Temp. Measurement
Description of the unit 3.3.4 Core temp. measurement When using core temperature measurement, the temperature inside the food being cooked is measured by means of a core temperature sensor. As soon as the target core temperature is reached, the cooking process is ended automatically or, in the case of a multi-step cooking program, the next cooking step starts. - Page 22 Description of the unit Image: "Automatic cooking" menu, autoChef a Main menu button f Help button b Back button g Category field c autoChef button h Next page arrow symbol d Barcode scanner button e Information strip Image: "Manual cooking" menu a Main menu button d Help button b Back button...
-
Page 23: Loading Capacities
Description of the unit Image: "Unit functions" menu a Main menu button d Help button b Back button e Next page arrow symbol f Manual cleaning field c Information strip 3.5 Loading capacities 3.5.1 Plate capacity during regeneration The cooking time and cooking temperature depend on the number of plates in the cooking chamber. -
Page 24: Core Temperature Standard Setting
Description of the unit Cooking mode Standard value Setting range Change increments (°C (°F)) (°C (°F)) (°C (°F)) Hot air 180 (356) 30 (86 ) - 300 1 (33,8 ) (572) Regeneration 50 (122 ) 30 (86 ) - 180 1 (33,8 ) (356) 3.6.2 Core temperature standard setting... -
Page 25: 4 Operating The Unit
Operating the unit 4 Operating the unit Explanatory video clips can be selected under VideoAssist by press the Help INFORMATION button. Reduction of acrylamide level INFORMATION Regulation EU 2017/2158 applies in Europe with effect from 2018.04.11. This requires that the lowest possible acrylamide level must be achieved when cooking potato products. -
Page 26: Switching Off
Operating the unit 4.2.2 Switching off Fans may continue to run for cooling; the unit's control system is disconnected INFORMATION from power. Press the On Off "I O" button to "O". The unit is now off. 4.3 Opening and closing the cooking chamber door 4.3.1 Opening Image: Opening the 1-step door lock 1. -
Page 27: Loading And Emptying The Unit
Operating the unit 4.4 Loading and emptying the unit Risk of scalding from hot liquid CAUTION • Never insert a food-containing tray with cooking liquid above eye level. • Use only suitable trays to hold food. The food-containing trays must rest se- curely on the support brackets. -
Page 28: Accessing The Main Menu
Operating the unit Image: Main menu a Stand-by button e Language selection button b Information strip f "Unit functions" button c FlexiHelp button g "autoChef" button d "myCooking" button The equipment information is displayed without entering a password. INFORMATION 4.5.1 Accessing the main menu The main menu can be accessed directly from every program step. -
Page 29: Changing The Basic Settings
Operating the unit 4.5.3 Changing the basic settings The basic settings for operation can be displayed, changed and exported by INFORMATION entering the password "111". Opening the setting menu Prerequisite Unit functions menu open 1. Tap the "Settings" field. The PIN window opens. 2. - Page 30 Operating the unit Delete user's own cooking programs Delete all the cooking programs created by the user. Setting units Set the units for temperature and liquid quantities. The possibilities for temperature are °C and °F. The possibilities for volume are mL, fl.oz (Imp.) and fl.oz (US) Display the error memory Retrieve stored faults for forwarding to service partners.
-
Page 31: Retrieving Unit Information
Operating the unit 4.5.4 Retrieving unit information The unit information contains data on the software and hardware version, the INFORMATION serial number of the unit and contact data. Prerequisite The Setting menu is displayed Tap the "Unit information" field. The Unit information window is displayed. Unit information can now be read. -
Page 32: Setting Favorites
Operating the unit The currently set language cannot be deselected. INFORMATION Prerequisite Settings menu displayed 1. Tap the "Language selection" field. The Languages menu is displayed. 2. The language is selected or deselected by tapping the fields with national flags. The selected languages are displayed. -
Page 33: Activating And Canceling Inhibit Operation
Operating the unit 4.5.8 Activating and canceling inhibit operation The display can be locked either by tapping and holding the information bar or INFORMATION automatically after a specified time without touching the display. The time until the display is locked is set in the parameter level. Activating inhibit operation Prerequisite The "Inhibit operation ON"... -
Page 34: Setting The Water Filter Maintenance
Operating the unit 2. The Brightness in percent menu is displayed. The roller shows the current value. 3. Using a swipe gesture, set the roller to the desired value. 4. Press the "OK" button. The background lighting is set. 4.5.10 Setting the water filter maintenance Prerequisite Settings menu displayed 1. - Page 35 Operating the unit Basic setting parameters The unit is delivered with presets. The values in the following list can be modified in the parameter level. Basic setting Parameter Standard Range of Explanation value adjustment Lockscreen Lockscreen 0 = Deactivated Activate or deactivate screen locking. Screen locking is activated after a certain 1 = Activated period of time if entries are no longer made...
-
Page 36: Importing Video
Operating the unit 4.5.12 Importing video Prerequisite WMV format Data size < 50 MB 1. On a USB stick, create the directory VideosCustom . 2. Save the desired video in this directory. USB stick prepared. 3. Insert USB stick into MultiPort. 4. - Page 37 Operating the unit Image: Setting the cooking temperature window a Confirm button c Setting window d Temperature field b Rollers Prerequisite Cooking program selected 1. Tap the Cooking temperature field. The Setting window is displayed. 2. Tap the Temperature field. 3.
-
Page 38: Setting The Cooking Time And Continuous Operation
Operating the unit 4.6.2 Setting the cooking time and continuous operation Setting the cooking time Image: Setting the cooking time a OK button d Setting window b Cooking time button e Cooking time field c Rollers f Start button Prerequisite Cooking program selected 1. - Page 39 Operating the unit Setting continuous operation Image: Setting the cooking time to continuous operation a OK button d Cooking time field b Continuous operation button e Start button c Setting window Prerequisite Cooking program selected 1. Tap the Cooking time field. The Setting window is displayed.
-
Page 40: Using Start Time Selection
Operating the unit 4.6.3 Using start time selection Image: Changing the "Start time selection setting" window a Start time selection field d Confirm button b Start time setting window e Start time field c Fan button Prerequisite Cooking program selected Additional functions menu open 1. - Page 41 Operating the unit Image: "Core temperature setting" window a Confirm button c Setting window b Temperature roller d Core temperature field Prerequisite Cooking program selected Cooking time set 1. Tap the Cooking time field. The Cooking time setting window is displayed. 2.
-
Page 42: Setting The Fan Speed And Direction Of Rotation
Operating the unit 4.6.5 Setting the fan speed and direction of rotation Image: Setting the fan speed and direction of rotation a Fan setting field d Setting window b Direction of rotation roller e Fan speed roller c OK button Prerequisite Cooking program selected 1. -
Page 43: Using Perfection (Regeneration)
Operating the unit 4.6.6 Using Perfection (regeneration) Image: "Perfection" cooking mode setting window d Cooking time field a "Start" button b Cooking mode field e Moisture field c Temperature field Starting Perfection Prerequisite Food to be cooked in the insert on the shelf Door closed Manual cooking menu displayed 1. -
Page 44: Using Perfecthold
Operating the unit 2. Wait until the cooking time ends. Heating of the unit is ended. The "Stopp" button is replaced with the "Start" button. The cooking time is reset. Perfection is ended. 4.6.7 Using PerfectHold Image: PerfectHOLD setting window a Moisture button c Temperature field b Cooking time field... -
Page 45: Ready2Cooksetting
Operating the unit 4.6.8 Ready2CookSetting Image: Window for setting the "Ready2Cook" parameters d Read button a Rollers b Write button e Display c Keyboard button Prerequisite Unit function menu open 1. Tap the Settings field. 2. Enter PIN 111 and confirm it. 3. -
Page 46: Rackcontrolusing 2
Operating the unit Image: Window for selecting the Steam Exhaust System (SES) a Steam Exhaust System field Prerequisite ChefsHelp information step created 1. Tap on Additional function. 2. Tap the SES field. The "ON" display switches automatically to "OFF" and vice versa. - Page 47 Operating the unit RackControlSetting and starting 2 Image: RackControl2 cooking time setting window a Settings field d Start time button b Shelf field e Confirm button c Start time window Image: RackControl2 core temperature setting window a Confirm button d Settings field b Core temperature button e Start time field c Rollers...
- Page 48 Operating the unit 6. Select the desired shelf. 7. Configure and confirm the desired settings (See "Setting the cooking time" and "Setting the core temperature"). RackControl2 is set for the selected shelf. 8. Configure settings for additional shelves as necessary. 9.
-
Page 49: Time2Servesetting
Operating the unit 4.6.11 Time2ServeSetting The cooking time can be set for up to 23 hours and 59 minutes in 1-minute in- INFORMATION crements. Continuous operation is stopped automatically after 23 hours and 59 minutes. The hours and minutes appear in the display. Image: Time2Serve cooking time setting window c OK button a Rollers... -
Page 50: Familymixusing
Operating the unit 4.6.12 FamilyMixUsing Image: FamilyMix selection window a Product overview field c FamilyMix field b Product field d Settings field Prerequisite Manual cooking field is selected Cooking program loaded 1. Tap the Settings field. 2. Tap the FamilyMix field. 3. - Page 51 Operating the unit Continue cooking can be set for up to 5 minutes in 1-minute increments. INFORMATION Image: Cooking time extension selection window a Continue cooking button c Continue cooking field b Stop button d Settings field Prerequisite Cooking program selected The RackTimer function is set 1.
-
Page 52: Setting Manual Steaming
Operating the unit 4.6.14 Setting manual steaming Image: Manual steaming setting window a Fan setting field c Temperature field b Moisture level field d Manual steaming field Prerequisite The cooking program is running 1. Tap the Unit functions field. Unit functions menu open. 2. -
Page 53: Qualitycontrolusing
Operating the unit Image: Insert rest step window a Start button b Rest step field Prerequisite Automatic cooking menu open Cooking program selected 1. Select the New step function. 2. Tap the Resting step field. The Manual cooking menu appears. 3. -
Page 54: Using Lt Cooking
Operating the unit Image: Window for selecting QualityControl a field QualityControl Prerequisite Unit functions menu open 1. Tap the "Settings" field. 2. Enter PIN 111 and confirm it. The QualityControl field is displayed. 3. Switch the function on or off as necessary. 4. - Page 55 Operating the unit Starting LT cooking Prerequisite Food to be cooked on insert in shelf Core temperature sensor set Door closed Manual cooking menu displayed 1. Tap the "LT cooking" mode field. The "Cooking mode" window is displayed. 2. Make the settings. The "Cooking mode"...
-
Page 56: Using Delta-T Cooking
Operating the unit 4.6.18 Using Delta-T cooking Image: Delta-T cooking mode setting window d Core temperature field a "Start" button b Cooking mode field e Moisture field c Cooking temperature difference field Starting Delta-T cooking Prerequisite Food to be cooked on insert in shelf Core temperature sensor set Door closed Manual cooking menu displayed... -
Page 57: Using The Barcode Scanner
Operating the unit 2. Wait until the cooking time ends. Heating of the unit is ended. The "Stopp" button is replaced with the "Start" button. The cooking time is reset. Delta-T cooking is ended. 4.6.19 Using the barcode scanner Image: Barcode scanner selection window a Barcode scanner button Prerequisite Barcode scanner connected 1. -
Page 58: Preparing A Usb Stick For Importing And Exporting
Operating the unit 4.6.21 Preparing a USB stick for importing and exporting Prerequisite USB stick is formatted USB stick not write-protected 1. Create a folder structure for importing and exporting. 2. Create a folder with the name "autoChefImages". Data exchange of photos in PNG format, resolution of 95x69 pixels, maximum resolution 150 KB. -
Page 59: Using The Core Temperature Sensor
Operating the unit The HACCP log can also be transferred via a kitchen guiding system. INFORMATION 4.7 Using the core temperature sensor Risk of injury from a bursting core temperature sensor WARNING • The core temperature sensor can burst as the result of overheating of the measuring tip. -
Page 60: Measuring The Core Temperature When Cooking Frozen Food
Operating the unit When cooking fowl, insert the core temperature sensor into the inside of the leg. 4.7.2 Measuring the core temperature when cooking frozen food Image: Drilling an insertion duct with a hand drill 1. Use a hand drill to make an insertion duct for inserting the sensor. 2. -
Page 61: Manual Cooking (Mycooking)
Operating the unit 2. On the second page, tap the "Measure core temperature" button. The core temperature is displayed. 4.8 Manual cooking (myCooking) Cooking modes and other functions are available in the Manual cooking mode. Selecting one of the components automatically creates a single-step cooking program. - Page 62 Operating the unit 3. Tap the OK button. The Setting window closes. 4. Tap the Cooking time field. The Setting window is displayed. 5. Tap the Continuous operation button or Cooking time button or Core temperature button. 6. Use a swipe gesture to set the rollers to the desired value. 7.
-
Page 63: Creating And Managing Your Own Cooking Programs
Operating the unit 13.Set the fan speed and direction of rotation. 14.Use a swipe gesture to set the rollers to the desired value. 15.Tap the OK button. The Setting window closes. The cooking program step can be started. The cooking mode can also be changed while entering the cooking step. •... -
Page 64: Saving The Cooking Program
Operating the unit Adding a cooking program step 1. Swipe up to open the next page. The next page is displayed. 2. Tap the "Add a preceding step" field. 3. Tap the "Add a following step" field. The "New step" window opens. 4. - Page 65 Operating the unit Cooking programs that have been created can be saved prior to starting or af- INFORMATION ter completion of the cooking program. To save a cooking program, at least one cooking program name and one cate- INFORMATION gory must be specified. Image: Saving the cooking program in the window a "Cooking program name"...
- Page 66 Operating the unit Entering a category 1. Tap the "Category" field. The Automatic cooking menu is displayed. 2. Tap the field for the desired Category . The category is set. The Automatic cooking menu closes. The category is displayed in the Save window. Entering a subcategory (optional) 1.
-
Page 67: Exporting A Cooking Program
Operating the unit 4. Tap the "Recipes in unit" button or the "Recipes on USB stick" button. The recipe is set. The Recipe menu closes. The name of the recipe is displayed in the Save window. Selecting favorites (optional) 1. Tap the "Show favorites" field. The Show favorites menu is displayed. -
Page 68: Automatic Cooking (Autochef)
Operating the unit Prerequisite Cooking program open Cooking program saved USB stick inserted 1. Tap the Additional functions tab. The Tab window is open. 2. Tap the "Export cooking programs" field. The Operating instructions window opens. 3. Read the operating instructions displayed. 4. - Page 69 Operating the unit Arrow symbols in a window always display the next or previous page. A swipe INFORMATION gesture upward or downward opens the corresponding window. Prerequisite Unit switched on Main menu displayed 1. Tap the "autoChef" button. The Automatic cooking menu is displayed. 2.
-
Page 70: Starting The Cooking Program
Operating the unit 3. Tap the Find cooking program field. The Search window is displayed. 4. Enter the letters of the name you are seeking on the keyboard. A filtered list appears in the Result display. 5. Tap the field with the name you are seeking. The cooking program is selected and being loaded. -
Page 71: Modifying The Cooking Program
Operating the unit 4.10.5 Modifying the cooking program Tabs are available only within cooking programs or the cooking step display. INFORMATION Tapping the tabs provides faster access to their functions. The current step in the cooking program is highlighted and can be modified. All INFORMATION settings of a step can be modified. -
Page 72: Deleting A Cooking Program
Operating the unit 4.10.6 Deleting a cooking program Prerequisite Cooking program open Cooking program not started 1. Tap the Additional functions tab. The Tab window is open. 2. Tap the "Delete cooking program" field. The Delete window is displayed. 3. Tap the "Yes" button. The cooking program is deleted. - Page 73 Operating the unit 3. Tap the OK button. All cooking programs that you created are exported from the cookbook to the USB stick. The Confirm window is displayed. 4. Tap the OK button. Close the Confirm window. The cooking programs have been exported. Importing cooking programs When importing, the new cooking programs are added to the cookbook.
-
Page 74: Videoassist
Operating the unit 3. Tap the Confirm button. All cooking programs on the USB stick are imported into the cookbook. The Operating instructions window is displayed. 4. Tap the "OK" button. The cooking programs have been imported. 4.11 VideoAssist 4.11.1 Watching a video Prerequisite Videos saved on the unit. -
Page 75: Pausing And Ending Operation
Operating the unit 3. Touch the Confirmation field. The marked videos are deleted. 4.12 Pausing and ending operation Switch off the unit during pauses and at end of operation. 4.12.1 Performing a hygiene flush after an extended period of idleness For reasons of hygiene, flush the water lines in the unit and on-site water lines before using the unit. -
Page 76: 5 Cleaning And Caring For The Unit
Cleaning and caring for the unit 5 Cleaning and caring for the unit Risk of burns from hot surfaces CAUTION • Allow surfaces to cool prior to cleaning. Risk of property damage from extremely abrupt cooling NOTICE • Do not shock the unit by cooling it abruptly. Risk of property damage from improper cleaning NOTICE •... -
Page 77: Cleaning The Housing
Cleaning and caring for the unit 5.3 Cleaning the housing Prerequisite Unit switched off and cooled down Clean the housing with warm water and a commercially available detergent. 5.4 Cleaning the door handle, operating elements and control panel Risk of property damage from improper cleaning NOTICE •... -
Page 78: Cleaning The Door Seal
Cleaning and caring for the unit 5.6 Cleaning the door seal Risk of property damage from improper cleaning NOTICE Animal fats in combination with high temperatures can damage the door seal very quickly if it is not maintained properly. • Clean the door seal regularly. •... -
Page 79: Cleaning The Steam Outlet
Cleaning and caring for the unit 5.8 Cleaning the steam outlet Risk of property damage from deposits NOTICE • Inspect the steam outlet nozzle and connected piping for deposits. Use a liquid cleaner containing at most 20% sodium or potassium hydroxide. INFORMATION Rinsing with water is not necessary. -
Page 80: Removing Calcium Deposits From The Unit
We assume no responsibil- ity or liability for damage caused by unsuitable cleaning agents. Claims against Henny Penny cannot be justified on the basis of such damage, not even in the context of warranty or guarantee. -
Page 81: Preparing For Cleaning
Cleaning and caring for the unit Forced rinse INFORMATION Automatic forced rinse is triggered in the following situations. • Cleaning is canceled manually. Canceling within the first 10 minutes of cleaning does not trigger an automatic forced rinse. • Cleaning is canceled automatically in the event of a fault. •... -
Page 82: Inserting The Cleaning Cartridge
Cleaning and caring for the unit 4. Tap the Confirm button. The Select cleaning level window is displayed. 5. Tap the "Start Stopp" button. If necessary, the cooking chamber is cooled down until the cleaning temperature of 60 °C (140 °F) is reached. 5.11.3 Inserting the cleaning cartridge Use only cleaning cartridges with an undamaged wax seal. -
Page 83: Starting Automatic Cleaning
Cleaning and caring for the unit 5.11.4 Starting automatic cleaning Never operate the unit in the automatic cleaning mode without a cleaning car- INFORMATION tridge. Requirements Water connection is open The unit is on Cleaning level selected Cleaning cartridge inserted Cooking zone temperature at 60 °C (140 °F) Tap the "START STOPP"... -
Page 84: Cleaning The Cooking Chamber Manually
Cleaning and caring for the unit 5.12 Cleaning the cooking chamber manually 5.12.1 Preparing the cooking chamber Risk of property damage from improper cleaning NOTICE • Do not clean the unit with a high-pressure cleaner or water jet. Prerequisite GN containers, baking sheets and grates removed from the cooking chamber 1. -
Page 85: Starting Cleaning
Cleaning and caring for the unit 5.12.5 Starting cleaning The acting time has elapsed, the cleaning process starts automatically. The cooking chamber is heated. The display shows the remaining time. 5.12.6 Drying the cooking chamber Prerequisite Cooking chamber door closed 1. -
Page 86: Inspecting The Unit
Cleaning and caring for the unit 5.14 Inspecting the unit 5.14.1 Performing a visual inspection Risk of property damage from improper inspection NOTICE • Inspect in accordance with the inspection intervals. • Have inspections performed by a capable user. • In the event of damage or signs of wear, contact customer service immedi- ately and stop using the unit. - Page 87 Cleaning and caring for the unit Prerequisite Water connection open Power optimization system deactivated (optional) Cooking chamber empty, no grates and no containers, with hang-in frame or tray trolley Unit switched on No faults displayed Settings menu displayed 1. Tap the "CombiDoctor" field. 2.
-
Page 88: 6 Troubleshooting
Troubleshooting 6 Troubleshooting If a fault occurs during operation, the fault number and fault message are displayed. If the cooking results or cleaning results with WaveClean vary without a fault message being displayed, use CombiDoctor to analyze the cause. 6.1 Emergency operation In order to allows limited use in case of error, the unit has several different emergency programs. -
Page 89: Nameplate
Troubleshooting Error no. Fault message displayed Description Action • Vapour sensor defective Steam elimination is now controlled • Contact Customer service solely by the software. This results in higher water consumption. • Water pressure too low As continuous fault message •... -
Page 90: 7 Carrying Out Maintenance
Carrying out maintenance 7 Carrying out maintenance The manufacturer recommends professional cleaning of the unit by trained technical personnel in 12-month intervals. With a heavier use, a maintenance interval of 6 months is recommended. Operating instructions... -
Page 91: 8 Disposing Of Unit In An Environmentally Responsible
Disposing of unit in an environmentally responsible manner 8 Disposing of unit in an environmentally responsible manner The unit has been designed to provide a lifetime of 10 years with average use. Do not dispose of unit or the unit's components together with non- recyclable waste. -
Page 92: Keyword Index
Keyword index Automatic cooking (autoChef) Low-temperature cooking ...... 18 Deleting a cooking program...... 72 Automatic cooking (autoChef) Main menu.......... 21, 28 Exporting a cooking program.... 72 Manual cooking .......... 61 Finding and opening a cooking program .. 69 Creating a cooking program step.... 61 Importing a cooking program .... - Page 96 Henny Penny Corporation P.O.Box 60 Eaton,OH 45320 Phone +1 937 456-8400 Fax +1 937 456-8402 Toll free in USA Phone +1 937 417-8417 *FM05-161-G* Fax +1 937 417-8434 www.hennypenny.com Henny Penny Corp., Eaton, Ohio 45320, Revised 2/24/2020...