
Related Manuals for Henny Penny FlexFusion GAS PLATINUM COMBI Series


Summary of Contents for Henny Penny FlexFusion GAS PLATINUM COMBI Series
- Page 1 Operating Read the operating instructions prior to commissioning manual FlexFusion® GAS PLATINUM COMBI Model FPG-615 FPG-621 FPG-115 FPG-121 FPG-215 FPG-221 FM05-118-D en-US...
-
Page 2: Operating And Display Elements
Operating and display elements a On Off button f "Automatic cooking" button b Help button g "Unit functions" button c Operating element with h Back button touchscreen d "Manual cooking" button i Information strip e Language selection button Operating instructions... - Page 3 Henny Penny Corporation P.O.Box 60 Eaton,OH 45320 Phone +1 937 456-8400 Fax +1 937 456-8402 Toll free in USA Phone +1 937 417-8417 Fax +1 937 417-8434 www.hennypenny.com Operating instructions...
-
Page 4: Table Of Contents
Directory of contents 1 Introduction ................. 9 1.1 About this manual ................ 9 1.1.1 Explanation of signs ................ 10 1.2 Intended use ................... 11 1.3 Warranty .................. 11 2 Safety instructions ............ 12 3 Rules of conduct when the smell of gas is detected .. 15 4 Description of the unit ............. 16 4.1 Overview of the unit ... - Page 5 Directory of contents 6.2.2 Switching off .................... 32 6.3 Opening and closing the cooking chamber door ...... 32 6.3.1 Opening the 1-step door lock .............. 33 6.3.2 Closing the 1-step door lock .............. 33 6.3.3 Opening the 2-step door lock .............. 33 6.3.4 Closing the 2-step door lock ...
- Page 6 Directory of contents 6.6.20 Preparing a USB stick for importing and exporting ....... 68 6.6.21 Inserting and removing the USB stick ........... 69 6.7 Using the core temperature sensor .......... 69 6.7.1 Measuring with a 4-point core temperature sensor ......... 70 6.7.2 Measuring the core temperature when cooking frozen food ...
- Page 7 Directory of contents 7.11.4 Starting automatic cleaning .............. 95 7.11.5 Canceling automatic cleaning ............... 95 7.11.6 Ending automatic cleaning .............. 95 7.12 Cleaning the cooking chamber manually ........ 96 7.12.1 Preparing the cooking chamber ............ 96 7.12.2 Starting the cleaning program ............... 96 7.12.3 Spraying the cleaner ...
-
Page 8: Directory Of Contents
Directory of contents Operating instructions... -
Page 9: 1 Introduction
Introduction 1 Introduction 1.1 About this manual The operating instructions are part of the unit and contain information: • on safe operation, • on cleaning and care • on remedial actions in case of faults. Observe the following notes and adhere to them: •... -
Page 10: Explanation Of Signs
Introduction 1.1.1 Explanation of signs Imminent danger DANGER Failure to comply will lead to death or very severe injuries. Potential danger WARNING Failure to comply can lead to death or very severe injuries. Dangerous situation CAUTION Failure to comply can lead do slight to moderately severe injuries. Property damage NOTICE Failure to comply can cause property damage. -
Page 11: Intended Use
Introduction 1.2 Intended use This unit is intended to be used solely for commercial purposes, particularly in commercial kitchens. This unit may only be used with suitable accessories and for the cooking of food. It is forbidden to use the unit for other purposes, which include the following: •... -
Page 12: 2 Safety Instructions
Safety instructions 2 Safety instructions The unit complies with applicable safety standards. Residual risks associated with operation or risks resulting from incorrect operation cannot be ruled out and are mentioned specifically in the safety instructions and warnings. The operator must be familiar with regional regulations and observe them. - Page 13 Safety instructions Escaping gas or exhaust Risk of asphyxiation and explosion from escaping gas • Follow the rules of conduct when the smell of gas is detected (see "Rules of conduct when the smell of gas is detected"). Risk of asphyxiation and poisoning from exhaust gases •...
- Page 14 Safety instructions Risk of injury from improper cleaning • Clean the cooking chamber carefully. The cooking chamber sensor protrudes into the cooking chamber. Risk of property damage from improper cleaning • Clean the unit after using it. • Do not clean the unit with a high-pressure cleaner. •...
-
Page 15: 3 Rules Of Conduct When The Smell Of Gas Is Detected
Rules of conduct when the smell of gas is detected 3 Rules of conduct when the smell of gas is detected Risk of asphyxiation and explosion from escaping gas DANGER Rules of conduct when the smell of gas is detected. •... -
Page 16: 4 Description Of The Unit
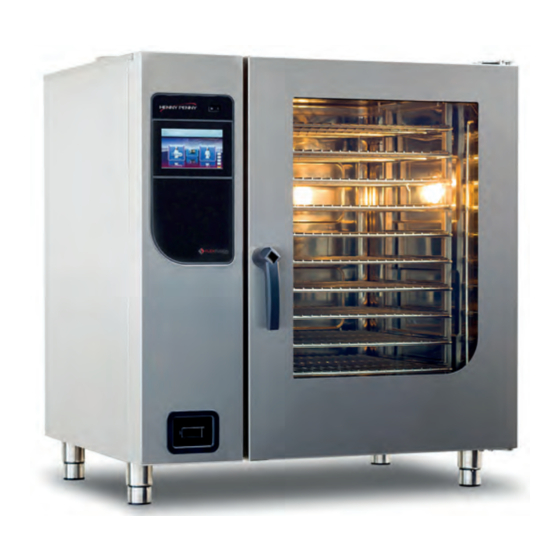
Description of the unit 4 Description of the unit 4.1 Overview of the unit 4.1.1 Tabletop unit Image: Unit with tray rack trolley a Tray rack j Hand shower b Insulating disk k Nameplate c Door handle l Base frame (optional) d Cooking chamber door m Unit leg e Tray rack trolley (optional) -
Page 17: Pedestal Unit
Description of the unit 4.1.2 Pedestal unit Image: Unit with tray trolley a Tray rack j Hand shower b Insulating disk k Nameplate c Door handle l Unit leg d Cooking chamber door m Operating unit e Guide rail (right) n Housing f Tray trolley o Air inlet nozzle... -
Page 18: Barcode Scanner
Description of the unit • Two-step door lock (optional); this feature is standard on size 20 units • Power optimization system (optional) • Ethernet connection (optional) • Cooking chamber door hinged at right • Cooking chamber door hinged at left (optional), not on size 20 floor-standing units •... -
Page 19: Preheat Bridge For The Models Fpg 215 And Fpg 221
Description of the unit 4.2.8 Preheat bridge for the models FPG 215 and FPG 221 Image: Preheat bridge The preheat bridge is placed on the lower edge of the cooking chamber opening on combisteamer models FPG 215 and FPG 221 when the cooking chamber is heating up or WaveClean is running and there is no tray trolley in the combisteamer. -
Page 20: Expanded Cooking Functions
Description of the unit Perfection (regeneration) Perfection is a cooking mode, in which cooled food to be cooked can be kept warm and prepared in a short time in a temperature range of 30 °C (86 °F) to 180 °C (356 °F). Delta-T cooking Delta-T cooking is a cooking mode, in which the cooking temperature depends on the core temperature of the food being cooked. - Page 21 Description of the unit With Ready2Cook, the cooking chamber can automatically be heated or cooled to the correct starting temperature. A screen-filling display gives information during the procedure about the status. Start-time selection When using start time selection, temperatures that promote the growth of INFORMATION harmful microorganisms on the food being cooked can occur in the cooking chamber.
- Page 22 Description of the unit FamilyMix With the expanded cooking function FamilyMix, the appropriate cooking programs are displayed in the Automatic cooking (autoChef) menu for the currently set cooking mode. The cooking programs displayed have the same cooking climate and an identical or shorter cooking time.
-
Page 23: Core Temperature Measurement
Description of the unit 4.3.4 Core temperature measurement When using core temperature measurement, the temperature inside the food being cooked is measured by means of a core temperature sensor. As soon as the target core temperature is reached, the cooking process is ended automatically or, in the case of a multi-step cooking program, the next cooking step starts. - Page 24 Description of the unit Image: Automatic cooking menu, autoChef a Back button e Help button f Category field b "autoChef" button c Barcode scanner button g Next page arrow symbol d Information strip h Separating bar Image: Manual cooking menu a Back button d "Hot air"...
-
Page 25: Touchscreen Operation
Description of the unit Image: Unit functions menu a Back button d Window e Manual cleaning field b Information strip c Help button f Next page arrow symbol 4.4.1 Touchscreen operation The touchscreen can be operated with latex gloves. INFORMATION Tapping Display elements such as buttons, fields or tabs are selected or activated by tapping them. -
Page 26: Operating, Control And Display Element Functions
Description of the unit Scrolling The rollers are used to scroll up or down to display additional content. Swiping You use the swipe gesture to access fields to the right and left of the current display. 4.4.2 Operating, control and display element functions Symbol Operating and display element Function... -
Page 27: Display Elements
Description of the unit Symbol Operating and display element Function Language selection button • Indicates that the operating language for the unit can be selected here by tapping a country's flag Selection and the number of selectable languages can be specified in the Unit functions menu in the "Languages"... - Page 28 Description of the unit Symbol Display element Function Field Fields are areas in windows or menus defined by separating bars. Tapping fields opens functions and settings. Button Buttons are areas enclosed by borders in windows or menus. Tapping buttons confirms settings. Buttons control functions and are used to navigate in menus and windows.
-
Page 29: Loading Capacities
Description of the unit 4.5 Loading capacities 4.5.1 Plate capacity during regeneration Cooking time and cooking temperature depend on the number of plates. Version Plate diameter 26 cm 28 cm 32 cm (10,24 inch) (11,02 inch) (12,56 inch) FPG-615 FPG-621 FPG-115 FPG-121 FPG-215... -
Page 30: Temperature Standard Setting
Description of the unit 4.6.2 Temperature standard setting The setting range for the cooking zone temperature depends on the type of cooking. Cooking mode Standard value Setting range Change (°C (°F)) (°C (°F)) increments (°C (°F)) Steaming 100 (212 ) 30 (86 ) 130 1 (33,8 ) (266)-... -
Page 31: 5 Quick Introduction
Quick introduction 5 Quick introduction Operating instructions... -
Page 32: 6 Operating The Unit
Operating the unit 6 Operating the unit Explanatory video clips can be selected under VideoAssist by press the Help INFORMATION button. 6.1 Environmentally friendly operation When used properly, this combisteamer has very low energy consumption. Reduce the energy consumption in the following manner: •... -
Page 33: Opening The 1-Step Door Lock
Operating the unit 6.3.1 Opening the 1-step door lock Image: Opening the 1-step door lock 1. Rotate the door handle counterclockwise or clockwise. The cooking chamber door opens. If the door handle is released, it returns automatically to its initial position. INFORMATION 2. -
Page 34: Closing The 2-Step Door Lock
Operating the unit 1. Rotate the door handle to a horizontal position. The cooking chamber door opens, but is still held. 2. Continue rotating the door handle upwards. The cooking chamber door is no longer held. If the door handle is released, it returns automatically to its initial position. INFORMATION 3. -
Page 35: Loading And Emptying
Operating the unit 6.4.1 Loading and emptying Loading 1. Open cooking chamber door. 2. Insert food-containing trays into the hang-in frame. 3. Close the cooking chamber door. 4. Start the cooking process. Emptying 1. Open cooking chamber door. 2. Remove the food-containing trays. 3. -
Page 36: Loading And Emptying With A Tray Trolley
Operating the unit 4. Position the tray rack trolley at the unit. Lock the casters to prevent the trolley's rolling away. 5. Rotate the lever. The tray rack is now free to move. 6. Insert the tray rack completely until the rollers rest in the openings in the guide rail. -
Page 37: Unit Functions Menu
Operating the unit Loading with a tray trolley Prerequisite Food-containing trays resting securely on the tray trolley 1. Load the tray trolley. 2. Move the tray trolley in completely. 3. Pull the push handle out of the tray trolley. 4. Close the cooking chamber door. 5. -
Page 38: Opening The Unit Functions Menu
Operating the unit The equipment information is displayed without entering a password. INFORMATION 6.5.1 Opening the Unit functions menu Prerequisite Unit is on The Main menu is displayed Tap the "Unit functions" button. The Unit functions menu is displayed. 6.5.2 Changing the basic settings The basic settings for operation can be displayed, changed and exported by INFORMATION entering the password "111". - Page 39 Operating the unit Standby mode Deactivate the operation inhibit to set the standby mode. When the standby mode is active, the touchscreen goes dark after a set time. The cooking chamber light switches off. Setting the background lighting This setting is used to reduce the brightness of the touchscreen. CombiDoctor CombiDoctor uses a selectable self-diagnostic program to check the components for climate control and cleaning.
-
Page 40: Retrieving Unit Information
Operating the unit Eco display on or off Set the Eco display function. Select signal tones Selection of one of the four possible signal tones. Software update Update of the software via a USB flash drive. Import additional content Import of additional content via a USB flash drive. 6.5.3 Retrieving unit information The unit information contains data on the software and hardware version, the INFORMATION... -
Page 41: Presetting The Language Selection
Operating the unit 6.5.5 Presetting the language selection A maximum of 5 languages can be specified for language selection in the main INFORMATION menu. Highlighted fields represent the specified languages. INFORMATION Fields that are not highlighted are languages that have not been specified. The currently set language cannot be deselected. -
Page 42: Activating And Canceling Inhibit Operation
Operating the unit 2. Using a swipe gesture, set the roller to the desired display. 3. Tap the "OK" button. The Settings for favorites window closes. The favorites are set. 6.5.7 Activating and canceling inhibit operation The display can be locked either by tapping and holding the information bar or INFORMATION automatically after a specified time without touching the display. -
Page 43: Setting The Background Lighting
Operating the unit 2. Enter the password. Inhibit operation is canceled by entering the password "369". The lock symbol and the keypad disappear. The Help button appears in the information strip and the touchscreen is unlocked. 6.5.8 Setting the background lighting Image: Setting the brightness Prerequisite The Settings menu is displayed 1. -
Page 44: Possible Settings In The Parameter Level
Operating the unit The display shows the entered date on which the reminder for the water filter maintenance is to be given. The filtered water quantity since the last filter change is displayed. The date for water filter maintenance can be entered with the keyboard and confirmed with the "OK"... - Page 45 Operating the unit Basic setting Parameter Standard Range of Explanation value adjustment Cooking modes Preselected steaming 30 °C (86 °F) — Preset temperature for steaming temperature 130 °C (266 °F) Preset 30 °C (86 °F) — Preset temperature for combisteaming combisteaming 250 °C (482 °F) temperature...
-
Page 46: Importing Video
Operating the unit 6.5.11 Importing video Requirements WMV format Data size < 50 MB 1. Create the directory VideosCustom on a USB stick. 2. Save the desired video in this directory. USB stick prepared. 3. Insert the USB stick into the MultiPort. 4. -
Page 47: Importing Recipes
Operating the unit 7. Follow the operating instructions. Image imported. 6.5.13 Importing recipes Text and graphics must be separated when converting into HTML format. For INFORMATION instance, in Microsoft Word the text is saved under the file type using the save filter "Web page, filtered". - Page 48 Operating the unit Image: Cooking temperature setting window a Temperature field c Rollers b Setting window d Confirm button Prerequisite Cooking program selected 1. Tap the Cooking temperature field. The Setting window is displayed. 2. Tap the Temperature field. 3. Using a swipe gesture, set the rollers to the desired temperature. Swipe up / down to increase / decrease the cooking temperature.
-
Page 49: Setting The Cooking Time And Continuous Operation
Operating the unit 6.6.2 Setting the cooking time and continuous operation Setting the cooking time Image: Setting the cooking time a Cooking time field d Cooking time button b Setting window e Confirm button c Rollers Prerequisite Cooking program selected 1. - Page 50 Operating the unit Image: Setting the cooking time to continuous operation a Cooking time field c Continuous operation button b Setting window d Confirm button Prerequisite Cooking program selected 1. Tap the Cooking time field. The Setting window is displayed. 2.
-
Page 51: Setting The Core Temperature
Operating the unit 6.6.3 Setting the core temperature Image: Core temperature setting window for internal and external display a Core temperature field d Temperature roller b Setting window e Confirm button c Core temperature sensor type roller Prerequisite Cooking program selected Cooking time set 1. -
Page 52: Setting The Fan Speed And Direction Of Rotation
Operating the unit 6.6.4 Setting the fan speed and direction of rotation Image: Setting the fan speed and direction of rotation a Fan setting field d Fan rotation direction roller b Setting window e Confirm button c Fan speed roller Prerequisite Cooking program selected 1. -
Page 53: Using Perfection (Regeneration)
Operating the unit 3. Tap the Confirm button. The Operating instructions window opens. 4. Tap the Confirm button. The HACCP log is exported to the USB stick. The Confirm window opens. 5. Tap the Confirm button. the Confirm window closes. The HACCP log can also be transferred via a kitchen guiding system. -
Page 54: Using Perfecthold
Operating the unit 3. Tap the "Start" button in the information strip. The unit heats up. The "Start" button is replaced with the "Stopp" button. The cooking time is updated in the Cooking mode window. Perfection is started. Ending Perfection Prerequisite Perfection started Cooking time has not expired 1. -
Page 55: Ready2Cooksetting
Operating the unit 3. Tap the Confirm button. The Setting window closes. 4. Tap the Cooking time field. The Setting window is displayed. 5. Tap the Cooking time button. 6. Using a swipe gesture, set the rollers to the desired temperature. Swipe up / down to increase / decrease the cooking time. -
Page 56: Using Start Time Selection
Operating the unit 8. Tap the Write button. The displayed value is applied. The Ready2Cook function is set. 6.6.9 Using start time selection Setting the start time selection Image: Window for setting the start time selection a Start time selection field c Rollers b Start time selection window d Confirm button... -
Page 57: Steam Exhaust System (Ses)
Operating the unit Changing the start time selection Image: Window for changing the start time setting a Start time selection field d Confirm button b Start time selection window e Rollers c Start time button Prerequisite Cooking program has ended AutoChef automatic cooking menu open Advanced cooking function selected 1. -
Page 58: Rackcontrolusing 2
Operating the unit Image: Window for selecting the Steam Exhaust System (SES) a Steam Exhaust System field Prerequisite Manual cooking menu open Desired cooking mode selected The first step of the cooking program is created 1. Tap the field for the desired cooking mode. 2. - Page 59 Operating the unit RackControlSetting and starting 2 Image: Window for setting the RackControl2 cooking time a Settings field d Start time button b Shelf field e Confirm button c Start time window f Rollers Image: Window for setting the RackControl2 core temperature a Settings field d Core temperature button b Core temperature field...
- Page 60 Operating the unit 6. Select the desired shelf. 7. Configure and confirm the desired settings (See "Setting the cooking time" and "Setting the core temperature"). RackControl2 is set for the selected shelf. 8. Configure settings for additional shelves as necessary. 9.
-
Page 61: Familymixusing
Operating the unit 6.6.12 FamilyMixUsing Image: Window for selecting FamilyMix a Start button d Settings field b Product overview field e FamilyMix field c Product field Image: Window for setting FamilyMix a Start button c Setting field b Cooking time extension button d field RackTimer Prerequisite Manual cooking field is selected Cooking program loaded... -
Page 62: Using Continue Cooking
Operating the unit 4. Tap the "Start" button. The display changes to "Ready2Cook". The unit heats up. The "Start" button is replaced with the "Stopp" button. 5. Wait until the cooking time ends. Heating of the unit is ended. The "Stopp" button is replaced with the "Start" button. The cooking time is reset. -
Page 63: Setting Manual Steaming
Operating the unit 2. Press the "Stop" button. The cooking program is interrupted. The "Continue cooking" button appears in the information strip. 3. Tap the "Continue cooking" button. 4. Since the desired time for continued cooking. The cooking time is increased in 1-minute increments. The modified cooking time applies only to the current cooking program. -
Page 64: Setting A Resting Step
Operating the unit 4. Tap the Desired injection amount field. The Setting window is displayed. 5. Using a swipe gesture, set the rollers to the desired temperature. Swipe up / down to increase / decrease the desired injection amount. 6. Tap the Confirm button. The Setting window closes. -
Page 65: Qualitycontrolusing
Operating the unit 5. Save the cooking program. The Resting step is saved in the cooking program. 6.6.16 QualityControlUsing QualityControl is an automatic cooking time optimization function based on au- INFORMATION tomatic temperature adjustment. It optimizes the preheating process. It is on by default and can be switched off for individual programs. The current setting applies to all cooking programs until changed. -
Page 66: Using Lt Cooking
Operating the unit 6.6.17 Using LT cooking Image: Window for setting the Delta-T cooking mode d Cooking time field a "Start" button b Cooking mode field e Moisture field c Cooking temperature difference field Starting LT cooking Prerequisite Food to be cooked in the insert on the shelf Core temperature sensor set Door closed Manual cooking menu displayed... -
Page 67: Using Delta-T Cooking
Operating the unit 2. Wait until the cooking time ends. Heating of the unit is ended. The "Stopp" button is replaced with the "Start" button. The cooking time is reset. LT cooking is ended. 6.6.18 Using Delta-T cooking Image: Window for setting the Delta-T cooking mode d Core temperature field a "Start"... -
Page 68: Using The Barcode Scanner
Operating the unit Ending Delta-T cooking Prerequisite Delta-T cooking started Cooking time has not expired 1. Tap the "Stopp" button in the information strip. 2. Wait until the cooking time ends. Heating of the unit is ended. The "Stopp" button is replaced with the "Start" button. The cooking time is reset. -
Page 69: Inserting And Removing The Usb Stick
Operating the unit 2. Create a folder named "autoChefImages". Data exchange of photos in PNG format, resolution of 95x69 pixels, maximum resolution 150 KB. 3. Create a folder named "FCBrowserFiles". Data exchange of text in HTML format. 4. Create a folder named "FCImport". Data exchange from cookbooks. -
Page 70: Measuring With A 4-Point Core Temperature Sensor
Operating the unit Measuring the core temperature is recommended for all types of cooking to INFORMATION achieve an optimal result. The unit has a core temperature sensor in the cooking chamber and can be equipped with an optional connection for an external core temperature sensor. A core temperature measurement is always possible, if the core temperature INFORMATION sensor is inserted in the food being cooked. -
Page 71: Core Temperature Display With Time-Controlled Cooking Process
Operating the unit 4. Insert the core temperature sensor into the food to be cooked. 6.7.3 Core temperature display with time-controlled cooking process a Core temperature button b Core temperature display Prerequisite Core temperature sensor in the food being cooked Time-controlled cooking process is running 1. -
Page 72: Opening The Manual Cooking Menu
Operating the unit Settings such as cooking mode, cooking temperature and cooking time are specified, and the cooking step is either started or saved. 6.8.1 Opening the Manual cooking menu Prerequisite Unit is on The Main menu is displayed Tap the "Manual cooking" button. The Manual cooking menu is displayed. - Page 73 Operating the unit 5. Tap the Continuous operation button or the Cooking time button or the Core temperature button. 6. Using a swipe gesture, set the rollers to the desired value. 7. Tap the Confirm button. The Setting window closes. 8.
-
Page 74: Creating And Managing Your Own Cooking Programs
Operating the unit The cooking mode can also be changed while entering the cooking step. • Tap the Cooking mode field. ð Possible selections appear. • Tap the new cooking mode. ð The standard values of the selected cooking mode are displayed. •... -
Page 75: Saving The Cooking Program
Operating the unit 4. Tap the field "Add step at the left". 5. the field "Add step at the right". The "New step" window opens. 6. Select the cooking mode or function in the window by tapping it. The cooking program step display in the window shows the current position of the new step in the cooking program. - Page 76 Operating the unit Image: Green tab and cooking program in the Save window a Green tab e "Subcategory" field b "Save cooking program" field f "Image" field c "Name cooking program" field g Next page arrow symbol d "Category" field h "Save"...
- Page 77 Operating the unit Entering a subcategory (optional) 1. Tap the "Subcategory" field. The Subcategory menu is displayed. 2. Tap the field with the desired Subcategory . The subcategory is set. The Subcategory menu closes. The subcategory is displayed in the Save window. Assigning an image (optional) 1.
- Page 78 Operating the unit 2. Tap the "Yes" button or the "No" button. Tapping Yes displays the cooking program in the Favorites menu. Selecting characteristics of the food to be cooked (optional) 1. Tap the "Frozen food" field. The Frozen food menu is displayed. 2.
-
Page 79: Exporting A Cooking Program
Operating the unit 3. Select the location to save the photo. 4. Tap the button for "Videos in unit" or "Videos on USB stick". Video is selected. The Video menu is closed. The name of the video is displayed in the Save window. 6.9.3 Exporting a cooking program Previously exported cooking programs on the USB stick will be overwritten. -
Page 80: Opening The Automatic Cooking Menu
Operating the unit 6.10.1 Opening the Automatic cooking menu Prerequisite Unit is on The Main menu is displayed Tap the "Automatic cooking" button. The Automatic cooking (autoChef) menu is displayed. 6.10.2 Finding and opening a cooking program Finding and opening a cooking program by category Cooking programs can be found in the Automatic cooking menu by category and subcategory. -
Page 81: Starting The Cooking Program
Operating the unit 3. Tap the Find cooking program field. The Search window is displayed. 4. Using the keyboard, enter the letters for the name to be found. A filtered list is displayed in the Result window. 5. Tap the field with the name found. The cooking program is selected and being loaded. -
Page 82: Modifying The Cooking Program
Operating the unit 2. Wait for the cooking time to end. Cooking program has ended. The "Stopp" button in the information strip changes to the "Start" button The cooking program has ended. If the cooking chamber door is not opened, the fan continues to run at a low INFORMATION speed at intervals. -
Page 83: Deleting A Cooking Program
Operating the unit Modifying a cooking program before the program has started Prerequisite Cooking program open Cooking program not started 1. Modify various steps. 2. Use a swipe gesture to reach the individual step to be modified. 3. Modify the settings for the step. The modifications of the step are displayed. -
Page 84: Exporting And Importing A Cooking Program
Operating the unit 6.10.7 Exporting and importing a cooking program Exporting cooking programs When exporting, all of the user-created cooking programs in the cookbook are exported. Previously exported cooking programs on the USB stick will be overwritten. INFORMATION Prerequisite USB stick inserted Automatic cooking menu open User-created cooking programs are saved in the cookbook 1. -
Page 85: Videoassist
Operating the unit Prerequisite USB stick inserted Automatic cooking menu open. 1. Tap the "autoChef" button in the information strip. The autoChef window opens. 2. Tap the "Import cooking programs" field. The Operating instructions window opens. Read the displayed operating instructions. 3. -
Page 86: Deleting A Video
Operating the unit 4. Tap the Confirm button. The video is played. 6.11.2 Deleting a video Prerequisite The Display videos menu is open. 1. Tape the field Delete . The Delete field becomes dark. 2. Tap the videos to be deleted. The Delete symbol appears behind the designation of the video. -
Page 87: 7 Cleaning And Caring For The Unit
Cleaning and caring for the unit 7 Cleaning and caring for the unit Risk of burns from hot surfaces CAUTION • Allow surfaces to cool prior to cleaning. Risk of chemical burns from cleaning agent CAUTION • Follow the instructions of the cleaning agent manufacturer. •... -
Page 88: Cleaning The Housing
Cleaning and caring for the unit 7.3 Cleaning the housing Prerequisite Unit switched off and cooled down Clean the housing with warm water and a commercially available detergent. 7.4 Cleaning the handle, operating elements and operating panel membrane Risk of property damage from improper cleaning NOTICE •... -
Page 89: Cleaning The Door Seal
Cleaning and caring for the unit Prerequisite Unit function menu displayed 1. Tap the "Clean touchscreen" field. The touchscreen no longer reacts when touched. The Clean window opens. The cleaning time is updated. 2. Clean the touchscreen within 20 seconds. The Clean window closes. -
Page 90: Cleaning The Steam Outlet
Cleaning and caring for the unit Risk of property damage from improper cleaning of the surface NOTICE • Do not use abrasive cleaners or cloths. • Do not use grill cleaners. Remove residual calcium deposits from the glass window with vinegar or citric acid. -
Page 91: Removing Calcium Deposits From The Unit
Cleaning and caring for the unit Image: Cleaning the condensation hood Prerequisite Unit and hood disconnected from the electric supply mains Unit and hood cool 1. Clean the housing daily with warm water and a commercially available cleaner. 2. Push the grease filter upwards. 3. - Page 92 Cleaning and caring for the unit Risk of chemical burns CAUTION Place the preheat bridge on the lower edge of the cooking chamber opening on models FPG-215 and FPG-221 when there is no tray trolley in the combisteamer. Note regarding cleaning agents INFORMATION The use of unsuitable cleaning agents normally will damage the units.
-
Page 93: Preparing For Cleaning
Cleaning and caring for the unit 7.11.1 Preparing for cleaning Risk of property damage from improper cleaning NOTICE • Do not clean the unit with a high-pressure cleaner or water jet. Prerequisite GN containers, baking sheets and grates removed from the cooking chamber 1. -
Page 94: Inserting The Cleaning Cartridge
Cleaning and caring for the unit 7.11.3 Inserting the cleaning cartridge Use only cleaning cartridges with an undamaged wax seal. INFORMATION If the wax seal is damaged, the cleaner can enter the cleaning circuit prema- turely or not dissolve completely, so that complete cleaning is no longer as- sured. -
Page 95: Starting Automatic Cleaning
Cleaning and caring for the unit 7.11.4 Starting automatic cleaning Requirements Water connection is open The unit is on Cleaning level selected Cleaning cartridge inserted Cooking zone temperature at 60 °C (140 °F) Tap the "START STOPP" button. The display shows the remaining time. 7.11.5 Canceling automatic cleaning 1. -
Page 96: Cleaning The Cooking Chamber Manually
Cleaning and caring for the unit 7.12 Cleaning the cooking chamber manually 7.12.1 Preparing the cooking chamber Risk of property damage from improper cleaning NOTICE • Do not clean the unit with a high-pressure cleaner or water jet. Prerequisite GN containers, baking sheets and grates removed from the cooking chamber 1. -
Page 97: Starting Cleaning
Cleaning and caring for the unit 7.12.5 Starting cleaning The acting time has elapsed, the cleaning process starts automatically. The cooking chamber is heated. The display shows the remaining time. 7.12.6 Rinsing the cooking chamber Prerequisite The cleaning process has completed 1. -
Page 98: Inspecting The Unit
Cleaning and caring for the unit Image: Air diverter fasteners on countertop and pedestal units a Air diverter c Lower fastener b Upper fastener d Center fastener Opening the air diverter Prerequisite Unit switched off 1. Remove the left support rack; present only in size 6 and size 10. 2. -
Page 99: Running Combidoctor (Self-Diagnostic Program)
Cleaning and caring for the unit Prerequisite Unit disconnected from the electric supply mains Unit empty and cleaned Cooking chamber door opened completely Inspect housing, cooking chamber door and cooking chamber yearly for deformation and damage. Visual inspection has been performed. 7.14.2 Running CombiDoctor (self-diagnostic program) Incorrect results are displayed when the unit is warm. - Page 100 Cleaning and caring for the unit 5. Press the "Start" button. A help text is displayed. 6. Open the cooking chamber door briefly and then close it. The self-diagnostic program continues automatically. On completion of self-diagnosis, the result is displayed. Note any error message and forward it to your local customer service.
-
Page 101: 8 Troubleshooting
Troubleshooting 8 Troubleshooting 8.1 Emergency operation Emergency programs handle the limited further operation of the appliance until INFORMATION servicing. Deviating cooking results and temperature deviations are possible. In order to allows limited use in case of error, the unit has several different emergency programs. -
Page 102: Disposing Of Unit In An Environmentally Responsible Manner
Disposing of unit in an environmentally responsible manner 9 Disposing of unit in an environmentally responsible manner The unit has been designed to provide a lifetime of 10 years with average use. Do not dispose of unit or the unit's components together with non- recyclable waste. -
Page 103: Keyword Index
Keyword index Automatic cooking (autoChef) Low-temperature cooking ...... 20 Deleting a cooking program...... 83 Exporting and importing a cooking program .. Main menu.......... 23, 37 84 Manual cooking .......... 71 Finding and opening a cooking program .. 80 Creating a cooling program step.... 72 Importing a cooking program .... - Page 104 Keyword index Operating instructions...
- Page 108 Henny Penny Corporation P.O.Box 60 Eaton,OH 45320 Phone +1 937 456-8400 Fax +1 937 456-8402 Toll free in USA Phone +1 937 417-8417 *FM05-118-D* Fax +1 937 417-8434 www.hennypenny.com Henny Penny Corp., Eaton, Ohio 45320, Revised 11/20/2018...