Table of Contents
Advertisement
Quick Links
Installation & Operating Manual
Installation and Appliance Setup - Care and Operation
INSTALLER: Leave this manual with party responsible for use and operation.
OWNER: Retain this manual for future reference.
Call your dealer for questions on Installation, Operation, or Service.
NOTICE: SAVE THESE INSTRUCTIONS
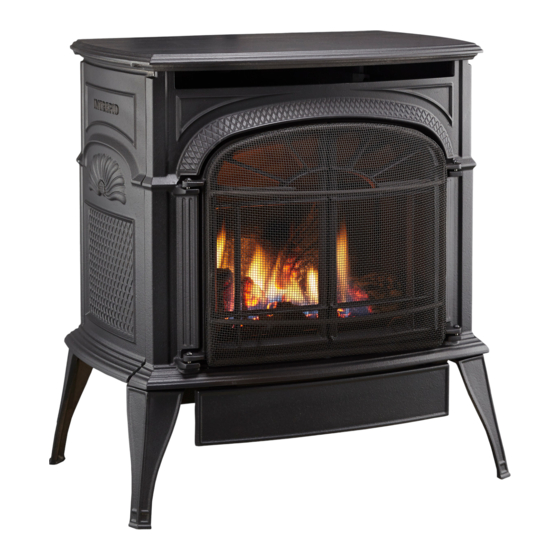
Intrepid
Direct Vent Gas Heater
®
Model: INDVR
12761
Intrepid DV Cover
6/07
This appliance may be installed in an aftermarket,
permanently located, manufactured home (USA only)
or mobile home, where not prohibited by local codes.
This appliance is for use only with the type of gas
indicated on the rating plate. This appliance is not
convertible for use with other gases, unless a certified
kit is used.
1
Vermont Castings • Intrepid DV Installation Manual_R15 • 04/18
!
FIRE OR EXPLOSION HAZARD
Failure to follow safety warnings exactly
could result in serious injury, death or
property damage.
•
Do not store or use gasoline or other flammable
vapors and liquids in the vicinity of this or any
other appliance.
•
WHAT TO DO IF YOU SMELL GAS
– Do not try to light any appliance.
– Do not touch any electrical switch; do not use
any phone in your building.
– Leave the building immediately.
– Immediately call your gas supplier from a
neighbor's phone. Follow the gas supplier's
instructions.
– If you cannot reach your gas supplier, call the
fire department.
•
Installation and service must be performed
by a qualified installer, service agency or the
gas supplier.
!
Improper installation, adjustment, alteration, service
or maintenance can cause injury or property damage.
Refer to this manual. For assistance or additional
information consult a qualified installer, service
agency or the gas supplier.
WARNING
WARNING
20012761
Advertisement
Table of Contents

Related Manuals for Vermont Castings Intrepid INDVR Series


Summary of Contents for Vermont Castings Intrepid INDVR Series
- Page 1 This appliance is for use only with the type of gas indicated on the rating plate. This appliance is not convertible for use with other gases, unless a certified kit is used. Vermont Castings • Intrepid DV Installation Manual_R15 • 04/18 20012761...
-
Page 2: Table Of Contents
Table of Contents PLEASE READ THE INSTALLATION & OPERATING INSTRUCTIONS BEFORE USING APPLIANCE. Thank you and congratulations on your purchase of a Vermont Castings stove. IMPORTANT: Read all instructions and warnings carefully before starting installation. Failure to follow these instructions may result in a possible fire hazard and will void the warranty. -
Page 3: Installation & Operating Instructions
Installation & Operating Instructions The Intrepid Direct Vent room Heater, Model INDVR is a vented gas absence of local codes, with the National Electrical Code ANSI/NFPA appliances listed to ANSI Standard Z21.88-2005 and CSA-2.33- 70, (latest edition), or of the current Canadian Electrical Code C22.1. 2005 for Vented Room Heaters, and CSA 2.17-M91, Gas-Fired Due to high temperatures this appliance should be located out Appliances For Use at High Altitudes. -
Page 4: Requirements For The Commonwealth Of Massachusetts
Installation & Operating Instructions Requirements for the Commonwealth of Inspection: The state or local gas inspector of the side wall horizontally Massachusetts vented gas fueled equipment shall not approve the installation All gas fitting and installation of this heater shall only be done unless, upon inspection, the inspector observes carbon by a licensed gas fitter or licensed plumber. -
Page 5: Stove Dimensions
Stove Dimensions - Intrepid Direct Vent Gas Heater 6¹⁄₂” 16⁷⁄₁₆” (165 mm) (418 mm) Valve Inlet 21³⁄₁₆” (538 mm) 13¹¹⁄₁₆” (347 mm) 21³⁄₈" 24¹⁄₄” (543 mm) (616 mm) Centerline of Flue Pipe 18” (457 mm) Valve Inlet 4” (102 mm) 21³⁄₄”... -
Page 6: Installation Requirements
Installation Requirements The installation must conform with local codes or, in the absence of local codes, with the National Fuel Gas Code, ANSI Z223.1/NFPA 54 - latest edition. (EXCEPTION: Do not derate this appliance for altitude. Maintain the manifold pressure at 3.5 inches w.c. for Natural Gas, and 10 inches w.c. -
Page 7: Corner Installation
Parallel Installation: Minimum Clearance and Flue Mantel Clearances Centerline Combustible Mantel or Trim Max. Vent Materials Length 24” (610 mm) 18³⁄₄" (476 mm) 2¹⁄₂" (64 mm) Noncombustible Materials 3" (75mm) Min. 4" A (Max.) B (Min.) 4" (102 mm) (102 mm) 10-1/2"... -
Page 8: Gas Specifications
Horizontal Termination: Gas Specifications Except for straight-through the wall vent installations. Max. Min. The vent must rise vertically a minimum of 24” (610 mm) Input Input after the first elbow directly off the back of the unit, before Model Fuel Control BTU/h BTU/h... -
Page 9: Vertical Termination
Restrictor Plate Adjustment Vertical Termination: A vertical vent system must terminate no less than 8’ (2.44 for Extended Pipe Runs: m) and no more than 40’ (12 m) above the appliance flue This stove is shipped with a restrictor plate in the Parts Bag. collar. -
Page 10: Vent Termination Clearances
Some of the most common wall, or vertical through the roof. clearances to keep in mind are shown in Figure 11. • Vermont Castings Group does not require any opening Important: All vent clearances must be maintained. for inspection of vent pipe. -
Page 11: General Venting Information / Termination Location
2. The special venting system used on Direct Vent Stoves are certified as part of the appliance, with clearances tested and approved by the listing agency. 3. Vermont Castings Group assumes no responsibility for the improper performance of the appliance when the venting system does not meet these requirements. -
Page 12: Termination Clearances
Termination Clearances Termination clearances for buildings with combustible and noncombustible exteriors. Inside Corner Alcove Applications* Outside Corner Combustible 6" (152 mm) Combustible 6" (152 mm) Noncombustible 2" (51 mm) Noncombustible 2" (51 mm) Balcony - Balcony - with no side wall with perpendicular side wall = Min. -
Page 13: Installation
Installation Unpack the Stove: The stove is shipped fully assembled on its back. Unpack the stove and carefully set it upright. Remove Four (4) Screws CAUTION (Retain for future use) Porcelain enamelled surfaces are fragile. Handle porcelain enamelled castings tenderly. Familiarize yourself with the assembly steps before you begin and proceed with deliberation and care. -
Page 14: Venting System Components
Firestop Spacer 46DVA-FS Basic Straight Through-the-Wall Installation Flashing 0/12 - 6/12 46DVA-F6 Horizontal Termination Cap 46DVA-HRC Flashing 6/12 - 12/12 46DVA-F12 Vermont Castings Group Zero Clearance Wall Thimble 46DVA-WT* Sleeve (included) 54623 Wall Thimble Cover (Brass) 3PVP-TKV Firestop 46DVA-WFS Wall Firestop... -
Page 15: Venting System Assembly
Venting System Assembly Square Horizontal Termination General Information: The Intrepid is approved for installation only with the Dura Vent components listed on Page 14. Follow these and the Zero Clearance Wall Sleeve vent component instructions exactly. Firestop For U.S. installations: The venting system must conform Round Ceiling Support / with local codes and/or the current National Fuel Gas Code, Wall Thimble Cover... -
Page 16: Rear Vent
Vent Opening - Combustible Wall Vertical High Wind Termination 10" Cap (shown) (254 mm) Storm Collar 10" (254 mm) Roof Flashing Framing Detail Ceiling Firestop Vent Opening - Noncombustible Wall Round Ceil- 7¹⁄₂" Dia. ing Support / (190 mm) Wall thimble Figure 21 - Locate vent opening. -
Page 17: Horizontal Installation
4. Slip the wall cover over the interior end of the horizontal pipe and install into the zero clearance sleeve. Seal the joint inside the wall plate if needed to keep cold air from being drawn into the home. 5. Install the vent terminal. (Figure 22) Guide the inner and outer vent termination collars into the adjacent pipes. - Page 18 2. The location of the horizontal vent termination on an NOTES: exterior wall must meet all local and national building 1. The four (4) wood codes, and must not be easily blocked or obstructed. screws provided Refer to Pages 10 and 11 for proper Termination Clear- should be replaced Wood ances.
-
Page 19: Vertical Installation
3. When penetrating through stucco wall, install the Vertical Installation counter flashing. The counter flashing allows stucco, Step 1. Check these installation instructions for required or other materials, to be finished directly to the sides of clearances (air spaces) to combustibles when passing the termination cap. - Page 20 Step 6. Cut a hole in Step 7. Slip the roof flashing over the pipe section(s) pro- the roof centered on truding through the roof. Use a non-hardening sealant be- small drill hole tween the roof flashing and the roofing to prevent water placed in the roof in leakage.
-
Page 21: Cathedral Ceiling Installation
Cathedral Ceiling Installation High Wind Vertical Step 1. Follow installation Step 1 and 2 under Vertical Termination Termination. Storm Collar Step 2. Using the plumb bob, mark the centerline of the Roof Flashing venting system on the ceiling and drill a small hole through the ceiling and roof at this point. -
Page 22: General Maintenance
Step 5. Using tin snips, cut the support box from the top 2. Remove the vertical terminations cap and shine a corners down to the roofline, and fold the resulting flaps flashlight down the vent. Remove any bird nests, or other over the roof sheathing. - Page 23 General Installation Use Conversion Kit A (#0931) for the Two different types of direct vent conversion systems are following chimney: described here. One is through an existing factory-built metal 6” ID Metalbestos chimney going through the ceiling. The other is through the 6”...
- Page 24 Converting a Factory-Built Metal Chimney Co-Linear Insert Termination Cap Vertical Termination Top Adapter 0985K, 0986K or 0987K Chimney Liner Termination Kit 3” Flex Existing Metal Chimney System 4” Aluminum Flex Pipe Co-Axial to Co-Linear Connector Retro Connector 0909B Any Black Di- rect Vent Pipe Plus an Adjust- able Length to...
-
Page 25: Converting A Class-A Metal Chimney Or Masonry Chimney To A Direct Vent System
Installation Instructions for Converting a Masonry Chimney Converting a Factory-Built Metal Chimney Termination Adapter 1. Remove the existing chimney cap. Top Adapter 2. Measure the distance from the Flashing top end of the chimney to the bottom of the ceiling support box, add 3”... - Page 26 7. Secure the cap adapter Cut & Bend Flashing as to the flashing. Use three (3) Needed to Fit Sheet Metal sheet metal screws through Chimney Screws (3) Existing Ceiling the side of the adapter into Support Box the flange on the flashing as shown in Figure 51.
-
Page 27: Connect Gas Supply Line
Connect the Gas Supply Line Check the rating plate attached by a steel cable to the firebox, to confirm that you have the appropriate firebox for the type Retro Connector of fuel to be used. The Intrepid may be converted from one gas to another using the appropriate Fuel Conversion Kit listed on Page 42. -
Page 28: Burner Information
Burner Information The appliance must only use the gas specified on the rating plate, unless converted using a Vermont Castings Fuel Conversion Kit. Refer to Page 42 for correct Fuel Conversion Kit for your stove model. Coversion instructions are provided with each kit and beginning on Page 34 of this manual. -
Page 29: Install The Log Set
Install the Log Set Pilot Raised Remove the logs from their packaging and inspect each piece Assembly Notch for damage. DO NOT INSTALL DAMAGED LOGS. Raised Notch CAUTION Before installation, inspect ember bed burner for damage. Do not use ember bed if damaged or cracked. NOTE: Small, shallow surface cracks are acceptable. -
Page 30: Operation
Operation The Intrepid is operated with the operable door front plate in place with the doors open or closed. To open the front doors, pull either door toward you. Your First Fire Read these instructions carefully and familiarize yourself with the burner controls shown in Figure 62. Locate the pilot assembly, Figure 63. -
Page 31: Flame Characteristics
Flame Characteristics Turn It is important to periodically perform a visual check of the Turn clockwise counterclockwise pilot and the burner flames. Compare them to Figure 65. to decrease to increase flame height If any of the flames appear abnormal call a service person. flame height Figure 64 - Flame adjustment knob for SIT valve. -
Page 32: Lighting And Operating Instructions
Lighting and Operating Instructions FOR YOUR SAFETY READ BEFORE LIGHTING WARNING:If you do not follow these instructions exactly, a fire or explosion may result causing property damage, personal injury or loss of life. A. This heater has a pilot which must be lit manually. C. -
Page 33: Troubleshooting
Troubleshooting the Gas Control System SIT NOVA 820 MILLIVOLT VALVE NOTE: Before trouble shooting the gas control system, be sure external gas shut off is in the “On” position. Symptoms Possible Causes Corrective Action Using a match, light pilot. If pilot lights, turn off pilot and 1. -
Page 34: Fuel Conversion Instructions
Fuel Conversion Instructions: 4. Insert a 5/32” or 4 mm Allen wrench into the WARNING hexagonal key- way of the screw This conversion kit shall be installed by a qualified (Figure 69), rotate service agency in accordance with the manufacturer’s it counterclockwise instructions and all applicable codes and requirements until it is free and... - Page 35 Pilot Hood Index Marks Pilot Bracket Figure 76 - Remove pilot hood. (Your pilot may have a different Pilot Assembly appearance.) Figure 73 - Pilot Assembly location. • Remove pilot orifice with Allen wrench. (Figure 75) CO105 Pilot • Install the conversion orifice. Orifice Gas Conversion ST935...
- Page 36 All Models: Orifice 1. Replace burner making sure venturi on bottom of ember Bracket bed aligns with orifice and is seated properly on air shutter assembly. (Figure 79) Make sure burner is slid into place at a slight angle and opposite to how it was removed. When burner is slid into place, the three (3) pem studs should slide down through clearance holes into the bottom of the control panel.
-
Page 37: Maintenance
Glass Replacement 5. Use a soft bristled brush to sweep dust or debris from the Replace glass only with Vermont Castings Group approved Logs, Pilot and Burner. Use care as the logs are fragile parts. Refer to Page 40 for Replacement Parts. Refer to and susceptible to damage. -
Page 38: Gasket Replacement
Figure 82 - Release the latches to release the glass frame. Do not use your stove if the flame pattern differs from that Gasket Replacement: shown here. Contact your Vermont Castings dealer or a The Intrepid Gas Heater uses a ‘tadpole’ type gasket to seal qualified technician for help. -
Page 39: Wiring Diagrams
Wiring Diagrams POWER CORD On/Off Switch Wiring TP/TH Chassis Ground Millivolt Gas Valve Black Thermostat (Optional) Optional Thermostat Wiring FAN JUNCTION BO Thermostat (Optional) St124b Strain Relief on/off/switch wiring ON / OFF Rheostat 1/11/00 djt TP/TH Snapstat Black Figure 84 - On/off switch and optional thermostat circuit. Chassis Ground RHEOSTAT / SNAPSTAT NOTE: IF ANY OF THE ORIGINAL WIRE, AS SUPPLIED... -
Page 40: Service Parts List
Intrepid Direct Vent/Rear Vent Gas Heater (continued): Model: INDVR 26 27 32a,b 31a,b Vermont Castings Group reserves the right to make changes in design, materials, specifications, prices and discontinue colors and products at any time, without notice. Ref. Description Intrepid... - Page 41 Intrepid Direct Vent/Rear Vent Gas Heater (continued): Model: INDVR Ref. Description Intrepid Left End Refer to Enamel Parts Chart Right End Refer to Enamel Parts Chart Refer to Enamel Parts Chart Door, Control 30003945 Hinge, Control Door 1601670 Rear Shroud Assembly 30004132 Clip, Rear Shroud 30004002...
- Page 42 Intrepid Direct Vent/Rear Vent Gas Heater (continued): Model: INDVR Ref. Description Intrepid Gasket, Flue Collar 30004021 Gasket Cement 1206122 *Magnet, Door (Not Shown) 1408818 Knob Extension - Hi/Lo 55162 Knob Extension - On/Off 55163 Tie Bracket Assembly 20012514 Right Burner Support Assembly 20012909 Switch Housing 30005040...
-
Page 43: Optional Accessories
Optional Accessories Fan Kits Warming Shelf: Warming shelves add versatility to your stove; they can be FK20 Fan: used to keep foods warm at mealtime. The fan helps distribute heated air from within the firebox out Model Color into the room. The fan is controlled by a snapstat that turns 0098 Classic Black power on and off as the firebox temperature rises above... -
Page 44: Warranty
Hearth & Home Technologies LIMITED LIFETIME WARRANTY Hearth & Home Technologies, on behalf of its hearth brands (“HHT”), extends the following warranty for HHT gas, wood, pellet and electric hearth appliances that are purchased from an HHT authorized dealer. WARRANTY COVERAGE: HHT warrants to the original owner of the HHT appliance at the site of installation, and to any transferee taking ownership of the appliance at the site of installation within two years following the date of original purchase, that the HHT appliance will be free from defects in materials and workmanship at the time of manufacture. - Page 45 WARRANTY CONDITIONS: • This warranty only covers HHT appliances that are purchased through an HHT authorized dealer or distributor. A list of HHT authorized dealers is available on the HHT branded websites. • This warranty is only valid while the HHT appliance remains at the site of original installation. •...
- Page 46 This warranty is void if: • The appliance has been over-fired, operated in atmospheres contaminated by chlorine, fluorine, or other damaging chemicals. Over-firing can be identified by, but not limited to, warped plates or tubes, deformation/warping of interior cast iron structure or components, rust colored cast iron, bubbling, cracking and discoloration of steel or enamel finishes.
-
Page 48: Energuide
Based on CSA P.4.1-09 Efficiency Ratings EnerGuide Ratings D.O.E Model Fireplace Efficiency (%) (AFUE %) INDVR 76.5 Recherchez dans la brochure les caractéristique de rendement énergétique de foyer au gaz Énerguide Based on CSA P.4.1-09 Selon CSA P.4.1-09 352 Mountain House Road • Halifax, PA 17032 www.vermontcasting.com 20012761...