Vulcan-Hart E36L Installation And Operation Manual
Electric restaurant ranges
Hide thumbs
Also See for E36L:
- Service manual (39 pages) ,
- Installation & operation manual (17 pages) ,
- Specifications (2 pages)
Table of Contents
Advertisement
ELECTRIC RESTAURANT RANGES
MODELS E24L, E36L, E48L, & E60L SERIES
For additional information on Vulcan-Hart or to locate an authorized parts
and service provider in your area, visit our website at www.vulcanhart.com
VULCAN-HART
DIVISION OF ITW FOOD EQUIPMENT GROUP, LLC
INSTALLATION &
OPERATION MANUAL
P.O. BOX 696, LOUISVILLE, KY 40201-0696
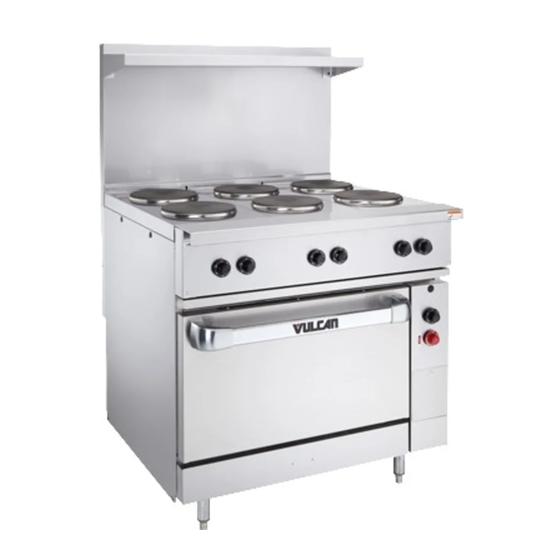
Model E48L
TEL. (502) 778-2791
FORM 30968 Rev. A (02-04)
Advertisement
Table of Contents

Related Manuals for Vulcan-Hart E36L


Summary of Contents for Vulcan-Hart E36L
- Page 1 ELECTRIC RESTAURANT RANGES MODELS E24L, E36L, E48L, & E60L SERIES For additional information on Vulcan-Hart or to locate an authorized parts and service provider in your area, visit our website at www.vulcanhart.com VULCAN-HART DIVISION OF ITW FOOD EQUIPMENT GROUP, LLC INSTALLATION &...
- Page 2 The following models have been discontinued and are no longer available: E24SL E36XL E24FL E48L E48SL E48XL E48FL E60SL – 2 –...
-
Page 3: Table Of Contents
ELECTRIC RESTAURANT RANGE MODELS ..........4 GENERAL . -
Page 4: Electric Restaurant Range Models
ELECTRIC RESTAURANT RANGE MODELS E24L E24SL E24FL E36L E36SL E36FL E36XL E48L E48SL E48FL E48XL E60SL E60FL E60XL E60L E24L E36L E48L E60L PL-51578 – 4 –... -
Page 5: General
The manufacturer suggests that you thoroughly read this entire manual and carefully follow all of the instructions provided. Your Vulcan-Hart range is produced with quality workmanship and material. Proper installation, usage and maintenance of your range will result in many years of satisfactory performance. -
Page 6: Installation
Model ESB Broiler/Backguard In E36L and E60L Series, slide the legs of the broiler inside the channels provided in the back of the range (in E60L Series, the broiler is mounted between the center and the right-hand channel), until the two holes on each side line up. - Page 7 3. Assemble heat shield to splasher back (Fig. 1). Top edge of heat shield must be placed inside the rear top flange of the splasher back. CAUTION: It is essential that the heat shield in the back of the high shelf be installed in such a way that the bent section at the bottom be inward, touching the rear wall of the range, thereby allowing the stack action of the double wall back splasher to draw air through the area below the top surface units.
-
Page 8: Electrical Connections
5. Place shelf in position on splasher and fasten with -20 screws and nuts provided (Fig's. 4 & 5) . PL-40463 PL-40462 Fig. 4 Fig. 5 ELECTRICAL CONNECTIONS WARNING: ELECTRICAL AND GROUNDING CONNECTIONS MUST COMPLY WITH THE APPLICABLE PORTIONS OF THE NATIONAL ELECTRICAL CODE AND/OR OTHER LOCAL ELECTRICAL CODES. WARNING: DISCONNECT ELECTRICAL POWER SUPPLY AND PLACE A TAG AT THE DISCONNECT SWITCH TO INDICATE THAT YOU ARE WORKING ON THE CIRCUIT. -
Page 9: Operation
Oven Light Thermostat Oven Infinite Switch Model E36L Shown Fig. 6 The controls are arranged in pairs; the left knob controls the front plate and the right knob controls the rear plate. maintains heat to the hot top section. temperature. -
Page 10: Before First Use
BEFORE FIRST USE Cleaning Clean the range and all accessories with water and a mild detergent. Rinse thoroughly and wipe dry with a soft clean cloth. Griddle Seasoning (SL, FL and XL Models) A new griddle surface must be seasoned to do a good cooking job. The metal surface of the griddle is porous. Food tends to get trapped in these pores and stick;... -
Page 11: Griddle
Some DO'S and DO NOT'S of Surface Cooking DO use utensils to fit the tops (9" to 10" [229 to 254 mm] inside diameter). DO use flat-bottomed, straight-sided pots and pans. DO use covers for stock pot work. Water will boil much sooner and much less heat is required for cooking in a covered container. -
Page 12: Broiler (Accessory)
" [329 x 527 mm]) food service pans. Model E24L and E36L ranges have a single oven; Model E48L and E60L ranges have two separate ovens. Each oven is equipped with top and bottom heating elements. The top element has an infinite heat switch for directional heat control. -
Page 13: Power Outage
Roasting Place meat on a rack in an open pan with sides sufficiently high to retain the drippings. Roasting may be done on the oven rack or the deck. For best results, roast at the low temperatures of 200°F (93°C) to 325°F (163°C) recommended by the Department of Agriculture and the American Meat Institute. - Page 14 Broiler Empty grease collector as often as necessary. It is recommended that the grease collector be emptied whenever it is filled. Remove grease collector slowly and be careful of liquid wave action. After each day's use, empty and wash the grease collector and wash the grid and drip shield. Clean the inside bottom, back and sides of the broiler compartment as often as necessary, with special care to clean the inside surface of the baffle across the front top of the broiler.
-
Page 15: Maintenance
OR SERVICING THE RANGE. SERVICE AND PARTS INFORMATION To obtain service and parts information concerning this range, contact the Vulcan-Hart Service Department in your area or Service Department at the address or phone number shown on the front cover of this manual. - Page 16 FORM 30968 Rev. A (02-04) PRINTED IN U.S.A. – 16 –...
- Page 17 – – É.-U. IMPRIMÉ (02-04) RÉV. 30968 FORMULAIRE...
- Page 18 – – près. plus Hobart l’entretien service avec communiquer entretien, cuisinière cette renseignements obtenir Pour RECHANGE PIÈCES L’ENTRETIEN SERVICE L’ENTRETIEN. À PROCÉDER NETTOYER L’UTILISER, MOMENT PRUDENCE EXTRÊME EXERCER CHAUDES. SONT PIÈCES CUISINIÈRE AVERTISSEMENT ENTRETIEN...
- Page 19 odeurs, éliminer Pour four. PUISSANT. FOUR POUR NETTOYANT brûlés graisse sucre sauces fruits, tartes cuisson grilloir. avant supérieure apportant nécessaire souvent même nettoyer vider rempli qu’il dès vider – – minutes. à °F) dans s’imprégner peut température joint. endommagera UTILISER four.
- Page 20 graisse couche épaisse extérieurs bords autour d’égouttement PREMIÈRE AVANT section Après surface. demeure l’aide à détergent l’eau à nettoyer dans frotter graisse. fond à nettoyer besoin, souvent souvent plus Quotidiennement, emplacement leur à remettre câblage. d’endommager Remettre ATTENTION nettoyage. essuyer rincer Bien doux.
- Page 21 ÉLEVÉ réglage utilise MED-LO MED, inscriptions grilloir gauche partie panneau trouvent Ceux-ci tubulaires chauffants éléments sauf E60L E36L modèles MOYEN réglage requièrent peut MOYEN. entre produits plupart chargement procéder délicats, pâtisseries s’éteint, rouge voyant Lorsque Pour l’utiliser.
- Page 22 chauds d’aliments bacs garder ragoûts soupes comme fondant. fromage sandwiches °C à plaque côté régler midi, repas Pour autres. °C à thermostat régler (300 °C à passe environ cuisinière. d’une pourvu droit côté côtés. °F). à (150 °C chauffants éléments trois E36XL, modèles...
- Page 23 ébullition. à l’eau amener rapidement correspond ÉLEVÉ marque respectivement). VERY-LO MED-LO MED, cuisson température atteindre commandées sont (Fig. marmites l’utilisation d’au intérieur diamètre dont miroitante. lisse soit surface film, mince obtenir à manière pied cuisson d’huile once dure, lisse devienne qu’elle important donc...
- Page 24 à Commutateur illustré) voyants allumés, sont Lorsqu’ils droite, celui gauche celui paires; surface. plaques température continu réglage à Commutateurs Fig. E36L MODÈLE thermostat Bouton NETTOYER SONT PIÈCES FONCTIONNEMENT — four four haut. chauffant l’élément — réglage à bouton °C Bouton —...
- Page 25 l’arrière, vers d’avant nivelage câblage schéma reporter terre à mise cosse à vert °F). (167 °C jusqu’à allant températures Pour l’appareil. nominale conformément type calibre à approprié d’alimentation panneau l’intérieur à apposé raccorder brûleurs. modèles pour (fils CIRCUIT. TRAVAILLE APPOSER L’APPAREIL TOUT L’ÉLECTRICITÉ...
- Page 26 Fig. cuisinière à anti-éclaboussures éléments dessous zone ainsi permettant cuisinière, partie surélevée, tablette dans l’écran supérieur bord – – (Fig. fournis panneau fixer prévu l’emplacement Fig. jusqu’à l’air tirer paroi arrière paroi contre s’appuyant thermique l’écran anti-éclaboussures. panneau Insérer (Fig. anti-éclaboussures Fig.
- Page 27 Fixer s’alignent. côté chaque grilloir monter E60L (modèles insérer E60L, E36L cuisinières modèle dosseret ASSEMBLAGE Fire National auprès (dernière n° ANSI/NFPA édition) (dernière partie première faire doit cuisinières NORMES D’INSTALLATION dégagement...
- Page 28 DESCRIPTION suivantes sont offertes rendement obtenir d’en permettront partir à soin grand plus attentivement suivre complet GÉNÉRALITÉS CONSERVER E48L E36L, E24L, POUR ÉLECTRIQUE FONCTIONNEMENT marmites. pour rapide rapide. chauffe à surface éléments bouillir à plaque substituer chauffants éléments sont...
- Page 29 – – E60L E48L E36L E24L PL-51578 E60L E60XL E60FL E60SL E48XL E48FL E48SL E48L E36L E36XL E36FL E36SL E24FL E24SL E24L RESTAURANTS POUR ÉLECTRIQUES CUISINIÈRES MODÈLES...
- Page 30 MATIÈRES – – rechange RESTAURANTS POUR ÉLECTRIQUES TABLE pièces l’entretien Service Nettoyage courant Panne (accessoire) Grilloir frire à Plaque surface Plaques utilisation première Avant Commandes FONCTIONNEMENT Nivelage électrique Raccordement Assemblage normes d’installation Codes Emplacement Déballage INSTALLATION GÉNÉRALITÉS CUISINIÈRES ENTRETIEN Four MODÈLES...
- Page 31 – – E60SL E48FL E48L E24FL E48XL E48SL E36XL E24SL offerts plus sont suivants modèles cessé, ayant fabrication Leur...
- Page 32 E48L Modèle E60L D’EMPLOI MODE D'INSTALLATION ALIMENTAIRE, P.O. à internet site notre visitez près, repérer pour Vulcan-Hart E48L E36L, RESTAURANTS ÉLECTRIQUE MANUEL ÉQUIPEMENT GROUPE VULCAN-HART plus autorisé service détails amples plus Pour E24L, MODÈLES POUR CUISINIÈRE DIVISION...