
Related Manuals for Shure ANI22


Summary of Contents for Shure ANI22
- Page 1 ANI22 Audio Network Interface Complete user guide for the ANI22. Includes system diagrams, specifications, installation instructions, command strings, and more. Version: 3 (2020-B)
-
Page 2: Table Of Contents
Shure Incorporated Table of Contents Audio Settings ANI22Audio Network Interface Adjusting Input levels Adjusting Output Levels Safety Information Metering Options (Pre-gain and Post-gain) IMPORTANT SAFETY INSTRUCTIONS Parametric Equalizer General Description Custom Presets Getting Started Networking and Dante Step 1: Connect to a Network... -
Page 3: Ani22Audio Network Interface
Shure Incorporated ANI22 Audio Network Interface Safety Information IMPORTANT SAFETY INSTRUCTIONS READ these instructions. KEEP these instructions. HEED all warnings. FOLLOW all instructions. DO NOT use this apparatus near water. CLEAN ONLY with dry cloth. DO NOT block any ventilation openings. Allow sufficient distances for adequate ventilation and install in accordance with the manufacturer’s instructions. -
Page 4: General Description
General Description The Shure ANI22 Audio Network Interface provides 2 channels of Dantetoanalog and 2 channels of analogtoDante conver sion. A single interface provides a simple way to connect analog equipment to the audio network, such as wireless micro... -
Page 5: Step 3: Connect Devices In Dante Controller Software
Shure Incorporated Double-click the device to open the web application. Tip: If setting up multiple Shure devices, use the Identify button in the application to flash the lights on the device. Step 3: Connect Devices in Dante Controller Software Download and install Dante Controller Software from http://www.audinate.com Use Dante Controller to create connections with other Dante devices Note: Refer to the Dante Controller user guide for more information on channel routing (available at http://www.audinate.com/resources/technicaldocumenta... -
Page 6: Get More Information
Shure Incorporated In the ANI22 web application, adjust input and output levels and perform a sound check. Refer to the help topics in the web application for additional information. Get More Information Now that the basic setup is complete, you should have access to the web application and be able to pass audio between de... -
Page 7: Hardware And Installation
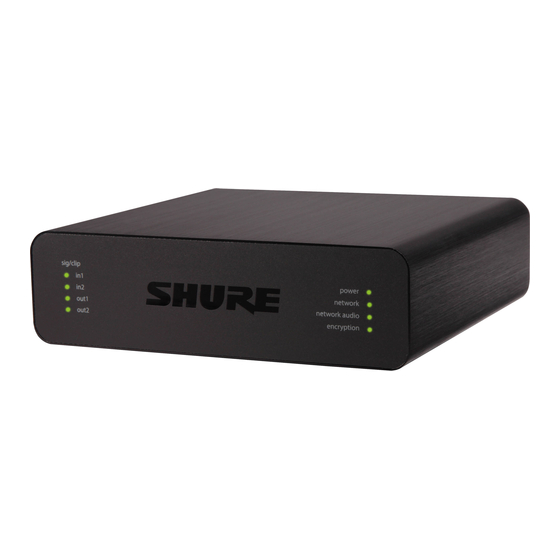
Shure Incorporated Hardware and Installation Hardware Block Connector Model: XLR Model: ① Signal/Clip Indicators Each indicator corresponds to a single channel. Analog and digital gain adjustments are made through the web application. ◦ If an input channel LED turns red, attenuate the level from the source device to prevent clipping at the input stage. - Page 8 Shure Incorporated LED State Audio Signal Level less than -60 dBFS Green -59 dBFS to -24 dBFS Yellow -23 dBFS to -1 dBFS 0 dBFS or more ② Audio and Logic Connections Note: Logic connections are only featured on the block connector version.
-
Page 9: Power Over Ethernet (Poe)
There are two hardware reset functions: Network reset (press button for 4-8 seconds) Resets all Shure control and audio network IP settings to factory defaults Full factory reset (press button for longer than 8 seconds) Restores all network and Designer settings to the factory defaults. -
Page 10: Installation And Rack Mounting
Shure Incorporated Default Settings: To revert audio settings back to the factory configuration (excluding Device Name, IP Settings, and Pass words), select Load Preset and choose the default settings preset. Installation and Rack Mounting Two mounting solutions are available for installing the Audio Network Interface: CRT1 19"... - Page 11 Shure Incorporated Under-Table Mounting Align the ears with the mounting holes pointed upward. Install the 3 screws that hold the ear to the tray as shown. 11/27...
-
Page 12: Signal Flow And Connections
Shure Incorporated Installing Underneath a Table Hold the tray in the desired location under a table. Use a pencil to mark the location of the mounting holes on the table. Drill 4 holes for the screws. The diameter of the holes in the tray are 7.1 mm. -
Page 13: Summing
A computer connected to the network accesses the web application to control the channel ⑤ Control CPU levels and processing. The network switch provides Power over Ethernet (PoE) to the ANI22, while also supporting ⑥ Network Switch all other Dante-enabled audio equipment. -
Page 14: Encryption
Enter a passphrase. All devices must use the same passphrase to establish an encrypted connection. Important: For encryption to work, all Shure devices on your network must use encryption. If you’re using Shure Designer software to configure your system, please check the Designer help section for more about this topic. Logic Applications The block connecter inputs feature three logic signal connections. -
Page 15: Device Identification
Shure Incorporated Device Identification To identify the hardware by flashing the lights, select the Identify button in the device options section. Audio Settings Adjusting Input levels Levels for analog and Dante channels are adjustable in the Input tab. Dante Sources Check the source level before it reaches the Network Interface: ◦... -
Page 16: Adjusting Output Levels
Shure Incorporated Source Level Gain Range Auxiliary (-10 dBV) +9 to +21 dB Microphone (varies) +21 to +51 dB The meters should peak between -18 and -9 dB. Note: Leaving some additional headroom is a recommended to prevent clipping if mobile devices will be plugged into particular channels. - Page 17 Shure Incorporated If you’re using Shure Designer software to configure your system, please check the Designer help section for more about this topic. Setting Filter Parameters Adjust filter settings by manipulating the icons in the frequency response graph, or by entering numeric values. Disable a filter using the check-box next to the filter.
- Page 18 Shure Incorporated Copy, Paste, Import, and Export Equalizer Channel Settings These features make it simple to use effective equalizer settings from a previous installation, or simply accelerate configuration time. Copy and Paste Use to quickly apply the same PEQ setting across multiple channels.
-
Page 19: Custom Presets
Shure Incorporated Equalizer Applications Conferencing room acoustics vary based on room size, shape, and construction materials. Use the guidelines in following ta ble. EQ Application Suggested Settings Add a high-shelf filter to boost frequencies greater than 1 Treble boost for improved speech intelligibility kHz by 3-6 dB. -
Page 20: Networking And Dante
Considerations for Shure devices controlled by DDM: • When you add Shure devices to a Dante domain, set the local controller access to Read Write. Otherwise, you won't be able to access to Dante settings, perform a factory reset, or update device firmware. -
Page 21: Ip Ports And Protocols
Required for device discovery Open † 5568 Required for inter-device communication Open 8023 Telnet Debug console interface Closed 8180 HTML Required for web application Open † 8427 Multcast SLP Required for inter-device communication Open 64000 Telnet Required for Shure firmware update Open 21/27... -
Page 22: Event Log
The Export feature creates a CSV (comma separated values) document to save and sort the log data. Refer to the log file for details when troubleshooting or consulting with Shure Systems Support. To view the event log:... -
Page 23: Using A Third-Party Control System
EMC conformance to Environment E2: Commercial and Light Industrial. Testing is based on the use of supplied and recommended cable types. The use of other than shielded (screened) cable types may degrade EMC performance. Changes or modifications not expressly approved by Shure Incorporated could void your authority to operate this equipment. Industry Canada ICES-003 Compliance Label: CAN ICES-3 (B)/NMB-3(B) Please follow your regional recycling scheme for batteries, packaging, and electronic waste. -
Page 24: Certifications
This product meets the Essential Requirements of all relevant European directives and is eligible for CE marking. The CE Declaration of Conformity can be obtained from Shure Incorporated or any of its European representatives. For contact information please visit www.shure.com... - Page 25 Shure Incorporated Power Requirements Power over Ethernet (PoE), Class 0. (PoE Plus compatible). Power Consumption 11W, maximum Weight 672 g (1.5 lbs) Dimensions H x W x D 4 x 14 x 12.8 cm (1.6 x 5.5 x 5.0 in.)
- Page 26 Shure Incorporated Equivalent Input Noise 20 Hz to 20 kHz, A-weighted, input terminated with 150Ω Analog Gain Setting= +0 dB -93 dBV Analog Gain Setting= +27 dB -119 dBV Analog Gain Setting= +51 dB -130 dBV Total Harmonic Distortion @ 1 kHz, 0 dBV Input, 0 dB analog gain <0.05%...
-
Page 27: Accessories
Shure Incorporated Accessories Furnished Accessories Hardware kit (XLR model) 90A29254 Hardware kit (block connector model) 90B33522 Mounting Bracket (1/3 rack unit) 53A27742 Optional Accessories and Replacement Parts 19" rack tray CRT1 27/27...