Table of Contents
Advertisement
Quick Links
Advertisement
Table of Contents

Related Manuals for Interlogix TVE-120


Summary of Contents for Interlogix TVE-120
- Page 1 TVE-120-420-820-1620 Encoder User Manual P/N 1073658-EN • REV D • ISS 25NOV19...
- Page 2 Copyright © 2019 United Technologies Corporation. Interlogix is part of UTC Climate, Controls & Security, a unit of United Technologies Corporation. All rights reserved. Trademarks and Trade names used in this document may be trademarks or registered patents trademarks of the manufacturers or vendors of the respective products.
- Page 3 Contact information For contact information and to download the latest manuals, tools, and and manuals firmware, go to the web site of your region. Americas: www.interlogix.com EMEA: www.firesecurityproducts.com Manuals are available in several languages. Australia/New Zealand: www.utcfs.com.au...
-
Page 5: Table Of Contents
Image adjustment 21 Motion detection 22 Privacy masking 25 Camera tamper 26 Text overlay 28 PTZ setup 29 VCA settings 31 Audio input exception 31 Cross line detection 32 Intrusion detection 34 Sudden scene change 36 TVE-120-420-820-1620 Encoder User Manual... - Page 6 Upgrade the system firmware 61 Holiday settings 62 RS-232 settings 63 System communication 63 Storage management 65 User management 66 System information 68 System log 72 Specifications 74 Appendix: Supported devices 78 Cameras 78 Decoders 78 Recorders 78 TVE-120-420-820-1620 Encoder User Manual...
-
Page 7: Important Information
Note: Note messages advise you of the possible loss of time or effort. They describe how to avoid the loss. Notes are also used to point out important information that you should read. TVE-120-420-820-1620 Encoder User Manual... -
Page 8: Introduction
(NVR) or digital video recorders (DVR) for remote storage, live-view and playback purpose. This user manual provides basic information on setting up and using the TVE-120, TVE-420, TVE-820 and TVE-1620 models. The encoder is shipped with web browser menus in 12 languages: English, Simplified Chinese, Dutch, Finnish, French, German, Italian, Polish, Portuguese, Russian, Spanish, and Turkish. -
Page 9: Product Description
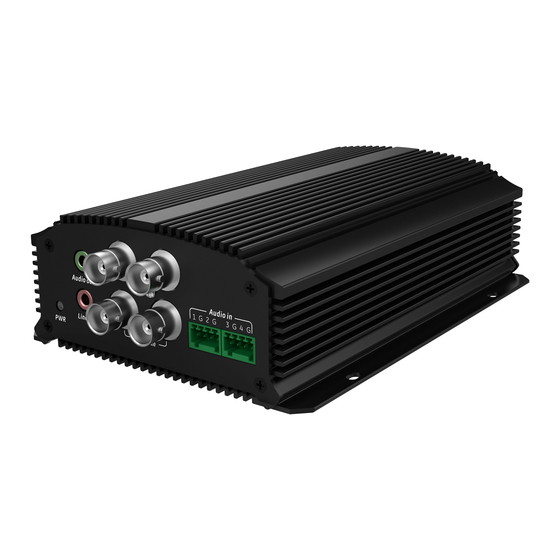
The LED lights up RED when the device is working. It is not lit when the device is powered down. TX/RX The LED is not lit when there is no network connection. It lights up green and flashes when data is being transmitted/received. TVE-120-420-820-1620 Encoder User Manual... - Page 10 1. Video In 6. RS-485 serial interface 2. Audio In, RCA connector 7. 12 VDC power input 3. Audio Out, RCA connector 8. Alarm In/Out 4. RS-232 serial interface 9. Power switch 5. LAN network interface 10. GND TVE-120-420-820-1620 Encoder User Manual...
-
Page 11: Connections
6. Normal alarm 7. 12 V or 24 V relay The alarm input can be selected to NO or NC. Different alarm output connection methods are applied to the AC or DC load. See Figure 3. TVE-120-420-820-1620 Encoder User Manual... -
Page 12: Getting Started
The password is case-sensitive so use a mixture of upper and lower case letters. • Do not use personal information or common words as a password User Name: It is always “admin”. It cannot be changed. The bar showing password strength Enter the new admin password and confirm it. TVE-120-420-820-1620 Encoder User Manual... -
Page 13: Accessing The Web Browser
Note: The TruVision Device Manager can only detect devices that are on the same LAN. The tool cannot detect devices placed on a VLAN. 3. Change the device settings as required. Click on the top right corner when completed. TVE-120-420-820-1620 Encoder User Manual... -
Page 14: Menu Tree
Menu tree Figure 4: Encoder menu tree TVE-120-420-820-1620 Encoder User Manual... -
Page 15: Browser Configuration
Options include: 256 MB, 512 MB and 1G. Latency Specify the transmission speed. Options include: Shortest Delay, Auto or Fluent. Auto Start Live View If enabled, automatically start all the live views when the users navigate to Live View tab. TVE-120-420-820-1620 Encoder User Manual... - Page 16 Specify the directory for saving snapshots in playback mode. Playback to the Path Save Clips from Playback Specify the directory for saving video clips in playback mode. to the Path Save Downloaded Files to Specify the directory for downloaded files. TVE-120-420-820-1620 Encoder User Manual...
-
Page 17: Live View
Define how you want video to be displayed in the viewer; single screen, 2X2, 3X3 or 4X4. When in multiview mode, double-click a video tile to get full- screen mode. Double-click again to return to multiview mode. Switch between main stream and substream. TVE-120-420-820-1620 Encoder User Manual... -
Page 18: Capture A Snapshot
A pop-up message will appear on screen to confirm that the capture was successful. The image is saved as a JPEG file on the computer. Note: Configure where the snapshots are saved on your computer in the Configuration > Browser Configuration menu on page 11. TVE-120-420-820-1620 Encoder User Manual... -
Page 19: Ptz Control
Presets are previously defined locations of a PTZ dome camera. They allow you to quickly move the PTZ dome camera to a desired position. Up to 256 presets can be configured. To set up a preset: 1. In live view mode, select a preset from the preset list. TVE-120-420-820-1620 Encoder User Manual... - Page 20 To call up a preset: 1. In live view mode, select a camera. 2. Select a preset from the preset list. 3. Click . The camera immediately moves to that preset position. TVE-120-420-820-1620 Encoder User Manual...
-
Page 21: Playback
Set playback time Input the time and click to locate the playback point. Control playback Click to control how the selected file is played back: play, stop, slow and fast forward playback. Stop Speed down Play Speed up TVE-120-420-820-1620 Encoder User Manual... - Page 22 4. Click a location on the timeline to move the cursor to where you want playback to start. The timeline can also be scrolled to earlier or later periods for play back. Click to zoom out/in of the timeline bar. 5. To download video files, click TVE-120-420-820-1620 Encoder User Manual...
-
Page 23: Camera Configuration
Refer to “Browser configuration” on page 11 on how to change main stream to substream for live viewing. 4. You can customize the following parameters for the selected Main Stream or Substream: TVE-120-420-820-1620 Encoder User Manual... -
Page 24: Camera Osd
To configure the OSD settings: 1. From the menu toolbar, click Configuration and then Remote Configuration > Camera Setup > Camera OSD. The Camera OSD window appears. TVE-120-420-820-1620 Encoder User Manual... -
Page 25: Image Adjustment
To configure the image settings: 1. From the menu toolbar, click Configuration and then Remote Configuration > Camera Setup > Image Adjustment. The Image Adjustment window appears. 2. Select a camera from the drop-down list. TVE-120-420-820-1620 Encoder User Manual... -
Page 26: Motion Detection
For example, recording is triggered by the movement of a person but not that of a cat. To configure motion detection: 1. From the menu toolbar, click Configuration and then Remote Configuration > Camera Setup > Motion Detection. The Motion Detection window appears. TVE-120-420-820-1620 Encoder User Manual... - Page 27 6. If you want to copy the motion detection settings of the current camera to other cameras, under Copy to Camera select the camera(s) to copy, or click Select All select all cameras. 7. Select the recording schedules for motion detection. Click the Arming schedule tab. TVE-120-420-820-1620 Encoder User Manual...
- Page 28 You can schedule only one time period in a day. Default is 24 hours. Note that when motion detection is enabled, motion events will always trigger event recording, regardless of the arming schedule. 8. Select the response method to motion detection. Click the Actions tab. TVE-120-420-820-1620 Encoder User Manual...
-
Page 29: Privacy Masking
This hidden area is referred to as privacy masking. Privacy masking cannot be viewed in live view or recorded mode, and appears as a blank area on the video image. TVE-120-420-820-1620 Encoder User Manual... -
Page 30: Camera Tamper
It is strongly recommended not to configure for video tampering when using PTZ dome cameras. To configure tamper-proof detection: 1. From the menu toolbar, click Configuration and then Remote Configuration > Camera Setup > Camera Tamper. The Camera Tamper window appears. TVE-120-420-820-1620 Encoder User Manual... - Page 31 The configuration is the same as that for motion detection (see “Motion detection” on page 22). You can schedule only one time period in a day. Default is 24 hours. 6. Click the Actions tab. TVE-120-420-820-1620 Encoder User Manual...
-
Page 32: Text Overlay
Remote Configuration > Camera Setup > Text Overlay. The Text Overlay window appears. 2. Select a camera from the drop-down list. 3. Enter the user-defined text content. Up to six character strings can be edited. TVE-120-420-820-1620 Encoder User Manual... -
Page 33: Ptz Setup
Click Configuration > Remote Configuration > Camera Setup > PTZ Setup. PTZ Setup window appears. 2. Select the camera, baud rate, data bit, stop bit, parity, flow control, PTZ protocol and PTZ address for the camera. TVE-120-420-820-1620 Encoder User Manual... - Page 34 3. If you want to copy the PTZ settings of the current camera to other cameras, under Copy to Camera select the camera(s) to copy, or click Select All to select all cameras. 4. Click Save to save the settings. TVE-120-420-820-1620 Encoder User Manual...
-
Page 35: Vca Settings
3. Select the type of audio input exception. Click the Exception Detection tab. Select the type of audio input exception to be detected: Audio Loss Detection, Sudden Increase of Sound Intensity, or Sudden Decrease of Sound Intensity. TVE-120-420-820-1620 Encoder User Manual... -
Page 36: Cross Line Detection
Remote Configuration > > Cross Line Detection. The Cross Line Detection window appears. 2. Select a camera from the drop-down list. 3. Enable Cross Line Detection. 4. Select the area where you want detection to start. TVE-120-420-820-1620 Encoder User Manual... - Page 37 To draw a new line, if required, select another line number from the drop-down list and then draw the line and set its direction rule values. Each line will be automatically numbered. 5. Select the arming schedules for the VCA event. TVE-120-420-820-1620 Encoder User Manual...
-
Page 38: Intrusion Detection
When you draw the rectangle, all lines should connect end-to-end to each other. Up to four regions are supported, each with a different time threshold and sensitivity. Click Clear to clear the rectangles. Note: The area can only be quadrilateral. TVE-120-420-820-1620 Encoder User Manual... - Page 39 Copy to copy these settings to other days of the week. 6. Select the response method to the VCA event. Click the Actions tab. Under Alarm Linking, check one of more of the desired response method: TVE-120-420-820-1620 Encoder User Manual...
-
Page 40: Sudden Scene Change
To setup sudden scene change actions: 1. From the menu toolbar, click Configuration and then Remote Configuration > > Sudden Scene Change. The Sudden Scene Change window appears. 2. Select a camera from the drop-down list. TVE-120-420-820-1620 Encoder User Manual... - Page 41 Linking, select the PTZ camera and enter the preset, preset tour, and/or a shadow tour to be triggered when the alarm is detected. Select Enable to activate the option. 7. Click Save to save all the settings. TVE-120-420-820-1620 Encoder User Manual...
-
Page 42: Network Settings
The Network Settings window appears. 2. Enter the required settings: Option Description NIC Type Network interface card (NIC) is a device used to connect the encoder to a network. Select the NIC type used from the drop-down list. TVE-120-420-820-1620 Encoder User Manual... - Page 43 RTSP Service The RTSP (Real Time Streaming Protocol) is a network control protocol Port designed for use in entertainment and communications systems to control streaming media servers. The default value is 554. TVE-120-420-820-1620 Encoder User Manual...
-
Page 44: Pppoe Settings
NO-IP server: Enter the server address for IPServer as well as the host name, user name and password. • ezDDNS: Enter the host name. It will automatically register it online. This is the default option. 4. Click Save to save the settings. TVE-120-420-820-1620 Encoder User Manual... -
Page 45: Ntp Settings
4. Click Save to save the settings. Email settings The encoder can send email notifications of alarms or notifications through the network. Note: Ensure that the DNS address has been set up correctly beforehand. TVE-120-420-820-1620 Encoder User Manual... -
Page 46: 802.1X Settings
IEEE 802.1X. To use 802.1X with the encoder, the network switch needs to also to support 802.1X. TVE-120-420-820-1620 Encoder User Manual... - Page 47 Note: The EAPOL version must be identical with that of the router or the switch. User Name This is a valid user name for the authentication server (usually a RADIUS server). Password This is a valid password for the user name specified in the previous field. TVE-120-420-820-1620 Encoder User Manual...
-
Page 48: Ftp Settings
2. Select SNMP. It is disabled by default. 3. Configure the Read SNMP Community (default: public), Write SNMP Community (default: private), Tap Address (default: empty) and Trap Port (default: 162). 4. Click Save to save the settings. TVE-120-420-820-1620 Encoder User Manual... -
Page 49: Network Storage
Automatic mapped type: The encoder automatically uses the free ports available that were set up in the Network Settings menu. Manual mapped type: You enter the particular external port settings and IP addresses required to connect to the desired router. TVE-120-420-820-1620 Encoder User Manual... -
Page 50: Https Settings
To configure IP Address Filter settings: 1. From the menu toolbar, click Configuration and then Remote Configuration > Network Settings > IP Address Filter. The IP Address Filter window appears. 2. Select Enable IP Address Filter. It is disabled by default. TVE-120-420-820-1620 Encoder User Manual... - Page 51 Note: Up to 256 IP address can be added to the list (allowed/forbidden) by web browser. 5. If required, you can modify a saved IP address. Click Modify and enter the changes. 6. Click Save to save the settings. TVE-120-420-820-1620 Encoder User Manual...
-
Page 52: Recording Settings
4. Schedule map. There are eight days to select: Sunday (Sun), Monday (Mon), Tuesday (Tue), Wednesday (Wed), Thursday, (Thu), Friday (Fri), Saturday (Sat), and Holiday (if enabled). 5. Advanced button. Schedule pre and post recording times, auto delete, and audio recording time. TVE-120-420-820-1620 Encoder User Manual... - Page 53 You can schedule only one time period in a day. Default is 24 hours. 6. Under Copy to Camera, select the other cameras to which to copy this schedule. 7. Click Save to save the settings. TVE-120-420-820-1620 Encoder User Manual...
-
Page 54: Alarm And Event Settings
Alternatively, you can also manually modify the length of the green timeline to the desired times. Click to copy the schedule to other days or to the whole week. TVE-120-420-820-1620 Encoder User Manual... -
Page 55: Alarm Output Settings
The actual status of the alarm output is shown under Alarm Status. It is either ON or OFF. To configure an alarm output: 1. From the menu toolbar, click Configuration and then Remote Configuration > Alarm & Event Setup > Alarm Output. The Alarm Output Settings window appears. TVE-120-420-820-1620 Encoder User Manual... - Page 56 Click to copy the schedule to other days or to the whole week. You can schedule only one time period in a day. Default is 24 hours. 5. Click Save to save settings. TVE-120-420-820-1620 Encoder User Manual...
-
Page 57: Manual Trigger
HDD Full: All installed HDDs are full and will not record any more video. • HDD Error: Errors occurred while files were being written to the storage, there is no storage, or the storage had failed to initialize. • Network Disconnected: Disconnected network cable. TVE-120-420-820-1620 Encoder User Manual... -
Page 58: Video Loss
To configure video loss detection: 1. From the menu toolbar, click Configuration and then Remote Configuration > Alarm & Event Setup > Video Loss. The Video Loss window appears. TVE-120-420-820-1620 Encoder User Manual... - Page 59 You can schedule only one time period in a day. Default is 24 hours. 5. Select the response method to motion detection. Click the Actions tab. TVE-120-420-820-1620 Encoder User Manual...
-
Page 60: Alarm Host Setup
2. Enter Alarm Host IP and Alarm Host Port values. Alarm host IP represents the IP of the remote PC where the Network Video Surveillance software installed. The alarm host port value must be the same as TVE-120-420-820-1620 Encoder User Manual... - Page 61 Up to three alarm hosts can be set. For each alarm host, the default port is 5001, 5002, and 5003. 3. Click Save to save the settings. TVE-120-420-820-1620 Encoder User Manual...
-
Page 62: Device Management
Set Time Enter the system date and time from the calendar. You can enable “Sync with computer time”. Auto DST Adjustment Enable to activate DST is automatically. It depends on the time zone selected. Default is Disabled. TVE-120-420-820-1620 Encoder User Manual... -
Page 63: General Settings
To set up the encoder’s name: 1. From the menu toolbar, click Configuration and then Remote Configuration > Device Management > General Settings. The Alarm Host Setup window appears. 2. Enter encoder’s name. 3. Click Save to save the settings. TVE-120-420-820-1620 Encoder User Manual... -
Page 64: Import/Export Configuration Files, Restart Device And Restore Default Settings
Remote Configuration > Device Management > Configuration Files. The Configuration Files window appears. 2. Click the Restart button to reboot the device. 3. Click in the pop-up message box to confirm reboot operation. The system will automatically restart. TVE-120-420-820-1620 Encoder User Manual... -
Page 65: Upgrade The System Firmware
Using TruVision Navigator. For further information, refer to the TruVision Navigator user manual. The firmware upgrade file is labeled tve-x20.dav. To update the system firmware: 1. Download the latest firmware from our web site to your computer or a USD device: Americas: www.interlogix.com EMEA: www.firesecurityproducts.com TVE-120-420-820-1620 Encoder User Manual... -
Page 66: Holiday Settings
3. Click save the settings and to return to the Holiday Parameters window. 4. Repeat steps 2 for other holiday periods. 5. Click Save to save the settings. TVE-120-420-820-1620 Encoder User Manual... -
Page 67: Rs-232 Settings
Default is None. Interface Only the RS-232 port can be used. Technical Support: Console mode. System communication Use the System Communication menu to enable/disable the RTSP and ONVIF protocols. TVE-120-420-820-1620 Encoder User Manual... - Page 68 Enable ONVIF The encoder supports all TruVision cameras and recorders and is compliant with ONVIF profile S cameras. Select this option to enable encoder to respond to any CGI commands. TVE-120-420-820-1620 Encoder User Manual...
-
Page 69: Storage Management
Storage management Use this menu to display and initialize SD cards/NAS devices as well as to set/unset storage to Overwrite. Figure 14: Storage Information window TVE-120-420-820-1620 Encoder User Manual... -
Page 70: User Management
Select one or more of the following rights: Select All Remote Parameters Settings Remote Advanced Operations Remote Bi-directional Audio Remote Shutdown/Reboot Remote Serial Port Control Remote: Notify Surveillance Center Remote Live View Remote Manual Record Remote PTZ Control Remote Playback Remote Video Download TVE-120-420-820-1620 Encoder User Manual... - Page 71 Remote Configuration > User Management > Users. The User Management window appears. 2. Select the desired user and click the Delete button. 3. Confirm your choice and click OK. 4. Click Save to save the settings. TVE-120-420-820-1620 Encoder User Manual...
-
Page 72: System Information
Preview link sum shows the amount of rote applications that are streaming video from this video channel. Preview link information shows you the IP addresses that are currently connected to this channel. TVE-120-420-820-1620 Encoder User Manual... - Page 73 You can view the alarm input number, alarm name, alarm type, alarm status, and triggered camera. 6. To view alarm output information, click Alarm Outputs. You can view the alarm output number, alarm name, and alarm status. TVE-120-420-820-1620 Encoder User Manual...
- Page 74 You can view the HDD label, status, capacity, free space, status, type, and property. Both total capacity and free space are also displayed. You can also see the recorded time in days. 9. To view the license agreement, click About > View Licenses. TVE-120-420-820-1620 Encoder User Manual...
- Page 75 TVE-120-420-820-1620 Encoder User Manual...
-
Page 76: System Log
Network Storage, Remote: Delete Network Storage, Remote: Set Network Storage Information All Types, Start Recording, Stop Recording, Network Storage Information, System Running Status 5. Click the Search button. A list of results appears. 6. Select a file and click: TVE-120-420-820-1620 Encoder User Manual... - Page 77 - Play: Click to start playback of the selected recording. - Export: Click to archive the selected file to a USB device. The Export window appears. 7. Click Exit to return to live view. TVE-120-420-820-1620 Encoder User Manual...
-
Page 78: Specifications
Built-in micro SD slot, up to 128 GB Operating temperature -10 to +55 C° (14 to 131 °F) Operating humidity 10 to 90% Dimensions 162.5 × 114 × 47.5 mm (6.4 × 4.5 × 1.9 in.) Weight 1.5 kg (3.3 lb.) TVE-120-420-820-1620 Encoder User Manual... - Page 79 Built-in micro SD slot, up to 128 GB Operating temperature -10 to +55 C° (14 to 131 °F) Operating humidity 10 to 90% Dimensions 162.5 × 114 × 47.5 mm (6.4 × 4.5 × 1.9 in.) Weight 1.5 kg (3.3 lb.) TVE-120-420-820-1620 Encoder User Manual...
- Page 80 Operating humidity 10 to 90% Dimensions 380 × 320 × 48 mm (15.0 × 12.65 × 1.9 in.) Weight 2 kg (4.4 lb.) Note: 19” rack brackets are included in the 8-channel model of the encoder. TVE-120-420-820-1620 Encoder User Manual...
- Page 81 Operating humidity 10 to 90% Dimensions 380 × 320 × 48 mm (15.0 × 12.65 × 1.9 in.) Weight 2 kg (4.4 lb.) Note: 19” rack brackets are included in the 16-channel model of the encoder. TVE-120-420-820-1620 Encoder User Manual...
-
Page 82: Appendix: Supported Devices
Appendix: Supported devices Cameras TruVision HD-TVI cameras up to 5MPx Decoders TVE-DEC12 Recorders TVN 10 series TVN 22 series TVN 11 series TVN 70 series TVN 21 series TVN 71 series TVE-120-420-820-1620 Encoder User Manual...