Interlogix XTI-5 Installation Manual
Hide thumbs
Also See for XTI-5:
- User manual (44 pages) ,
- Installation manual (21 pages) ,
- Installation manual (20 pages)

Related Manuals for Interlogix XTI-5


Summary of Contents for Interlogix XTI-5
- Page 1 ® Simon XTi-5 Installation Manual P/N 466-5256 • REV A • 16JUN16 Simon XTi-5 Installation Manual...
- Page 2 Copyright © 2016 United Technologies Corporation. Interlogix is part of UTC Climate, Controls & Security, a unit of United Technologies Corporation. All rights reserved. ® Trademarks and patents The Simon XTi-5 name and logo are trademarks of UTC Fire & Security.
- Page 3 THAT A THIRD PARTY MAY HACK, COMPROMISE OR CIRCUMVENT ITS SECURITY PRODUCTS OR RELATED SOFTWARE, ANY SECURITY PRODUCT OR SOFTWARE MANUFACTURED, SOLD OR LICENSED BY INTERLOGIX, MAY STILL BE HACKED, COMPROMISED AND/OR CIRCUMVENTED. INTERLOGIX DOES NOT ENCRYPT COMMUNICATIONS BETWEEN ITS ALARM OR SECURITY PANELS AND THEIR OUTPUTS/INPUTS INCLUDING, BUT NOT LIMITED TO, SENSORS OR DETECTORS UNLESS REQUIRED BY APPLICABLE LAW.
-
Page 4: Table Of Contents
Voice volume ..................30 Beep volume ..................30 Brightness ..................30 Default screen ................... 31 Calibration ..................31 Help ....................32 Set time and date ................32 Version ....................33 Programming...................... 34 Access codes .................... 35 Security ..................... 36 Simon XTi-5 Installation Manual... - Page 5 Cleaning the touch screen ............... 65 Disposal ....................65 Troubleshooting ....................66 System status ..................66 Control panel ................... 66 Sensors ....................66 Specifications..................... 67 Sensor names ....................68 Simon XTi-5 system quick reference ............... 72 Simon XTi-5 Installation Manual...
-
Page 7: Product Overview
Devices that report to the panel • Devices that respond to commands from the panel Figure 1: Simon XTi-5 system The self-contained panel provides the main processing unit for all system functions. It receives and responds to signals from wireless sensors and wireless touchpads throughout the premises. -
Page 8: System Components
Simon XT Talking Touchpad The wall-mounted, two-way, talking touchpad combines a conventional learn mode touchpad with an RF receiver, speech (60-924-3-XT) chip, and voice amplification circuit. Simon XTi-5 Installation Manual Contents... -
Page 9: Standard Panel
Do not use outdoor motion sensors for intrusion protection. ATTENTION: N’utilisez pas des détecteurs de mouvement extérieurs pour détecter les intrusions. Standard panel Table 2 below describes the basic panel (out-of-box) hardware capabilities for the Simon XTi-5 600-1054-95R-16 and 600-1054-95R-16-CN. Table 2: Panel hardware capabilities Hardware Capability Power Input for an AC step-down, plug-in style transformer. -
Page 10: Planning The Installation
Has not been investigated by UL. c. Required for UL-listed residential fire alarm applications. d. Additional devices employing UTCFS 80 Bit Enhanced Protocol have not been investigated for use in a UL Listed installation. Simon XTi-5 Installation Manual Contents... - Page 11 20 Delayed interior: PIR motion sensor that initiates a Intrusion delay before going into alarm. 21 Local instant interior: 24-hour local alarm zone Intrusion 1234 protecting anything that opens and closes. No report. Contents Simon XTi-5 Installation Manual...
- Page 12 Three 1234 beeps 43 Property/asset management: Notify the user that a One beep 1234 protected asset has moved. Note: We recommend you use this sensor group in combination with a Simon XT Talking Touch Screen. Simon XTi-5 Installation Manual Contents...
- Page 13 Table 5: Sensor assignments/locations Sensor Device Sensor Sensor name/location Notes group Contents Simon XTi-5 Installation Manual...
-
Page 14: Cross-Zoning
Figure 2: Cross-zone diagram Note: We do not recommend cross zoning for exit/entry zones. Each zone can individually protect the intended area. Simon XTi-5 Installation Manual Contents... -
Page 15: System Configuration
Security menu Account number 00000 00000 0 to FFFFFFFFFF D, I Downloader code 12345 12345 00000 to 99999 Phone lock On/Off Auto arm On/Off D, I Exit extension On/Off D, I Secure arming On/Off D, I Contents Simon XTi-5 Installation Manual... - Page 16 D, I Sensors menu Learn sensors D, I Delete sensors D, I Edit sensors D, I Reporting menu Report options Opening reports On/Off D, I Closing reports On/Off D, I Forced armed On/Off D, I Simon XTi-5 Installation Manual Contents...
- Page 17 D, I Fail to open time 12:00 midnight to D, I 11:59 PM, Off Fail to close time 12:00 midnight to D, I 11:59 PM, Off Siren timeout 5 minutes 2 to 254 minutes, D, I Contents Simon XTi-5 Installation Manual...
- Page 18 On/Off D, I, M Trouble beeps On/Off D, I Voice chime D, I, • Voice chime (sensor name) • Chime bell • Soft chime bell • Off-No voice chime Hardwired siren On/Off D, I supervision Simon XTi-5 Installation Manual Contents...
- Page 19 Vox microphone gain 1 to 64 D, I range Manual microphone 1 to 64 D, I gain System test menu Sensor test D, I, M Communication test D, I, M System download D, I, M Contents Simon XTi-5 Installation Manual...
-
Page 20: Installation
6. Hold the mounting plate against the wall and mark the mounting hole locations (Figure 4) with a pencil. Note: Mark both mounting holes in the middle of the mounting slot. This will allow better adjustment of the panel before securing it to the wall. Simon XTi-5 Installation Manual Contents... -
Page 21: Connecting Hardwired Devices
Tighten the screws. 11. Reattach the trim ring. Connecting hardwired devices The panel has five screw terminals, two battery terminals, and two telephone connections. The screw terminals connect the AC power, sirens, and/or hardwired detectors. Contents Simon XTi-5 Installation Manual... -
Page 22: Interior Sirens
Connect the hardwired interior siren (13-374) to the panel using a 4.7 kohm resistor (included with the siren) as shown in Figure 6 on page 17. The resistor must be connected across the siren wires as close to the siren as possible. Simon XTi-5 Installation Manual Contents... -
Page 23: Exterior Sirens
Connect hardwired reed switches to the panel using a 47-kohm resistor (not a 4.7-kohm resistor) as shown in Figure 7 on page 18. The resistor must be connected at the last switch in the circuit. Contents Simon XTi-5 Installation Manual... -
Page 24: Wiring A Phone Line To The Panel
You may also need an inline filter to ensure panel reporting is successful. Note: Avoid connecting the panel to a standard phone (voice) line as other devices on the line can prevent reports from going through. Figure 8: Phone connectors Simon XTi-5 Installation Manual Contents... -
Page 25: Full Line Seizure
5. Connect the phone cord included with the panel to the RJ31X and the panel LINE jack. Figure 9: Full line seizure wiring with RJ31X Phone cord To RJ45 connector (LINE) RJ31X RING Four-conductor cable Telco block Green Black White (or Yellow) Green Contents Simon XTi-5 Installation Manual... -
Page 26: Full Line Seizure Wiring With One Premises Phone
AC power transformer. This sequence prevents a battery fault condition. Note: Maximum battery charge current is 120 mA. It may take up to 36 hours for a new battery to fully change. Simon XTi-5 Installation Manual Contents... - Page 27 5. Plug the battery connector into the panel. Caution: Do not connect the battery until you are ready to power up the panel. ATTENTION: Ne branchez pas la batterie tant que vous n’êtes pas prêt à mettre le panneau sous tension. Contents Simon XTi-5 Installation Manual...
-
Page 28: Resetting Memory To Factory Defaults
Note: Upon initial installation, the battery may not be fully charged for as long as 36 hours. A low battery icon will be present and trouble beeps will sound until the battery is sufficiently charged. After the initial charge, should the Simon XTi-5 Installation Manual Contents... - Page 29 Arming or disarming the system. • Pressing the STATUS & SETTINGS icon and pressing LISTEN next to Panel Status. This will disable the sounder for 4 hours but the trouble indication will remain until the battery is recharged. Contents Simon XTi-5 Installation Manual...
-
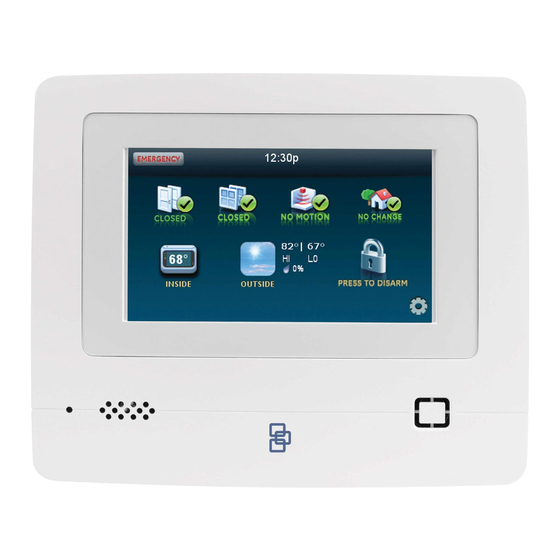
Page 30: System Configuration
All installer options are set in the Programming menu, except for setting the system time and date. Figure 12 below shows the Simon XTi-5 front panel. Figure 12: Simon XTi-5 front panel Note: The touch screen in Figure 12 above is an example. - Page 31 The panel automatically exits the system menu after a few seconds of inactivity if no access code has been entered yet. After an access code has been entered to access a code-protected area of the system menu, the timeout is four minutes. Contents Simon XTi-5 Installation Manual...
-
Page 32: Status & Settings Menu Navigation
Lights Note: Has not been investigated by UL. Door lock Note: Has not been investigated by UL Voice volume Beep volume Brightness Default screen Calibration Help Set date/time System tests Sensor test Comm test Simon XTi-5 Installation Manual Contents... - Page 33 Speaker volume, Silent police panic, Alarm report verify Auto Audio mode, Fire shutdown, Panic talk, VOX verification receiver gain, VOX microphone gain, VOX gain range, Manual microphone gain System tests Sensor test, Communication test, Initiate download call Version Contents Simon XTi-5 Installation Manual...
-
Page 34: Event History
From the Status & Settings screen, press CLEAR next to Panel Status. Lights To control lights programmed into the system: 1. From the Status & Settings screen, press CONTROL next to Lights. Note: If no lights are programmed into the system, the following screen will appear: Simon XTi-5 Installation Manual Contents... -
Page 35: Door Lock
Note: If no door locks are programmed into the system, the following screen will appear. 2. From the Door Locks screen, choose the following options: • Press LOCK ALL to lock all system programmed door. Contents Simon XTi-5 Installation Manual... -
Page 36: Voice Volume
From the Status & Settings screen, next to Brightness, press the left arrow to make the screen less bright and the right arrow to make the screen more bright. The bars between the arrows register the brightness level. One bar is least bright. Four bars is brightest. Simon XTi-5 Installation Manual Contents... -
Page 37: Default Screen
2. Press and hold the Reset button (D in Figure 3). 3. Press and hold anywhere on the screen. 4. While you are pressing the screen, release the Reset button. 5. Follow the calibration prompts. Contents Simon XTi-5 Installation Manual... -
Page 38: Help
3. From the Set Date/Time screen press the first box to set the hour and press SAVE. 4. Press the second box to set the minutes and press SAVE. 5. Press a.m/p.m. box to toggle a.m./p.m. setting. Simon XTi-5 Installation Manual Contents... -
Page 39: Version
3. Press the third box and enter the year and press SAVE. 4. Press CLOSE repeatedly to exit. Version To display the system’s firmware version, touch screen version, and copyright information, scroll until the display shows Version on the bottom of the screen. Contents Simon XTi-5 Installation Manual... -
Page 40: Programming
Note: You have four seconds between number presses to enter the code or you will be returned to the home screen. Note: Do not remove the panel power within 30 seconds of exiting program mode. Table 9: Simon XTi-5 programming codes Code Description Dealer code... -
Page 41: Access Codes
You can use the user codes to arm/disarm the system. Duress code Blank Use the duress code in place of the master or user code to cause a silent alarm. Code length Four Codes can be three to six digits long. digits Contents Simon XTi-5 Installation Manual... -
Page 42: Security
Disarm. You can enter numerical digits sequentially. Account numbers with letters A through F, or numbers 0 through 9 (or a combination of those letters and numbers) are only supported. Simon XTi-5 Installation Manual Contents... - Page 43 (on), or not (off). This option does not affect key fob arm/disarm operation. No arm on Determines whether the system protests arming if a low CPU battery low battery condition exists (on), or not (off). Contents Simon XTi-5 Installation Manual...
-
Page 44: Phone Numbers
To add a pause to the phone number, press Pause on Phone #4 Blank the keypad. Downloader # Blank Lets you program up to a 26-digit phone number for the Enterprise Downloader. Simon XTi-5 Installation Manual Contents... -
Page 45: Phone Options
1. From the Phone Options screen, press the white field next to Call Waiting #. 2. Enter the new/edited call waiting # on the numbered keypad and press SAVE. 3. Press CLOSE repeatedly to exit menus. Contents Simon XTi-5 Installation Manual... - Page 46 The panel dials immediately for both the alarm and opening report. Regardless of this option setting, the panel always dials immediately for fire alarms, AC power failure, and low battery reports. Simon XTi-5 Installation Manual Contents...
-
Page 47: Sensors
To learn (program) and edit a sensor: 1. From the Programming screen, press SENSORS. 2. From the Sensors screen, press LEARN SENSORS. 3. Press the sensor program button or release the sensor tamper switch. The Edit Sensor screen will appear. Contents Simon XTi-5 Installation Manual... - Page 48 7. Press SAVE to save the changes. 8. Press CLOSE to return to the Sensors screen. To delete a sensor: 1. From the Programming screen, press SENSORS. 2. From the Sensors screen, press DELETE SENSORS. Simon XTi-5 Installation Manual Contents...
-
Page 49: Mounting Recommendations
Avoid mounting the sensor or receiver directly on metal. • The Simon XTi-5 system should not be mounted within 3 meters of any other RF equipment (RF music system transmitter, wireless router/modem, etc.). Note: Refer to specific sensor installation instructions for complete operation and testing details. -
Page 50: Sensor Association With The Graphical Interface Icons
Figure 13: At a glance icons The at-a-glance icons (see Figure 13 above) Door, Window, Motions, and Property, found on the Simon XTi-5 (and remotely connected Talking Two-Way Touch Screens) are associated with sensors, given a set of rules. •... -
Page 51: Common Associations Of Icons And Sensors
Tilt sensors can be used as a means to provide asset monitoring associated with the Property icons with the use of group type 43. Reporting To turn on/off reporting options: 1. From the Programming screen, press REPORTING. 2. From the Reporting screen, select REPORTING OPTIONS. Contents Simon XTi-5 Installation Manual... - Page 52 Sensor Close - Immediately after sensor is closed or restored after dial delay • Siren Timeout - After siren timeout expires if sensor is restored • System Disarm - When system is disarmed if sensor is restored. • Simon XTi-5 Installation Manual Contents...
- Page 53 (5 minutes). To edit communication modes options: 1. From the Programming screen, press REPORTING. 2. From the Reporting screen, select COMM MODES. Contents Simon XTi-5 Installation Manual...
-
Page 54: Timers
Alarms include: Fire, Intrusion, Emergency, Silent, and Alarm Cancels. Nonalarms include: No Activity, Openings, Closings, Fail-to-Open, Fail-to-Close, Force Armed, AC Power Failure, CPU Low Battery, and Trouble Restoral. Timers To edit timer options: 1. From the Programming screen, press TIMERS. Simon XTi-5 Installation Manual Contents... - Page 55 (except sensors in group 25 and 43). The timeout can be set from 02 to 24 hours. Contents Simon XTi-5 Installation Manual...
- Page 56 (on), or remains at the armed level chosen (off). This feature does not work from a key fob. Autoarm must be on for this feature to work. Simon XTi-5 Installation Manual Contents...
-
Page 57: Touchpad Options
(on), or arm and disarm the system anytime (off). If this option and the key fob no delay option are on, you cannot enter and/or disarm using remote touchpads without causing an alarm. Contents Simon XTi-5 Installation Manual... -
Page 58: System Options
Demo mode Determines whether the panel operates as a demonstration model (on) or a standard panel (off). Turning on this feature disables low battery supervision. With this option on, the panel is not testing battery supervision. Simon XTi-5 Installation Manual Contents... -
Page 59: Siren Options
3. From the Voice chime screen, press to turn an option on and press turn an option off. Note: indicates the option is turned on. 4. Press SAVE. 5. Press CLOSE to return to the Programming screen. Contents Simon XTi-5 Installation Manual... -
Page 60: Audio Verification Options
Determines whether the panel verifies successful alarm reports to the central station by announcing “Phone Communication OK” (on), or verify not (off). Audio verification options To edit audio verification options: From the Programming screen, press AUDIO VERIFICATION. Simon XTi-5 Installation Manual Contents... - Page 61 2. From the Audio Mode screen, press to turn an option on and press turn an option off. Note: indicates the option is turned on. 3. Press SAVE. 4. Press CLOSE to return to the Programming screen. Contents Simon XTi-5 Installation Manual...
- Page 62 Determines the gain level (sensitivity) during two-way audio sessions when mic gain audio mode is set to 0 or 1 (speak). Room size, acoustics, and furnishings when the panel is located will influence the setting. Gain range is 01 (lowest) to 64 (highest). Simon XTi-5 Installation Manual Contents...
-
Page 63: System Tests
The comm test, or communication test, is used to check proper communication. If Comm Test is not finished it will continue to run even if you exit program mode. System This feature initiates a phone call from the panel to the Enterprise download Downloader. Contents Simon XTi-5 Installation Manual... -
Page 64: Testing
The panel will sound EMERGENCY icon on to activate a police, fire, or an alarm and the Police the home screen to panic emergency alarm. following alarm icon access these icons. will appear with the Fire alarm message: Simon XTi-5 Installation Manual Contents... -
Page 65: Arming Errors
ENTER next to System Tests. 3. Enter the dealer, installer or master code and press OK. 4. Press SENSOR TEST. 5. All learned in sensors will be displayed on this screen. Press to scroll through the pages. Contents Simon XTi-5 Installation Manual... - Page 66 Press and hold the test button until the system sounds 6 of 8 transmission beeps. Personal help Press and hold the appropriate help button until the light 6 of 8 button blinks and the panel sounds for at least seven beeps. Simon XTi-5 Installation Manual Contents...
-
Page 67: Sensor Test Failure
2. Increase the distance from the original position and retest until an acceptable location is found. 3. Mount the sensor in the new location. 4. If no location is acceptable, replace the sensor. To replace a sensor: 1. Test a known good sensor at the same location. Contents Simon XTi-5 Installation Manual... -
Page 68: Sensor Testing Notes
There is a 30 second delay. 4. When you finish testing the system, call the central station to verify that the alarms were received. Simon XTi-5 Installation Manual Contents... -
Page 69: System Download
Note: When in this mode, the user cannot re-enter the previous menu. You must hang up and call back in to the panel to perform additional functions. Specific light on *, <unit number> Specific light off #, <unit number> Contents Simon XTi-5 Installation Manual... -
Page 70: Two-Way Voice Operation
1. Contact the central monitoring station (if the system is monitored) to inform them you are testing the system and not to dispatch authorities. 2. At the system site, put the system into an alarm condition. Simon XTi-5 Installation Manual Contents... -
Page 71: Cleaning The Touch Screen
Cleaning the touch screen If necessary, use a soft lint-free cloth to clear smudges on the touch screen; do not use glass cleaner on the touch screen. Disposal Dispose of all equipment in accordance with local requirements. Contents Simon XTi-5 Installation Manual... -
Page 72: Troubleshooting
Troubleshooting This section provides information to help you diagnose and solve various problems that may arise while configuring or using your Simon XTi-5. System status To clear Status (alarm memory), from a disarmed state press CLEAR from the Status & Settings screen. -
Page 73: Specifications
14 to 86ºF (-10 to 30ºC) with battery one year shelf life Operating temperature 32 to 120ºF (0 to 49ºC) Maximum humidity 85% relative humidity, noncondensing Auxiliary power Unregulated 4.0 to 12.3 VDC, with a maximum of 250 mA Contents Simon XTi-5 Installation Manual... -
Page 74: Sensor Names
Nursery 024 Office 025 Office window Outside 173 Panic 133 Patio Patio door 146 Pendant 042 Phone module Police 134 Pool 021 Porch Porch window 187 Rear 139 Room Second 197 Second floor 170 Sensor Simon XTi-5 Installation Manual Contents... - Page 75 049 G 050 H 052 J 053 K 055 M 056 N 058 P 059 Q 061 S 062 T 064 V 065 W 067 Y 068 Z 070 1 071 2 073 4 074 5 Contents Simon XTi-5 Installation Manual...
- Page 76 Motion detector 163 Smoke detector 164 Glass break Water sensor 166 Freeze sensor 167 Medical Detector 169 Smoke 170 Sensor Alarm 172 Emergency 173 Panic Motion 175 Alert 176 Police Silent police 178 Transmitter 179 Main Simon XTi-5 Installation Manual Contents...
- Page 77 Master 181 North 182 South East 184 West 185 Front Back 187 Rear 188 Side First 190 1st 191 Second 193 3rd 194 4th Floor 196 First floor 197 Second floor Third floor Contents Simon XTi-5 Installation Manual...
-
Page 78: Simon Xti-5 System Quick Reference
Simon XTi-5 system quick reference Task Instructions Level 1: Disarm the system Control panel: Press Disarm and enter your access code. Key fob: Press Unlock. Telephone: Press 1. Level 2: Arm doors and Control panel: Press to Arm, Press Doors & Windows Only and enter windows your access code (if required).