Interlogix ZeroWire User Manual
Wireless security & home automation
Hide thumbs
Also See for ZeroWire:
- Reference manual (93 pages) ,
- Installation manual (62 pages) ,
- User manual (51 pages)
Table of Contents
Advertisement
Advertisement
Table of Contents

Related Manuals for Interlogix ZeroWire


Summary of Contents for Interlogix ZeroWire
-
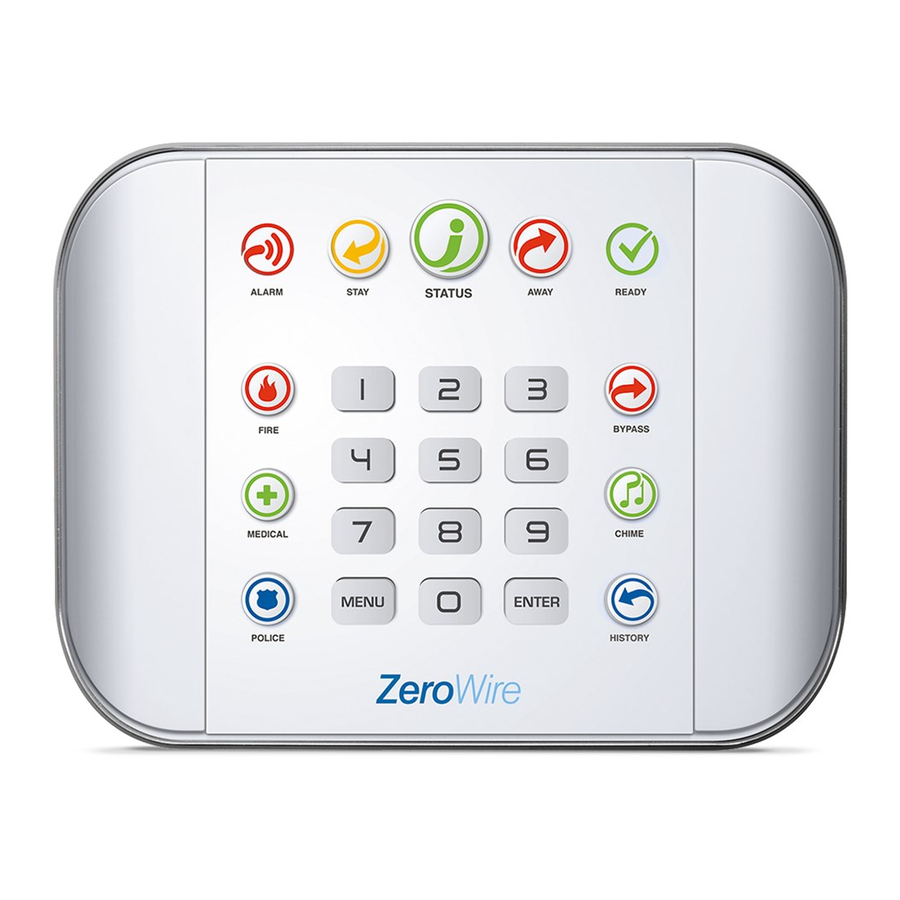
Page 2: Front Of Zerowire
CHIME System is disarmed if Not lit the ZeroWire when they are tripped. Stay is also not lit. Press the HISTORY key to listen for System is armed in the AWAY ... -
Page 3: Basic Features
Select the Away Mode. AWAY USER PIN CODE ENTER Leave the premises. EXIT DELAY BEEPS To silence the Exit Delay beeping, press the Away Key again and the beeping will stop. This can also be performed from the UltraConnect app. ZeroWire User Manual... - Page 4 Perimeter detectors will be armed and active to detect intruders. The security of your home in Stay mode is dependent on the type and number of detectors you have installed and are active in Stay mode. There are three similar modes available - Stay Mode, Stay Instant Mode, and Night Mode. ZeroWire User Manual...
-
Page 5: Arm Your System In Stay Mode
If the Ready Light is flashing green then “forced arming” is enabled. This means some zones are not secure but you can still arm your security system. Read more about the Forced Arming Feature on the previous page. ZeroWire User Manual... - Page 6 If an armed zone is alarmed whilst your security system is in the Stay mode, it will sound a warning tone on your ZeroWire and start a timer. At the end of the Stay Mode Entry Time your sirens will sound. Your service provider predetermines this warning time at the time of installation.
- Page 7 To set normal Stay Mode, touch the Stay key one more time: Select the Stay Mode when the system is in Night Mode. STAY Stay button will return to a solid yellow. STAY Stay within the protected areas. ZeroWire User Manual...
- Page 8 For EN Grade 2 compliant systems, the Status Key behaviour has been modified for greater security. It will be off or red, and not announce system status when pressed. To check system status on EN Grade 2 systems: ZeroWire User Manual...
- Page 9 Once a detector detects your presence, the entry delay will begin counting down and your ZeroWire will repeat a warning message until a valid PIN code is entered. If a valid PIN code is not entered by the end of the entry delay time, your sirens and communicator will activate.
-
Page 10: Bypass A Zone
Lock Out On 3 Invalid Attempts If an invalid PIN code is entered three times, the ZeroWire will deny all login attempts for 90 seconds. Attempts are counted from any method (e.g. keypad, app, or web server). -
Page 11: Event History
MENU It is recommended you record user names, zone names, and outputs names in Menu 8 – Recordings. This will make reviewing any events much clearer as ZeroWire will announce the recorded name. You may also review all events recorded by your security system:... -
Page 12: Emergency Keys
Exits from History Menu. Emergency Keys ZeroWire has three (3) emergency keys: Medical, Police (duress) and Fire. If these keys are not lit, then the Emergency Keys are not available on your system. Check with your service provider to clarify what responses will be provided upon activation. -
Page 13: Add A User
Add a User You need to be a Master user to add new users to the panel. Example: Add a new user to ZeroWire and assign them a PIN code 2580. We will add this as user 4. Selects User Configuration menu. -
Page 14: Add A Username
ZeroWire Web Server to view or program usernames: 1. On the ZeroWire press Menu – 8 – [PIN] – 6 and note the IP address announced. 2. Open your web browser and enter the IP address. Some browsers may require you to enter http:// before the IP address. -
Page 15: Remove A User
Example: Remove User 4 from your system. Selects User Configuration menu. MENU YOUR 4 TO 8 DIGIT MASTER CODE ENTER Selects configure user PIN. Select user 4. ENTER Disables the user PIN. BYPASS Exits from Advanced system configuration. MENU MENU MENU ZeroWire User Manual... -
Page 16: Change A User Pin
Note: User must have a unique PIN code. If the new PIN code you enter is the same as another user’s PIN code your ZeroWire will announce "PIN code is occupied, select a new user PIN code." Change the User Type The user type determines what that user can do: •... -
Page 17: More About Users
ZeroWire Web Server (see User Name and PIN on page 21) or DLX900 desktop software. If you have many users to add you may find it is easier to use ZeroWire Web Server or DLX900 desktop software. These are installer tools, refer to the Installation Manual for instructions. - Page 18 Each ZeroWire user number is sent to the same numbered slot in the lock, up to the maximum slots available in the lock. For example, ZeroWire user number 1 will be sent to the Z-Wave Door Lock slot 1. Users exceeding the capacity of the lock will not be sent.
- Page 19 10. Refer to door lock manual to remove or change installer / master codes from door lock. As PIN codes can also be changed on the door lock, over time there may be a mismatch in PINs on the door lock compared to ZeroWire. To avoid this confusion, only make PIN code changes via ZeroWire.
-
Page 20: Ultraconnect App
The UltraConnect app requires a valid username and PIN code to function. A default user should be written on the rear of this manual, or refer to "Add a Username" on page 23. The menus available are dependent on the permissions for the user entered. ZeroWire User Manual... - Page 21 5. Click + on the top right to add a new site, or the (i) icon to edit an existing site. 6. Enter the details of your security system. The serial number is printed on the back of the ZeroWire unit. Alternatively login to ZeroWire Web Server and go to Settings – Details to view it.
-
Page 22: Using The App
Touch Bypass to ignore a zone or touch it again to restore it to normal operation. Touch Chime to add or remove a zone from the Chime feature. Touch Notify to receive push notifications when there is activity from that zone. ZeroWire User Manual... - Page 23 Video clips can also be accessed from the History screen. Touch Menu , HISTORY, then change Selected Events to Video. Touch “Press to Play Video” to retrieve the clip from the camera. ZeroWire User Manual...
- Page 24 This History screen displays the event log of the ZeroWire, recording important events and allowing authorized users the ability to audit the system. Changing the Selected Events to Alarms will display the filtered Mandatory Event Log. Events followed with an * have not yet been reported to a control room or have failed to report, while events with ** are for events not intending to be reported to a control room.
- Page 25 All users can change their PIN code by touching Menu , USERS. A history of events and status changes on your ZeroWire can be accessed by touching Menu , HISTORY: The list of events can be filtered to make it easier to locate more relevant information. Click Touch the Select Events drop down and select “Alarm”...
-
Page 26: Zerowire Web Server
To connect via local WiFi you will need a router supporting 802.11 b or 802.11g. 1. Power on - Connect power to your ZeroWire. 2. Enable WiFi on ZeroWire - On the ZeroWire press Menu – 9 – [PIN] – 8. This will enable WiFi Discovery Mode for 10 min. - Page 27 The ZeroWire will announce “Ethernet is on” when this is set correctly. Press Menu, Menu to exit. 3. Connect an Ethernet cable to the rear of the ZeroWire and wait 10 sec for the local router to assign the ZeroWire an IP address 4.
-
Page 28: Troubleshooting
6. Enter the IP address from step 4 and the ZeroWire login screen should appear. Some browsers may require you to enter http:// before the IP address. 7. Enter your username and password, by default this is "installer" and 9713. -
Page 29: Customizing Your Zerowire
Customizing Your ZeroWire Volume Level Example: Set volume level to 6 MENU Select main menu - Option 1 Volume level. Set volume level to 6. Exit menu. MENU MENU Voice Annunciation Example: Turn on/off the voice when arming and disarming... -
Page 30: Backlight Level
MENU MENU Idle mode is when your ZeroWire is not being used. The lights on the screen dim for your comfort at night and to save power. All security functions work normally. Example: Set idle mode brightness level to 1 Select main menu –... -
Page 31: Change Time And Date
Change Time and Date When ZeroWire is connected to the Internet, time and date are automatically updated with an Internet time server Example: Manually set the time as 9.30AM, and the date as 19.6.2014 Select main menu - Option 8, Basic system MENU configuration. -
Page 32: Record Zone Names
Select zone name recording. Select zone 1. ENTER Activate recording mode. HOLD DOWN HISTORY Record voice, maximum 2 seconds. ( ( SPEAK NAME ) ) Stop recording mode. RELEASE HISTORY Exits from Advanced system configuration. MENU MENU MENU ZeroWire User Manual... -
Page 33: Record User Names
MENU Voice Message Recording ZeroWire has a digital message board so you can leave entry messages for users to hear when they disarm the system and reminder messages for users arming the system. Example: Record an Entry or Exit Message. -
Page 34: Set Zone Chime Mode
Set Zone Chime Mode You can setup your ZeroWire so that it will make a “chime” sound when programmed zones are unsealed. Chime mode does not trigger any alarms and is only used as a low level alert such as a customer entry door. - Page 35 5. Enter an email address in the Destination field. 6. Select an Event List. 7. Enter a Channel Name for future reference. 8. Click Save. ZeroWire User Manual...
-
Page 36: Add Z-Wave Devices
Add Z-Wave Devices 1. Log in to ZeroWire Web Server or UltraConnect app. 2. Click Settings, Rooms and edit Room Names. 3. Click Settings, Z-Wave Add/Remove. 4. Click Add. ZeroWire User Manual... - Page 37 To do this, click Remove, then activate LINK or REMOVE mode on the device. 6. Click Rooms 7. Check you can see the device you just added. Click a button such as ON or OFF to verify you can control the device. ZeroWire User Manual...
- Page 38 Enabling Camera Recording Adding Camera to UltraConnect Make sure the ZeroWire panel is on the same local area network as the camera(s). 1. From your iOS or Android device, open the UltraConnect app and log in to the site as an installer.
- Page 39 Ensure you can view the live stream from the camera before continuing. 1. Touch Menu then Settings. 2. Select Scenes under the Settings Selector. 3. Select the Scene to Configure and type a Scene Name. 4. Select the Scene Trigger. ZeroWire User Manual...
- Page 40 1. Open the UltraConnect app. 2. Click the Camera icon. 3. Click the Latest Clip button. Please wait while the ZeroWire servers retrieve the last recorded video clip from the selected camera. 4. Click the Share button to download or forward the clip.
-
Page 41: Enabling Notifications
Enabling Notifications ZeroWire can send notifications to the UltraConnect app via the Channels feature. Each ZeroWire has up to 13 available channels. Each device registered to receive notifications will take up a channel position. 1. Open the UltraConnect app. 2. Click the edit button next to the site you wish to receive notifications from. - Page 42 Notifications to free up the channel position for future use. Troubleshooting notifications If notifications are not working: • Confirm you can login and see the Overview screen on the device you wish to receive notifications on. This ensures you have authority to access the ZeroWire. ZeroWire User Manual...
- Page 43 • Check the ZeroWire has at least one unused channel. Login to the ZeroWire, touch Menu , Settings, then Channels. • Check your site is registered for notifications in the app (follow instructions above). • Check your smartphone has notifications enabled (on Apple iOS click Settings, Notifications, scroll down and click UltraConnect, check “Allow Notifications”...
- Page 44 Removing notifications To manually remove a device from receiving notifications on the ZeroWire: 1. Log in to the ZeroWire. 2. Click Settings. 3. Click Channels from the Settings Selector. 4. Click the Channel Number in the drop down list, your device name will appear.
- Page 45 6. Click Save. 7. Your device will no longer receive notifications from this ZeroWire and the Channel is available to be reused. ZeroWire User Manual...
-
Page 46: Location Services
Location Services The UltraConnect app can advise the ZeroWire panel when a user has left or returned to a predefined physical location. For example, when a user leaves home, the UltraConnect app can detect this and remind a user to arm the security system and automatically turn off Z-Wave lights. On return home in the evening, the UltraConnect app can turn on Z-Wave lights. - Page 47 6. Click Save Map. 7. Enable Geo Actions if you want your device to regularly check it’s GPS location and send a message to the ZeroWire when it enters or leaves the location. Note: Enabling this feature will consume more battery.
- Page 48 Program ZeroWire to Respond When Location Services is enabled, the app can send to your ZeroWire one of two event messages: Geosphere Entered or Geosphere Exited. Your ZeroWire has 16 programmable “scenes”. Each scene can perform up to 16 sequential actions based on when the event is received, which event is received, and which user triggered the event.
- Page 49 • A valid user must be entered in the site details screen. • If actions are programmed in the ZeroWire with a User, the selected user must have permissions to perform the selected action. • Note on Apple iOS 7, the background Location Services of the UltraConnect app may be terminated by the phone if it is low on memory and notifications will cease working.
- Page 50 Ensure you click the Save Map button. • Take care when creating Scenes with Location Services for multiple users on separate devices. Improper programming may lead to conflicting behaviour on the ZeroWire. Selecting the appropriate “Activate User Number” in the Scene programming may be beneficial.
-
Page 51: Testing Your System
YOUR 4 TO 8 DIGIT MASTER CODE ENTER Select zone walk test. Walk past each motion detector, open The ZeroWire will chirp the siren and announce the and close windows and doors with zone name and the signal level of each detector that is detectors. -
Page 52: Perform A Siren Test
Example: How to perform a siren test. Select main menu - Option 4, System Test MENU YOUR 4 TO 8 DIGIT MASTER CODE ENTER Select siren test To stop sirens (Within 30 seconds) MUTE Exits from System Test MENU MENU ZeroWire User Manual... -
Page 53: Perform A Battery Test
Perform a Battery Test The backup battery is located on the rear of the ZeroWire behind a cover. It provides temporary power to the ZeroWire when mains power is not available. This may occur during a power outage or an intruder cutting power to a property. - Page 54 YOUR 4 TO 8 DIGIT MASTER CODE ENTER Select communicator test. The central monitoring station will confirm the test message was received Exits from System Test. MENU MENU MENU If communicator test fails, notify your service provider ZeroWire User Manual...
-
Page 55: Main Menu
It is recommended you contact your service provider to program advanced settings. A full installation manual including instructions on advanced customization and automation features is available from www.interlogix.com. Incorrect settings may render your system non-functional. Proceed only if you accept this. -
Page 56: Voice Library
ZeroWire User Manual... - Page 57 A company to which alarm signals are sent during an alarm report. Also known as Central Station Central Monitoring Station (CMS). A channel is a communication path for events to be sent from the ZeroWire panel to a selected destination. Channels can be set to UltraConnect or Email. Channel A channel has an associated event list which contains the events it is allowed to forward on.
- Page 58 A security system that is configured to send all alarm signals to a central monitoring Monitored station. Outputs on the ZeroWire panel can be connected to a siren and strobe when an Output alarm condition occurs on the system. Zones are grouped into partitions which can be secured independently from each other.
- Page 59 Each token is identified by a token number and a full list of tokens is in the "Voice Library" on page 65. Mobile app for smartphones to access your ZeroWire. View status, control zones and outputs, control Z-Wave devices, view cameras, program users and other ZeroWire features.
-
Page 60: App And Web Error Messages
Each ZeroWire user has a set of profile levels. These control what the user has access to, a list of functions, and when the user is allowed to perform these functions. -
Page 61: System Status Messages
• "Data must not contain the following characters []" System Status Messages Various messages may appear on the Status screen of ZeroWire Web Server and UltraConnect App. These are also announced by voice when the Status button is pressed. System •... -
Page 62: Features And Benefits
• Fire alarm – A fire alarm has been activated from the ZeroWire unit. • Panic – A panic alarm has been activated from the ZeroWire unit. • Medical – A medical alarm has been activated from the ZeroWire unit. - Page 63 802.11 b/g WiFi – enables remote access via a web browser or smart phone • IEEE 802.3 Compliant Ethernet – use hardwired cable instead of wireless, the choice is yours • 3G Cellular radio support – allows reporting alarm messages without a fixed line telephone service ZeroWire User Manual...
-
Page 64: Specifications
2x zone inputs up to 6.6 V, seal with 3.3k EOL Outputs 2x open collector outputs at 100 mA 30 V (max) Dimensions (W × H × D) 190 mm x 140 mm x 32 mm Operating temperature 0 to 50°C Shipping weight 1 kg ZeroWire User Manual... - Page 65 ZeroWire Web Server Login IP Address (Menu 8 – 6): Default User Name is: User 1 Default PIN Code is: 1234 UltraConnect App Login Download the UltraConnect App on to your smartphone. My Serial Number is: Default Web Access Passcode is:...
- Page 66 30 features and benefits, 72 welcome, 9 forced arming, 13 what's inside, 9 G Z glossary, 67 ZeroWire web server, 36 zone names, 42 L Z-Wave devices, 46 location services, 56 M main menu, 65 ZeroWire User Manual...