Hilti PD-I Original Operating Instructions
Hide thumbs
Also See for PD-I:
- Original operating instructions (388 pages) ,
- Operating instructions manual (378 pages) ,
- Manual (208 pages)
Table of Contents
Advertisement
PD-I
Bedienungsanleitung
Operating instructions
Mode d'emploi
Istruzioni d'uso
Manual de instrucciones
Manual de instruções
Gebruiksaanwijzing
Brugsanvisning
Bruksanvisning
Bruksanvisning
Käyttöohje
Οδηγιες χρησεως
Instrukcja obsługi
Upute za uporabu
Navodila za uporabo
Ръководство за обслужване
Instrucţiuni de utilizare
de
en
fr
it
es
pt
nl
da
sv
no
fi
el
pl
hr
sl
bg
ro
Advertisement
Table of Contents

Related Manuals for Hilti PD-I


Summary of Contents for Hilti PD-I
- Page 1 PD-I Bedienungsanleitung Operating instructions Mode d’emploi Istruzioni d’uso Manual de instrucciones Manual de instruções Gebruiksaanwijzing Brugsanvisning Bruksanvisning Bruksanvisning Käyttöohje Οδηγιες χρησεως Instrukcja obsługi Upute za uporabu Navodila za uporabo Ръководство за обслужване Instrucţiuni de utilizare...
-
Page 6: Table Of Contents
In these operating instructions, the designation “the tool” Always keep these operating instructions to- always refers to the PD-I laser range meter. gether with the tool. Parts, operating controls and indicators 1 Ensure that the operating instructions are with the tool when it is given to other persons. -
Page 7: Description
The type designation and serial number can be found on the type identification plate on the tool. Make a note of Generation: 01 this data in your operating instructions and always refer to it when making an enquiry to your Hilti representative or service department. Serial no.: 2 Description 2.1 Use of the product as directed... -
Page 8: Accessories
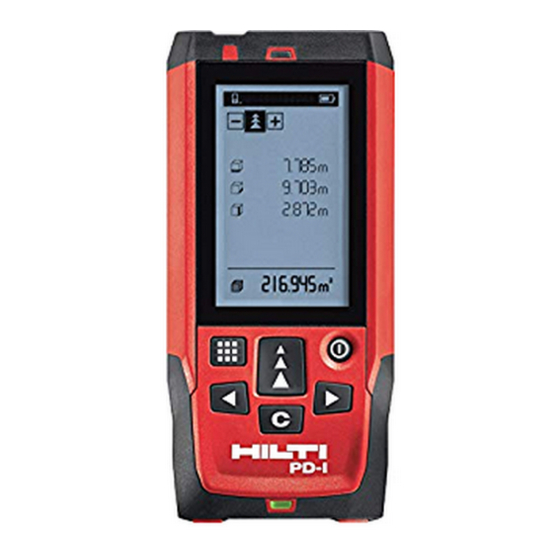
2.9 Control panel “Measure” button Quick start (when the tool is switched off, press the button briefly to switch it on). Begins distance measurement. Activates the laser beam. Activates continuous measuring mode (long press, approx. 2 sec.). Stops continuous measuring mode. Confirms the selected function or setting. -
Page 9: Technical Data
2. Have the tool repaired only at a times. Hilti service center. Keep all safety instructions and information for future d) Modification of the tool is not permissible. -
Page 10: Before Use
To avoid the risk of injury, use only genuine Hilti d) Although the tool is protected to prevent entry accessories and additional equipment. - Page 11 Remove the batteries from the packaging and insert 6.4.2 Measuring references them in the tool. NOTE Take care to observe correct polarity (see symbols in battery compartment). Close the battery compartment cover. Check to ensure that the battery compartment cover NOTE is closed securely.
-
Page 12: Left Arrow Button
The angle units used to show the inclination can be set to 6.4.8 Permanent laser mode degrees, percent or mm/m. The currently selected angle unit is shown in a black square. 6.4.4 Expert mode on / off When in permanent laser mode, a measurement is taken each time the “Measure”... -
Page 13: Operation
6.5 Measuring aids The PDA 51 target plate has no reflective coating and its use is recommended in unfavorable light conditions and 6.5.1 Measuring using the spike 3 4 at short distances. The spike can be used when measuring diagonally across The PDA 52 target plate is equipped with the same rooms or from inaccessible corners. -
Page 14: Left Arrow Button
Switch on the laser by pressing the “Measure” but- Addition can be used, for example, to determine the total ton. length of window and door reveals or to add several Aim the tool at the target and press the “Measure” part distances together in order to determine the total button. -
Page 15: Measure" Button
Press the “Measure” button. Press the “Measure” button. The room width is measured and displayed in the The second distance is measured and displayed in intermediate result line. the intermediate result line. The graphic display automatically prompts you to The graphic display then automatically prompts you measure the length of the room. -
Page 16: Measure" Button
Press the “Measure” button. Trapezoid functions can be used, for example, to de- The first distance is measured and displayed in the termine the length of a roof. The Trapezoid function cal- intermediate result line. culates the target distance with the aid of three measured The graphic display then automatically prompts you distances. - Page 17 Select the Single Pythagoras function from the Select the Combined Pythagoras function from the group of Pythagoras functions. group of Pythagoras functions. Aim the range meter at the target. Aim the range meter at the target. Press the “Measure” button. Press the “Measure”...
-
Page 18: Measure" Button
7.6.1 Indirect Horizontal Distance (1 angle, 1 NOTE distance) Take care to ensure that the measured points and the point at which the tool is positioned all lie on the same vertical plane. This function is particularly suitable for use in situations where a distance on a ceiling requires to be meas- This function is particularly useful in situations where ured. - Page 19 is done by determining the total length of all walls and Press the “Measure” button to begin measuring. The multiplying this figure by the height of the room. arrows in the display indicate the direction in which Select Painter’s Area from the group of special func- the tool must be moved.
-
Page 20: Care And Maintenance
8.1 Cleaning and drying 8.3 Transport Blow dust off the lenses. Use the Hilti packaging or packaging of equivalent quality for transporting or shipping your equipment. Do not touch the lens with the fingers. Use only a clean, soft cloth for cleaning. If necessary, moisten the cloth slightly with pure alcohol or a little 8.4 Calibration and adjustment of the laser... -
Page 21: Troubleshooting
8.4.3 Hilti calibration service the next test is due. We recommend that the tool is checked by the Hilti cal- NOTE Repeat this test at regular intervals as well as ibration service at regular intervals in order to verify its before and after important measuring tasks. -
Page 22: Manufacturer's Warranty - Tools
Most of the materials from which Hilti tools or appliances are manufactured can be recycled. The materials must be correctly separated before they can be recycled. In many countries, Hilti has already made arrangements for taking back old tools and appliances for recycling. Ask Hilti customer service or your Hilti representative for further information. -
Page 23: Ec Declaration Of Conformity (Original)
12 EC declaration of conformity (original) Hilti Corporation, Feldkircherstrasse 100, Designation: Laser range meter FL‑9494 Schaan Type: PD-I Generation: Year of design: 2012 We declare, on our sole responsibility, that this product Paolo Luccini Edward Przybylowicz complies with the following directives and standards:... - Page 24 Tel.: +423 / 234 21 11 Fax: +423 / 234 29 65 www.hilti.com Hilti = registered trademark of Hilti Corp., Schaan W 4276 | 0513 | 00-Pos. 2 | 1 Printed in Liechtenstein © 2013 Right of technical and programme changes reserved S. E. & O.
- Page 25 PD-I / PD-E www.hilti.com Hilti = registered trademark of Hilti Corporation, Schaan, LI...