Advertisement
Quick Links
1
Y E A R
L I M I T E D
8 5 - 1 0 3 5 - 0
Read and save this manual for future reference.
If pre-assembled, leave this manual
with unit for consumer's future reference.
For product inquires, parts, and warranty
and troubleshooting support, please call
1-877-707-5463
Charcoal Barbecue
with lighting System
S A F E U S E , C A R E A N D A S S E M B L Y M A N U A L
W A R R A N T Y
F O R Y O U R S A F E T Y
If You Smell Gas
1. Shut off gas to the appliance.
2. Extinguish any open flame.
3. Open lid.
4. If odour continues, immediately call your
gas supplier or your fire department.
F O R Y O U R S A F E T Y
1. Do not store or use gasoline or other flammable
vapours and liquids in the vicinity of this or any
other appliance.
2. An LP cylinder not connected for use shall not be
stored in the vicinity of this or any other appliance.
W A R N I N G
Failure to follow all of the Manufacturer's instructions
could result in hazardous fires, explosions, property
damage, or serious personal injury or even death.
W A R N I N G
Follow all leak check procedures carefully prior
to operation of barbecue, even if
barbecue was dealer assembled. Do not try to
light this barbecue without reading the
Lighting Instructions section of this manual.
T H I S B A R B E C U E I S F O R
O U T D O O R U S E O N L Y
Advertisement

Subscribe to Our Youtube Channel
Related Manuals for Master Chef 85-1035-0


Summary of Contents for Master Chef 85-1035-0
- Page 1 Charcoal Barbecue with lighting System S A F E U S E , C A R E A N D A S S E M B L Y M A N U A L Y E A R L I M I T E D 8 5 - 1 0 3 5 - 0 Read and save this manual for future reference.
-
Page 2: Table Of Contents
T A B L E C O N T E N T S Warranty ....ii Danger, ....1 Warnings Storage . -
Page 3: Danger
D A N G E R W A R N I N G S Failure to follow the Dangers, Warnings and Cautions contained in this Owner’s Manual may result in serious bodily injury or death, or in a fire or an explosion causing damage to property. - Page 4 Although your LP tank may appear to be empty, it may still contain propane. • The tank should be transported and stored accordingly. If you see, smell or hear gas escaping from the LP tank: • 1) Move away from the LP tank. 2) Do not attempt to correct the problem yourself.
-
Page 5: Storage
S T O R A G E O P E R A T I N G I N S T R U C T I O N S When the outdoor cooking season is over and you’re going to store the unit for the winter, please do the following: After removing and cleaning the cooking grill (lightly oil the grill after cleaning) •... -
Page 6: Cleaning And
C L E A N I N G A N D M A I N T E N A N C E Insect Alert The barbecue, as well as any outdoor gas appliance, attracts spiders and insects. They can nest in the Venturi section of the burner tube causing gas to flow back out of the air shutter. -
Page 7: Troubleshooting Guide
T R O U B L E S H O O T I N G G U I D E Problem Possible Causes Burner flame appears Burner flame should be bluish in colour. • yellowish/orange, Inspect burner for possible obstructions accompanied with smell of gas Burner does not... -
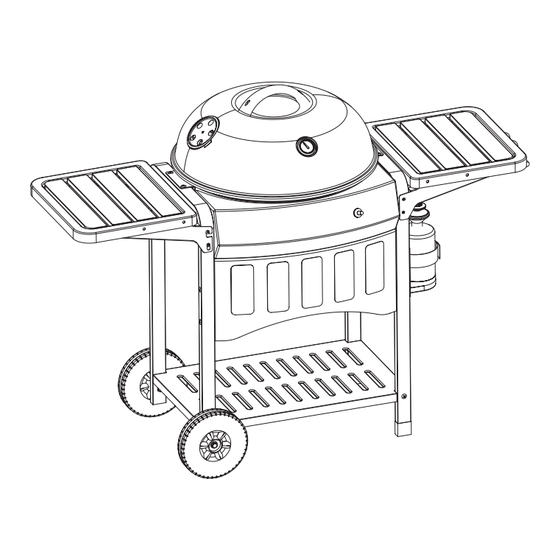
Page 8: Parts List And
P A R T S L I S T 8 5 - 1 0 3 5 - 0 Item No. Quantity Description Hook of Lid Handle, Lid Air Shutter,Lid Thermometer Bezel, thermometer Cooking Chamber Ash Tray Stand Brackets Fixed Plate 1, Burner Chamber Brace Burner Fixed Plate 2, Burner... - Page 9 19 21...
-
Page 10: Assembly Instructions
A S S E M B L Y I N S T R U C T I O N S Key A: No.10 – 24UNC Nut – 13 Pcs. Key D: No.8 – 24UNC x 20 Screw – 1 Pcs. Key G: 1/4”... - Page 11 Assemble the bottom shelf (No.32) to the cart sides (No.26, 27) using screws, nuts & washers (Key H, C, M). Assemble the front panel (No.31) and the tank stand (No.29) to the cart sides using screws, nuts & washers (Key I, C, M). Assemble the control panel (No.28) to the cart sides using screws &...
- Page 12 Assemble the chamber brace (No.10) to both sides of chamber (No.7) using screws, nuts & washers (Key G, C, M). Assemble the ash tray stand brackets (No.8) to the bottom of the chamber using screws, nuts & washers (Key E, A, K). Assemble the ash tray stand (No.16) to the ash tray stand brackets using screw, nuts &...
- Page 13 Attach the chamber to the cart sides using screws, nuts & washers (Key H, C, M). Insert the ash tray handle (No.18) into the appropriate hole of the ash tray (No.17). Lift the ash tray handle up into the appropriate slot of the ash tray stand and rotate clockwise.
- Page 14 Carefully push the electrode set (No.14) into the burner (No.11) and secure in place using tapping screw (Key P). Insert the burner into the appropriate hole of the chamber and secure the burner to the cart side (R) and chamber using screws, nuts &...
- Page 15 Attach the lid handle (No.3) and lid hook (No.2) to lid (No.1) using screws, nuts & washers (Key D, B, K). Assemble the air shutter (No.4) to lid using screws, nuts & washers (Key E, A, K). Insert the tube handle (No.37) into the appropriate hole of tube (No.36).
- Page 16 D I S T R I B U T O R Trileaf Distribution Trifeuil Toronto, Canada M4S 2B8...
Need help?
Do you have a question about the 85-1035-0 and is the answer not in the manual?
Questions and answers