Table of Contents
Advertisement
Quick Links
Advertisement
Table of Contents

Subscribe to Our Youtube Channel
Related Manuals for moon 340i Neo Series


Summary of Contents for moon 340i Neo Series
- Page 1 340i Series Integrated Amplifier Owner’s Manual...
- Page 2 340i Nēo Series...
-
Page 3: Important Safety Instructions
Owner’s Manual Important Safety Instructions Read these instructions. receptacles, and the point where they exit from the apparatus. Unplug mains cord during Keep these instructions. transportation. Heed all warnings. 11. Only use attachments and accessories specified by Follow all instructions. the manufacturer. - Page 4 340i, immediately disconnect it from the AC component. To completely disconnect this mains and take it to your MOON dealer for a apparatus from the AC mains, disconnect the complete check-up. power supply cord plug from the AC receptacle.
-
Page 5: Table Of Contents
Owner’s Manual Table of Contents Introduction Unpacking Installation & Placement Front Panel Controls Optional Digital Inputs Optional Phono Section Optional Balanced Inputs Rear Panel Connections SimLink™ Operating the Nēo 340i Remote Control Operation Specifications www.simaudio.com Simaudio Ltd., 1345 Newton Road Boucherville, Québec J4B 5H2 CANADA Date Code: 20150909... -
Page 6: Introduction
30 years, with a PC, digital music server or external transport, etc. and the know-how gained through our cumulative experience is an important reason why MOON Optional internal phono preamp is available with Integrated amplifiers are so musically satisfying. -
Page 7: Unpacking
Owner’s Manual Unpacking The Nēo 340i integrated amplifier should be removed from its box with care. The following accessories should be included inside the box with your integrated amplifier: AC power cable ‘CRM-2’ remote control with two ‘AA’ batteries ‘SimLink™’ cable with 1/8” mini plug terminations on each end This owner’s manual Warranty and product registration information (USA and Canada only) Once the Nēo 340i is unpacked, inspect it thoroughly and report any damage to your dealer immediately. -
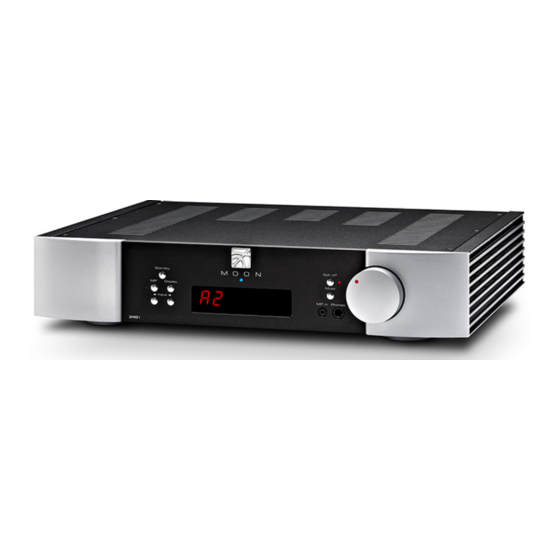
Page 8: Front Panel Controls
340i Nēo Series Front Panel Controls Figure 1: Nēo 340i Front panel The front panel will look similar to Figure 1 (above). The large display window indicates the selected input source. If your Nēo 340i includes the digital input option, additional information will appear in the display window. Refer to the section entitled “Optional Digital Inputs”... -
Page 9: Optional Digital Inputs
Owner’s Manual The “A2” input can be configured as a ‘pass-through’ Optional Digital Inputs which bypasses the 340i’s gain control section, allowing you to control the gain setting via the connected source The Digital Input option includes four (4) separate component’s own volume control –... -
Page 10: Optional Phono Section
Figure 3: Nēo 340i Optional Phono Section Circuit Board Layout Internal Settings We strongly recommend that you ask your MOON Authorized Dealer to make these adjustements. If you decide to do this on your own, any damage cause to this component, including from static discharge, will... -
Page 11: Optional Balanced Inputs
Owner’s Manual There are three (3) types of settings available on the For MM cartridges, it is recommended that you leave the jumpers inserted in the factory default setting of optional phono section of the Nēo 340i; Capacitance loading, Resistance loading, and Gain level. Each setting 100pF. -
Page 12: Rear Panel Connections
340i Nēo Series Rear Panel Connections Figure 4: Nēo 340i Rear panel The rear panel will look similar to Figure 2 (above). There are four (4) pairs of single-ended analog inputs on RCA connectors labeled CD, A1, A2 and A3/P. The RCA input and output connectors on the rear panel have been color coded: ‘white’... -
Page 13: Simlink
AC wall outlet such as a hospital grade Hubbell*. * Please speak with your MOON Authorized Retailer Operating the Nēo 340i about the benefits of high quality cables for your system, and superior quality AC wall outlet. -
Page 14: Remote Control Operation
The Nēo 340i Integrated Amplifier uses the ‘CRM-2’ full-function remote control (figure 7). It operates on the Philips RC-5 communication protocol and is can be used with other Simaudio MOON components. The ‘CRM-2’ remote uses two AA batteries (included). To install them, simply slide the back plate off in the direction of the arrow;... - Page 15 Owner’s Manual Remote operation with multiple MOON components Figure 6: Remote Operation with SimLink™ In figure 6 we have a 180 MiND Music Streamer and a Nēo 340i Integrated Amplifier connected together via their respective SimLink™ ports. The SimLink™ output on the 180 MiND is connected to the SimLink™ input on the 340i (using a 1/8”...
-
Page 16: Specifications
340i Nēo Series Specifications Configuration Stereo Power Supply Transformer 400VA Power Supply Capacitance 40,000μF Class Of Operation – Amplifier Class A/B Single-ended inputs 4 (RCA) Mini-jack input 1 (1/8”) Optional Balanced inputs 1 (XLR) Input Sensitivity 370mV – 3.0V RMS Input Impedance 11,000Ω... -
Page 17: Www.simaudio.com
Owner’s Manual Specifications (cont’d) Optional Phono Section: Input Impedance - Adjustable 100 ohms and 47K ohms Input Capacitance - Adjustable 0pF and 100pF Gain - Adjustable 40dB and 60dB Input overload @ 40dB / 60dB gain 58mV RMS / 3mV RMS Signal-to-noise ratio (full scale @ 40dB / 60dB gain) 107dBr / 85dBr Frequency Response... - Page 18 340i Nēo Series...
Need help?
Do you have a question about the 340i Neo Series and is the answer not in the manual?
Questions and answers