
Related Manuals for Intek KT-380EE


Summary of Contents for Intek KT-380EE
- Page 1 KT-380EE AMATEUR RADIO 2-METER BAND VHF FM HANDHELD TRANSCEIVER 144-146 MHz 5W INSTRUCTION MANUAL MANUALE DI ISTRUZIONI...
-
Page 2: Declaration Of Conformity
(to EC Directive 99/5-89/336-93/68-73/23) DECLARATION OF CONFORMITY With the present declaration, we certify that the following products : INTEK KT-380EE comply with all the technical regulations applicable to the above mentioned products in accordance with the EC Directives 73/23/EEC, 89/336/EEC and 99/5/EC. -
Page 3: Table Of Contents
INTEK S.R.L. declines any responsibility concerning any modification of the product, made by the user or by a third party, after delivery of the product. -
Page 4: General Information
As regulations are usually subject to possible modifications, please check the current regulations in your country with your dealer or local supplier. INTEK does not take any responsibility for illegal use and operation of this product not in accordance with the regulation of the country where the product is used. -
Page 5: Unpacking And Checking Parts
Unpacking and Checking Parts - Supplied Accessories Unpacking and checking parts Carefully unpack the product. Please identify all the parts listed below, before wasting the packaging. If any part is missing or if the packaging shows any damage, please contact your dealer immediately. Supplied accessories Rubber flexible antenna with SMA connector 7.2V 1200mAh Li-Ion Rechargeable Battery Pack... -
Page 6: Preliminary Steps
Preliminary Steps Battery charging Connect the 230VAC adaptor charger to the desk type battery charger and to a 230VAC outlet. The Red Led will flash to confirm that the charger is powered. Insert the empty battery or the transceiver with the battery pack in the battery charger. - Page 7 Preliminary Steps To remove the battery To remove the battery, press the battery locker placed on the rear side of the radio and slide the battery away from the radio. Warning ! Please do not waste used batteries into the environment and do not trash them with the common garbage.
-
Page 8: Preliminary Steps
Preliminary Steps Install the external earset-microphone jack rubber cover. If an external earset-microphone is not used, please install the earset- microphone jack rubber cover. Install the earset-microphone jack rubber cover, by matching the three rubber tabs with the holes on the radio, as showed on the drawing. If the earset-microphone jack rubber cover is removed, radio will not be splash proof. -
Page 9: Getting Acquainted With The Product
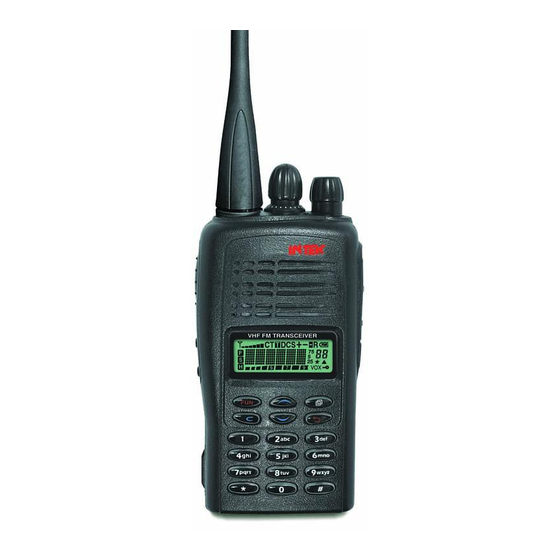
Getting Acquainted with the Product GETTING ACQUAINTED WITH THE PRODUCT Antenna Rubber flexible antenna with SMA connector. Rotary Switch Frequency, channel and functions selector. Power ON switch and volume control Switch on the transceiver turning the knob clockwise or counterclockwise to switch it off. To increase the volume, turn the knob clockwise or counterclockwise to decrease it. - Page 10 Getting Acquainted with the Product FUN Key Function key to quickly access several functions of the radio. 10. UP/DOWN Keys Channels and menu operation selection keys. Microphone Built-in microphone. 12. Speaker Built-in speaker. 13. RX/TX LED Indicator The LED indicator will light in green colour when the radio is receiving a signal and in red colour during transmission.
- Page 11 Getting Acquainted with the Product LCD DISPLAY Signal Digital Bar Meter Indicates the received signal strenght in the receive mode. CT Indication The CT indication is lighted when the CTCSS function is enabled. T Indication Non available on this model. DCS Indication The DCS indication is lighted when the DCS function is enabled.
-
Page 12: Getting Started
Getting Acquainted with the Product - Getting Started VOX Indication The VOX icon is lighted when the VOX function has been enabled. Frequency Reading (25-5-75). It shows the KHz decimal figures of the frequency. RF Digital Meter It indicates the transmitter RF output power. Dot Matrix Indication It provides full information on channel, frequency and all enabled functions. -
Page 13: Menu Operation
Menu Operation MENU OPERATION In stand-by status, press FUN (9) key to enter the menu. Press the UP/DOWN (10) keys to choose menu items. Channel Mode / Frequency Mode CHANNEL MODE Press the UP/DOWN (10) keys or use the rotary switch (2) to choose desired channel. SCAN --->... - Page 14 Menu Operation CT/DCS (CTCSS / DCS selection) In the stand-by status, press the FUN (9) key to enter menu page, then press the UP/DOWN (10) keys to confirm (you will see CT/DCS). Then press the MENU (5) key to enter. Press the UP/DOWN (10) keys to choose CTCSS or DCS.
-
Page 15: Menu Shortcut Keys
Menu Operation - Menu Shortcut Keys SQL : Squelch level setup In the stand-by status, press the FUN (9) key and then UP/DOWN (10) keys, and when the display shows SQL ?, press the MENU/CONFIRMATION (5) key to enter. Press the UP/DOWN (10) keys to choose the desired squelch level and confirm the selection by pressing the MENU/CONFIRMATION (5) key. -
Page 16: Self Programming Mode
Self Programming Mode SELF PROGRAMMING MODE When the Two-Way Radio enters the Self Programming Mode, the handheld Two-Way Radio allows channel set-up. Operation : 1. Keep pressing the FUN (9) key and turn on the power at same time. When the display shows SELF, the radio enters the Self Programming Mode. - Page 17 Self Programming Mode (4) TRANSMITTING FREQUENCY SETUP Press the numeric keypad (7) or use the selector (2) to input the transmitting frequency. The frequency range is 144-146 MHz (136.000-174.99375 MHz) (*). The default frequency step is 5 KHz. Press the MENU/CONFIRMATION (5) key to confirm. (5) TRANSMITTING CTCSS/DCS SETUP Press the C (8) key to select the CTCSS or DCS codes.
- Page 18 Self Programming Mode RESET TO FACTORY SETTINGS In the Power-OFF status, hold on the FUN (9) key and turn on the radio at the same time, then press 1 0 1 0 to get back the factory setting. RECEIVING / TRANSMITTING SIGNAL SETUP In the CTCSS and DCS code settings (RX and TX modes), use the C (8) key to select the following modes : CTCSS disabled (OFF) --->...
-
Page 19: Self Programming Mode
Self Programming Mode Self Programming Mode Diagram Press the key and switch on the radio LCD DISPLAY Self Programming Mode Select channel Channel Selector Channel Selection (1-80) Select Channel Selector receiving Receiving Frequency frequency Numeric Keypad Select receiving Channel Selector Receiving CTCSS/DCS codes CTCSS/DCS codes Select... -
Page 20: Specifications
Specifications - Optional Accessories SPECIFICATIONS General Frequency 144-146 MHz (136.000 - 174.9875 MHz) (*) Channels Channel spacing 5, 6.25, 10, 12.5, 25 KHz DC input voltage 7.2 VDC Operating temperature -20/+55° Dimensions mm 58 x 120 x 35 Weight 235 gr. (with battery and antenna) Receiver Sensitivity (12dB Sinad) 0.16 µV... -
Page 21: Indice
INTEK s.r.l. declina qualsiasi responsabilità relativamente a modifiche della programmazione del ricetrasmettitore, eseguite dall’utente o da terzi, dopo la consegna del prodotto. -
Page 22: Informazioni Per L' Utente
Informazioni per l' utente Grazie Vi ringraziamo per aver scelto INTEK per applicazioni radioamatoriali. Siamo certi che questo ricetrasmettitore di facile uso vi consentirà di comunicare in modo affidabile e di svolgere le vostre attività hobbistiche con la massima efficienza. Questo ricetrasmettitore incorpora la più avanzata tecnologia e sarete soddisfatti del suo livello di qualità... -
Page 23: Disimballaggio E Verifica Delle Parti
Disimballaggio e verifica delle parti - Accessori forniti Disimballaggio e verifica delle parti Disimballate accuratamente il ricetrasmettitore. Si raccomanda di identificare tutte le parti elencate nella tabella seguente, prima di eliminare l’imballo. Se vi sono stati danni o mancanze durante la spedizione, contattate immediatamente il vostro fornitore. -
Page 24: Preparazione
Preparazione Ricarica della batteria Collegare l’adattatore 230V alla presa posta sul retro del caricatore da tavolo, come mostrato dal disegno. Collegare l' adattatore alla presa 230VAC. Il LED rosso inizierà a lampeggiare. Inserire la batteria scarica o il ricetrasmettitore con la batteria installata nel caricabatteria. - Page 25 Preparazione Rimuovere la batteria Per rimuovere la batteria premere sul blocco posto alla base della radio e far scivolare via la batteria dalla radio. Avvertenze ! Non disperdere batterie esaurite nell’ambiente e non gettarle tra i rifiuti ordinari. Utilizzate gli appositi contenitori per la raccolta delle batterie usate o restituite le batterie da eliminare al vostro fornitore.
- Page 26 Preparazione Installare la chiusura per la presa earset-mic Se non si utilizza un microfono-altoparlante esterno, coprire la presa con il coperchio in gomma in dotazione. Applicare il coperchio facendo coincidere i 3 dentelli in gomma con i 3 fori posti sul lato destro della radio come mostrato nel disegno. Questa copertura assicura inoltre la tenuta stagna (anti spruzzo) del ricetrasmettitore, che non sarà...
-
Page 27: Familiarizzare Con Il Prodotto
Familiarizzare con il prodotto FAMILIARIZZARE CON IL PRODOTTO Antenna Antenna in gomma con connettore SMA. Selettore rotativo Consente la selezione dei canali/frequenze e di tutte le funzioni del menu. Interruttore ON-OFF / Comando di volume Ruotare la manopola in senso orario per accendere il ricetrasmettitore e in senso antiorario per spegnerlo. - Page 28 Familiarizzare con il prodotto Tasto FUN (Menu) Tasto funzione per l' accesso veloce alle varie funzioni della radio. 10. Tasti UP/DOWN Tasti per la selezione dei canali/frequenze. Nelle operazioni del menu consentono la selezione delle varie funzioni. Microfono Microfono entro contenuto. 12.
- Page 29 Familiarizzare con il prodotto DISPLAY LCD Strumento a barre S-Meter indica l' intensità del segnale in ricezione. In assenza di segnale, l' indicatore è spento. Indicazione CT L' indicazione CT è accesa quando è attiva la funzione CTCSS. Indicazione T Non disponibile in questo modello.
-
Page 30: Operazioni Di Base
Familiarizzare con il prodotto - Operazioni di base Icona MONITOR L' icona Monitor (M) è accesa quando è attiva la funzione Monitor, cioè quando viene premuto il tasto Monitor (16). Rilasciando il tasto Monitor (16), l' icona (M) si spegne. Icona blocco tastiera (Key Lock) L' icona (N) è... -
Page 31: Utilizzo Del Menu
Utilizzo del menu Se la funzione VOX è attivata, per trasmettere è sufficente parlare nel microfono (11). Terminata la conversazione, la radio passerà automaticamente in ricezione. Ricezione Rilasciando il tasto PTT (14) e regolando opportunamente il volume, sarà possibile ascoltare il segnale in arrivo. - Page 32 Utilizzo del menu UP/DOWN (10) Questi tasti consentono la selezione delle funzioni desiderate. MENU/CONFERMA (5) Premendo questo tasto si conferma la selezione della funzione o dei parametri desiderati. EXIT (6) Premendo questo tasto si ritorna alla modalità Stand-By. FUNZIONI DEL MENU Scansione automatica In modalità...
- Page 33 Utilizzo del menu N a I o viceversa (es. D032I / D032N). Confermare la selezione premendo il tasto MENU/CONFERMA (5). A conferma della selezione avvenuta, sul display comparirà la scritta DCS (D). Per disattivare la funzione DCS, ripetere la procedura sopra descritta e selezionare OFF nella lista dei toni e confermare premendo il tasto MENU/CONFERMA (5);...
- Page 34 Utilizzo del menu BEEP : impostazione del tono di programmazione Questa funzione consente di attivare o disattivare il tono emesso ogni qualvota si interviene sui comandi della radio, ad eccezione dei tasti laterali. Premere il tasto FUN (9) per accedere al menu. Premere i tasti UP/DOWN (10) fino a visualizzare sul display la scritta BEEP ? e confermare con il tasto MENU/CONFERMA (5).
-
Page 35: Comandi Veloci Da Tastiera
Utilizzo del menu - Comandi veloci da tastiera sensibilità desiderato da 0 (bassa sensibilità) a 9 (sensibilità massima). Premere il tasto FUN (9) per accedere al menu. Premere i tasti UP/DOWN (10) fino a visualizzare sul display la scritta VOX ? e confermare con il tasto MENU/CONFERMA (5). Utilizzare i tasti UP/DOWN (10) per selezionare il livello desiderato (es. -
Page 36: Programmazione Manuale Da Tastiera
Questa funzione avanzata permette di programmare ciascun canale della radio, assegnando loro diversi parametri quali DCS, CTCSS, BCL (Busy Channel Lockout), ecc. La programmazione può essere eseguita anche da PC utilizzando il Kit di programmazione opzionale mod. INTEK CDKT-0380. Si consiglia pertando questo tipo di programmazione in quanto più semplice e pratico. - Page 37 Programmazione manuale da tastiera (4) FREQUENZA DI TRASMISSIONE Il display visualizza la frequenza in uso, come per il punto 2. L' indicatore numerico (I) visualizzerà 4. Digitare da tastiera la frequenza desiderata. E' possibile comunque utilizzare il selettore rotativo (2) oppure i tasti UP/DOWN (10).
- Page 38 Programmazione manuale da tastiera Note RESET GENERALE Questa funzione consente di riportare tutti i parametri della radio nelle condizioni originali, molto utile nel caso di inserimento di funzioni accidentali. Accendere la radio mantenendo premuto il tasto FUN (9), sul display comparirà la scritta SELF. Digitare da tastiera la sequenza numerica 1 0 1 0.
- Page 39 Programmazione manuale da tastiera Diagramma della programmazione manuale Premere il tasto e accendere la radio DISPLAY LCD Programmazione manuale Selezionare il canale Selettore canali Selezione del canale da 1 a 80 Selezionare Selettore canali la frequenza Frequenza in ricezione in ricezione Tastiera numerica Selezionare...
-
Page 40: Specifiche Tecniche
Specifiche tecniche - Accessori opzionali - Garanzia limitata SPECIFICHE TECNICHE Generali Gamma di frequenza 144-146 MHz (136.000 - 174.9875 MHz) (*) Canali Step di frequenza 5, 6.25, 10, 12.5, 25 KHz Tensione di alimentazione 7.2 VDC Temperatura di funzionamento -20/+55° Dimensioni mm 58 x 120 x 35 Peso... -
Page 41: Avvertenze Importanti / Avviso Agli Utenti
22/1997” (articolo 50 e seguenti del dlgs. n. 22/1997). KT-380EE Data: Timbro e firma del rivenditore Prodotto importato e distribuito da INTEK S.R.L. Via G. Marconi, 16 - 20090 Segrate (MI) - Tel. 02-26950451 - Fax. 02-26952185 www.intek-com.it / e-mail : intek.com@intek-com.it - 39 -... -
Page 42: Notes
Notes - 40 -... - Page 43 Notes - 41 -...
Need help?
Do you have a question about the KT-380EE and is the answer not in the manual?
Questions and answers