Table of Contents
Advertisement
Quick Links
Advertisement
Table of Contents

Subscribe to Our Youtube Channel
Related Manuals for KanexPro HDSC12


Summary of Contents for KanexPro HDSC12
- Page 1 USER HDSC12 Scaler Switcher with Digital Amplifier...
-
Page 2: Table Of Contents
HDSC12 Table of Contents Introduction ......................1 1.1. Introduction to HDSC12 ..............1 1.2. Package Contents ................1 Features .........................2 Specification ......................3 Operations of the Control Panel and the Remote Controller........5 4.1. Operations of the Control Panel............5 4.2. Operations of the Remote Controller ..........6 Interfaces Connection Introduction .................7... -
Page 3: Introduction
1. Introduction 1.1. Introduction to HDSC12 HDSC12 is a full HD scaler switcher with 12 video, 6 audio & 2 MIC inputs. It scales & switches any video signal HDMI, VGA, YPbPr, C-Video & S-video to HDMI & VGA simultaneously, and any audio to 2x20W amplifier. It’s controllable via the button, IR, RS232,TCP/IP. -
Page 4: Features
HDSC12 2. Features 12 video Inputs: 4 x HDMI, 4 x VGA, 1 x YPbPr, 2 x C-video & 1 x S-video. 2 MIC inputs with level control and mixer function. Upscale to outputs HDMI & VGA simultaneously up to 1080P. -
Page 5: Specification
HDSC12 3. Specification Video Input Video Output 4 HDMI 4 VGA 1 HDMI Input 1 YPbPr Output 1 VGA 2 C-Video 1 S-Video HDMI female connector VGA(15 pin HD), HDMI female connector Input female connector Output VGA(15 pin HD), female... - Page 6 HDSC12 Stereo audio for line 6 Stereo Audio for line audio Input audio Output 2x10W@8Ω/2x20W@4Ω 2 MIC audio amplifier 4 RCA female connector for YPbPr, C-Video & S-Video Input audio Output RCA connector Connector 4 3.5mm jack for VGA Connector...
-
Page 7: Operations Of The Control Panel And The Remote Controller
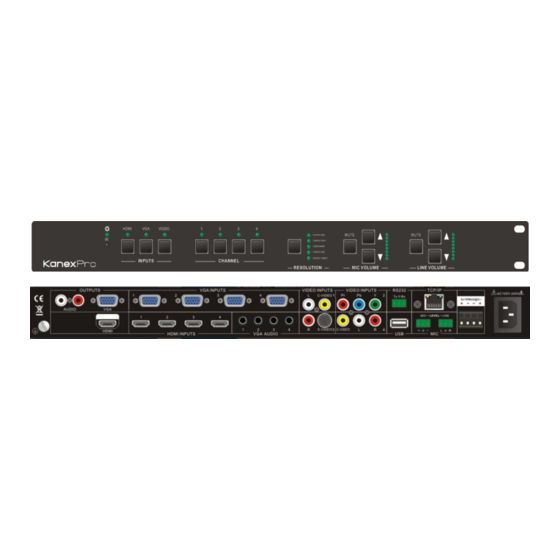
HDSC12 4. Operations of the Control Panel and the Remote Controller 4.1. Operations of the Control Panel ① ③ ⑤ ⑥ ⑦ ⑧ ② ④ ① Power indicating LED. It will keep on red when the unit is connected with power. -
Page 8: Operations Of The Remote Controller
HDSC12 4.2. Operations of the Remote Controller Source select area, 12 channels for inputs, Line volume control including: area, can work when 4 HDMI not in MENU mode. 4 VGA 2 C-VIDEO Menu/ Volume control 1 S-Video area, MUTE for line 1 YPbPr and MIC audio mute. -
Page 9: Interfaces Connection Introduction
⑩ Grounding protection. ⑪ TCP/IP port : for network controlling 5.1. Video Input/output HDSC12 supports different kinds of video signal, such as C-Video, S-Video, YPbPr, VGA, and HDMI. And all can be scaled to high-resolution HDMI & VGA format and switched out. -
Page 10: Ypbpr Input
HDSC12 5.1.2. YPbPr input Input Display Parameter Resolution Frame Frame Frame frequency frequency frequency 720×480 I 15.75 720×480 P 31.5 720×576 I 15.625 720×576 P 31.25 1280×720P 16:9 1280×720P 37.50 16:9 1920×1080 I 1125 28.125 16:9 1920×1080 I 1125 33.75 16:9 1920×1080 I... -
Page 11: Hdmi Input
HDSC12 The bandwidth is up to 375MHz. The following audio can adjust bass/treble Changeable aspect ratio. (Full-screen, 4:3) 5.1.4. HDMI input HDMI resolution support: Resolution Resolution 640×480@60Hz 1024×768@70 Hz 640×480@72Hz 1024×768@75 Hz 640×480@75Hz 1280×1024@75Hz 800×600@56Hz 1360×768 800×600@60 Hz 1920×540... -
Page 12: System Diagram
6. System Diagram Figure 2 System Diagram 7. OSD Functions Introduction HDSC12 provides a nice OSD operation menu, with various functions and language. The operation introduction is showed as follows. 7.1. Picture Setting The first icon from left of OSD menu is to set the picture parameter. It includes the pictures mode preset, color temperature, contrast, brightness, hue, saturation, sharpness, scale, and Advance picture adjust. -
Page 13: Audio Setting
HDSC12 Please check the picture below: 7.2. Audio Setting The Second icon from left of OSD menu is to set the audio/sound parameter. It includes the sound effect preset, bass, treble, balance, scene mode, surround and smart volume setting. Some parameters are available depending on different input. -
Page 14: System Setting
3) Pressing the button “HDMI” on the front panel for 6 seconds or sending RS232 command 0698% for updating, then press the button “OK” on the remote or send RS232 command 0609% to confirm update. HDSC12 will capture the new firmware from USB flash disk. -
Page 15: Communication Protocol And Command Codes
HDSC12 9. Communication Protocol and Command Codes 9.1. RS232 Controlling Communication protocol: RS232 Controlling Protocol Command Type: ASCII Baud rate: 9600 Data bit: 8 Stop bit: 1 Parity bit: none Command Function Description Feedback Example 0600% MUTE Line LINE Mute On... - Page 16 HDSC12 0615% SM Mode Sound Mode: XX 0616% MENU of OSD MENU 0617% Command to reset to factory defaults Factory reset Resolution: HD 0618% Change the resolution to 1360X768 HD 1360X768 Change the resolution to 1024X768 Resolution: XGA 0626% 1024X768...
- Page 17 HDSC12 Digital audio (HDMI and SPDIF) output Digital Sound Ouput: 0648% able Enable Shield digital audio (HDMI and SPDIF) Digital Sound Ouput: 0649% output Disable 0650% Check OSD CHANNEL display status OSD Source: Display 0651% Check Volume Bar display status...
- Page 18 HDSC12 9.2. TCP/IP Control HDBT port of Scaler Switcher with Digital Amplifier-TN is used for TCP/IP control. all the control commands are the same as the RS232 command list. Here is the detailed introduction. 9.2.1. IP Configuration 1) Connect a computer to the HDBT port, set its IP to the same IP section as the default IP of Scaler Switcher with Digital Amplifier-TN (192.168.0.178).
- Page 19 HDSC12 3) Enter the password “88888”, and then you can enter the configuration page to configure the IP port, including the IP reset, PW reset etc. As picture below: Notice: Serial configuration must be fixed to meet Scaler Switcher with Digital Amplifier-TN, so it cannot be changed.
- Page 20 HDSC12 9.2.2. Connection Introduction 1) Connect a computer and Scaler Switcher with Digital Amplifier-TN to the same network. Open the PTNET software (or any other TCP/IP communication software) and create a connection, enter the IP address and port of Scaler Switcher with Digital Amplifier-TN (default IP: 192.168.0.178, port:4001):...
-
Page 21: Troubleshooting & Maintenance
HDSC12 10. roubleshooting & Maintenance 1) When images of terminal unit output with ghost, such as the projector output with ghost. Please check the projector’s setting or try another high quality connection cable. 2) When there is a color losing or no video signal output, please check the input and output end connections of the cables. -
Page 22: Safety Operation Guide
HDSC12 11. Safety Operation Guide In order to guarantee the reliable operation of the equipments and safety of the staff, please abide by the following proceeding in installation, using and maintenance: 1) The system must be earthed properly. Please do not use two blades plugs and ensure the alternating power supply ranged from 100v to 240v and from 50Hz to 60Hz. -
Page 23: After-Sales Service
HDSC12 12. After-sales Service 1) If there appear some problems when running HDSC12, please check and deal with the problems reference to this user manual. Any transport costs are borne by the users during the warranty. 2) You can email to our after-sales department or make a call, please tell us the following information about your cases.
Need help?
Do you have a question about the HDSC12 and is the answer not in the manual?
Questions and answers