
Related Manuals for dallmeier DMS 240


Summary of Contents for dallmeier DMS 240
-
Page 1: Digital Video Recorder
Operating Instructions Digital video recorder DMS 240 DMS 160 DMS 80 DK 200.240.002 EN / Rev. 1.1.0 / 060929... - Page 2 All rights reserved. This document may not be copied, photocopied, reproduced, translated, transferred to an electronic medium or converted to a machine-readable form either whole or in part without first receiving written permission from Dallmeier electronic GmbH & Co.KG. We reserve the right to make technical modifications.
-
Page 3: Table Of Contents
Playback mode .................. 31 Tracks ....................31 7.1.1 Track types ..................31 7.1.2 Track selection ..................32 7.1.3 Changing the track ................33 Playback ..................... 33 7.2.1 Playback control .................. 34 7.2.2 Playback with audio ................35 Dallmeier electronic GmbH & Co.KG... - Page 4 DMS 240 / DMS 160 / DMS 80 Magnifying glass (zoom) ..............35 Stopping the recording ................. 36 Printing an image ................37 Exit playback mode ................37 Search functions ................39 Simple search ..................39 Quick search with time intervals ............40 Index search ..................
-
Page 5: About This Document
About this document Validity This document applies to the digital video recorder DMS 240 / DMS 160 / DMS 80. It has been produced on the basis of version 6.0.2 (software). Documentation on the unit Operating Instructions (this document) The document entitled "Operating Instructions" contains detailed descriptions on how to operate the unit. - Page 6 DMS 240 / DMS 160 / DMS 80 WARNING The warning word WARNING denotes a possible danger that may cause death or serious injury if it is not averted. CAUTION The warning word CAUTION denotes a possible danger that may cause minor injury if it is not averted.
-
Page 7: For Your Safety
Do not make modifications Do not make any modifications to the unit (neither to the software nor the hardware) without consulting Dallmeier electronic. Improper modifications can cause malfunctions or damages. Dallmeier electronic accepts no liability for damages resulting from unauthorized or improper modifications to the unit. - Page 8 Furthermore, the use of peripheral devices that are not certified by Dallmeier electronic results in loss of warranty. In case of doubt, contact the sales partner responsible for your area.
- Page 9 (pull out the po- wer plug). Please contact the sales partner responsible for your area. Disposal Disconnect the unit from the power supply. Remove all connected units and system components. Return the unit to your respective sales partner. Dallmeier electronic GmbH & Co.KG...
- Page 10 DMS 240 / DMS 160 / DMS 80 Dallmeier electronic GmbH & Co.KG...
-
Page 11: Description
Description Intended use The DMS 240 / 160 / 80 is used to record and evaluate video images. Up to 24 cameras can be connected. The DMS 240 / 160 / 80 can be operated on a network. Performance Features The DMS 240 / 160 / 80 is a real time recorder with virtual matrix function. - Page 12 DMS 240 / DMS 160 / DMS 80 Dallmeier electronic GmbH & Co.KG...
-
Page 13: Display Indications And Ports On The Front Side
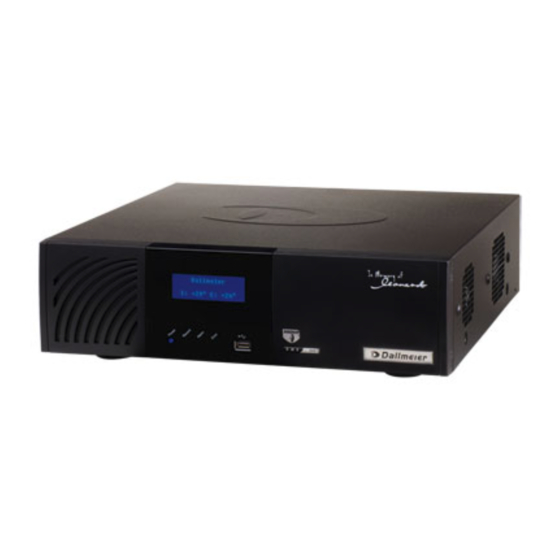
Display indications and ports on the front side Fig. 4-1: Front view DMS 240 9 10 11 12 Filter pad (behind the panel) Display Serial number Version number Product name/Number of activated cameras Internal temperature External temperature Status LEDs Power (blue) Always lights up while the unit is switched on. - Page 14 DMS 240 / DMS 160 / DMS 80 Dallmeier electronic GmbH & Co.KG...
-
Page 15: Sequencer/Live Mode
" Move the mouse pointer to the lower edge of the display. The task bar with the buttons for selecting the split type will be displayed. The current split type is marked in blue. Dallmeier electronic GmbH & Co.KG... -
Page 16: Changing The Split Type (Fbas Monitor)
DMS 240 / DMS 160 / DMS 80 " Left-click on a button to display the corresponding split type. Fig. 5-2: Task bar for selecting the split type Changing the split type (FBAS Monitor) To change the displayed split type on the FBAS monitor, please proceed as follows: "... -
Page 17: Context Menu Functions Of The Multi Split Types
(Audio on) and off (Audio off). Context menu functions of the single split " Right-click into the single split. The context menu of the single split will be displayed. Dallmeier electronic GmbH & Co.KG... - Page 18 DMS 240 / DMS 160 / DMS 80 Fig. 5-5: Context menu single split Sequencer If the recorder has been configured for alternately displaying various cameras (sequence), this sequence will run in the single split after clicking on Sequencer. Back The context menu only contains the entry Back if a single split has been activated by clicking on Expand in a multi split type.
-
Page 19: Login
" Left-click into a split. The Login dialog will be displayed. Fig. 5-6: Login with virtual keyboard " Enter your password with the virtual keyboard. " Confirm with the OK button. Dallmeier electronic GmbH & Co.KG... - Page 20 DMS 240 / DMS 160 / DMS 80 Dallmeier electronic GmbH & Co.KG...
-
Page 21: Playback/Live Mode
2 Buttons for selecting the dialog 3 Live or playback splits 4 Information window 5 Camera buttons 6 Buttons for playback control The Sequencer/Live mode can be reactivated at any time by clicking on the Sequencer button. Dallmeier electronic GmbH & Co.KG... -
Page 22: Split Types
DMS 240 / DMS 160 / DMS 80 Split types 6.2.1 Changing the split types " Click on one of the buttons for selecting the split type to activate another split. Fig. 6-2: Selecting a split type The currently displayed split type is marked in blue. -
Page 23: Toggling Between Cameras In Multi Split Types
The current camera - split window assignment can be saved as preset for multi split types. 5 presets can be saved for each multi split type. " Right-click on the button of the current multi split type. Dallmeier electronic GmbH & Co.KG... - Page 24 DMS 240 / DMS 160 / DMS 80 The context menu of the button will be displayed. " Select Save/Preset X. Fig. 6-6: Context menu for saving a preset The virtual keyboard will be displayed. " Enter a name for the preset.
-
Page 25: Camera Control
Fig. 6-9: Camera control panel 1 Control buttons (left, right, up, down) 2 Starting position 3 Zoom + 4 Zoom - 5 Focus + 6 Focus – 7 Open shutter 8 Close shutter 9 PTZ preset buttons Dallmeier electronic GmbH & Co.KG... -
Page 26: Ptz Presets
DMS 240 / DMS 160 / DMS 80 NOTE Buttons F1 through F4 and ALT are intended for future options and are not yet active. 6.4.2 PTZ presets The current position of a camera can be saved as preset. For this purpose 18 presets are available. -
Page 27: Leaving The Camera Control
" Click again on the camera control button to leave the camera control. UTC zoom control The graphical user interface allows to control (zoom control) a Dallmeier electronic UTC camera if such a camera has been connected to the recorder and defined as controllable (see Instal- lation and Configuration). NOTE... -
Page 28: Functions
8 Menu on/off 9 Reset settings The functions 6 - 8 allow to change the internal configuration of a Dallmeier electronic UTC camera. Normally, it is not necessary to change this configuration. This functionality is described in the documentation Installation and Configuration. -
Page 29: Leaving The Utc Zoom Control
Displaying a PTZ preset " Click on the corresponding button to activate a saved PTZ preset. 6.5.4 Leaving the UTC Zoom control " Click again on the camera control button to leave the UTC Zoom control. Dallmeier electronic GmbH & Co.KG... - Page 30 DMS 240 / DMS 160 / DMS 80 Dallmeier electronic GmbH & Co.KG...
-
Page 31: Playback Mode
Single images of the cameras are stored in the reference track. These images can be used to compare current camera settings and positions with the original conditions. Reference tracks are therefore not used for recording or playback. Dallmeier electronic GmbH & Co.KG... -
Page 32: Track Selection
DMS 240 / DMS 160 / DMS 80 7.1.2 Track selection There are different methods for selecting a track: Direct selection This method allows a LP track to be quickly selected. " Click on a camera button in the Playback/Live mode to display the live image of the camera. -
Page 33: Changing The Track
Select track button. Select the new track following the method described above. Playback The recorder will switch to Playback mode after a track for playback has been selected. The playback control panel and the latest image in the track will be displayed. Dallmeier electronic GmbH & Co.KG... -
Page 34: Playback Control
DMS 240 / DMS 160 / DMS 80 Fig. 7-5: Playback control panel 9 10 11 12 13 14 15 16 17 18 19 NOTE The functions marked with * are described in se- parate chapters. 1 Information window 11 Picture-by-picture backward... -
Page 35: Playback With Audio
" Call the context menu of the split. " Turn Audio on or Audio off. Fig. 7-7: Context menu with track playback Magnifying glass (zoom) The magnifying glass function of the recorder is a digital section enlargement. Dallmeier electronic GmbH & Co.KG... -
Page 36: Stopping The Recording
DMS 240 / DMS 160 / DMS 80 " Click on the Zoom button. Fig. 7-8: Zoom button Except for printing, all functions will be deactivated. The split window will be displayed at maximum size. " Position the mouse pointer in the split window. -
Page 37: Printing An Image
" Click the Print image button to print the currently displayed image. Fig. 7-10: Print image button This function is also provided when using the magnifying glass. Exit playback mode " Click on the Exit playback mode button to end the playback of a track. Dallmeier electronic GmbH & Co.KG... - Page 38 DMS 240 / DMS 160 / DMS 80 Dallmeier electronic GmbH & Co.KG...
-
Page 39: Search Functions
Search for objects in a picture. (only active in case of a corresponding configuration in the Camera settings dialog) " To select the desired search function, click the corresponding tab. Simple search " Click the Simple Search tab. Fig. 8-2 Dallmeier electronic GmbH & Co.KG... -
Page 40: Quick Search With Time Intervals
DMS 240 / DMS 160 / DMS 80 " Clicking the Date field opens a calendar in which you can select the date directly. " You select the time by clicking the arrow buttons next to the hours, minutes and seconds. -
Page 41: Index Search
You can access the listed events with the Event back and Event forward buttons (B). If you would like to view events belonging to the relevant event, close the search function. You can also select an event directly by double-clicking the corresponding list entry. Dallmeier electronic GmbH & Co.KG... -
Page 42: Extended Search
DMS 240 / DMS 160 / DMS 80 Extended search The extended search is used when other data, in addition to the picture data (including date and time), is saved for the picture. This is especially the case with ATMs and cash registers. -
Page 43: Smartfinder
Configuration manual. The following steps are therefore necessary in order to use the SmartFinder search function: 1. Feed a track. 2. Click the Search functions (binoculars) button. 3. Click the SmartFinder tab. Fig. 8-8 Dallmeier electronic GmbH & Co.KG... -
Page 44: Basic Procedure
DMS 240 / DMS 160 / DMS 80 8.5.1 Basic procedure Steps A to D first show the basic course of the search function. Further settings can be found in the Advanced search options section. A) Selecting the search range in the picture "... -
Page 45: Advanced Search Options
Draw-Mode section whether the display is to be realized as individual fields or as a combination of fields. In the Search-Mode a relationship is established between these rectangles (picture changes) and the marking drawn by you. Dallmeier electronic GmbH & Co.KG... - Page 46 DMS 240 / DMS 160 / DMS 80 Draw mode The draw mode influences the display of the existing picture changes. Rectangle If you have activated Rectangle in the draw mode, all the changes are each displayed with a rectangle, whereby rectangles may also be positioned partially on top of each other.
- Page 47 The geometric balance point is not of relevance then. Fig. 8-17: Rectangles intersect the marking = Hit Dallmeier electronic GmbH & Co.KG...
-
Page 48: Use Database
DMS 240 / DMS 160 / DMS 80 General comparison of the search modes If one compares the two search modes, it becomes clear that more search results (hits) result during an intersection search than during a balance point search. -
Page 49: Image Export And Import
Export pictures and then click on Ex- port ... which will now be active. Fig. 9-2 9.1.2 Export sequences Select the start of the required sequence using the slide. " Click on Export pictures. " Click on Sequence start. Dallmeier electronic GmbH & Co.KG... -
Page 50: Export List
DMS 240 / DMS 160 / DMS 80 Select the end of the sequence you wish to export using the slide. " Click on Export pictures. " Click on Sequence end. If you wish to export more sequences, repeat the steps described above. -
Page 51: Select Devices For Export
In the next dialog you can select a medium for exporting the pictures or sequences. Fig. 9-4 " Update the device list if necessary using " Select a medium using the pull-down menu. After selecting the medium the current information for it will be displayed. Dallmeier electronic GmbH & Co.KG... -
Page 52: Exporting
DMS 240 / DMS 160 / DMS 80 Fig. 9-5 " Compare the Export Information with the free memory of your selected medium. " If necessary delete some data from your medium. To do this mark the appropriate file in the information window and click on... -
Page 53: Importing Exported Pictures
Pictures already processed can no longer be read in and viewed on the system. Exported pictures cannot be saved to the hard disk of the DMS 240 / 160 / 80 with the Import function. Dallmeier electronic GmbH & Co.KG... - Page 54 DMS 240 / DMS 160 / DMS 80 " Click Import in the dialog selection. Fig. 9-7 " Select the file whose pictures are to be viewed in the list of data medium information. " Update the device list if necessary using "...
-
Page 55: 10 Erasing Tracks
Saved tracks are secure tracks that have been protected against overwriting. Erasing such tracks results in a loss of the saved images. The disk space required for recording will again be available for saving a secure track. Dallmeier electronic GmbH & Co.KG... - Page 56 DMS 240 / DMS 160 / DMS 80 " Open the Select track panel to erase a saved track. " Click on the Saved Tracks tab. Fig. 10-2: Select track panel/Saved Tracks tab " Left-click the relevant track. " Click on the Delete button.
-
Page 57: 11 Reference Image Memory
Creating a new reference image set " Open the Select track panel. " Select Reference on the Longplay Tracks tab. " Click on Open. Fig.11-1: Select track panel The Reference Image Memory dialog will be displayed. Fig.11-2: Reference Image Memory Dallmeier electronic GmbH & Co.KG... -
Page 58: Comparison Of Reference To Live Image
DMS 240 / DMS 160 / DMS 80 " Click on New. The virtual keyboard will be displayed. Enter a name for the reference image set. The reference image set will be created and displayed with date and time in the Memory Selection field. -
Page 59: Deleting The Reference Image Set
As the storage capacity of the reference image memory is limited, the oldest reference image sets should be deleted. " Select an image set in the Memory Selection field. " Click on View. " Click on Delete and then OK. Dallmeier electronic GmbH & Co.KG... - Page 60 DMS 240 / DMS 160 / DMS 80 Dallmeier electronic GmbH & Co.KG...
-
Page 61: 12 System Messages
Apply to decide which category you wish to be relevant for the analysis. Standard System messages relating to certain states of the recorder or events will be displayed (e.g. fan failure, shut down). Dallmeier electronic GmbH & Co.KG... -
Page 62: Filtering System Messages
DMS 240 / DMS 160 / DMS 80 Protocol System logons and logoffs will be displayed (e.g. login, external connection to PView). Actions System messages relating to actions carried out by the user will be displayed (e.g. changing a setting, track playback). -
Page 63: Exporting System Messages
If all system messages in the archive are to be exported, all categories must be activated and both the lower and upper times must be deactivated. Dallmeier electronic GmbH & Co.KG... -
Page 64: Deleting And Limiting An Archive
" To export the correct list, always click Apply before exporting. " Insert a floppy disk into the dri- ve of your DMS 240 / 160 / 80, or insert a USB stick into an available USB port. Fig. 12-5... - Page 65 " Enter the maximum of messages you wish to save. This setting will only take effect when the system updates the system messages, in other words when it writes a new message to the protocol file. Dallmeier electronic GmbH & Co.KG...
- Page 66 DMS 240 / DMS 160 / DMS 80 Dallmeier electronic GmbH & Co.KG...
-
Page 67: 13 Info Menu
Functions which are not activated with a check are either not integrated in your system or are not enabled. Versions The Versions tab provides information on the software versions and internal components. Fig. 13-2: Versions tab Dallmeier electronic GmbH & Co.KG... - Page 68 DMS 240 / DMS 160 / DMS 80 Network connection Active network connections are listed on the Network connections tab. Here, you can determine which user (IP address/Host name) is accessing the system at the time of the inquiry. All the connections using the DaVid protocol are displayed (for example, DMS WebAccess, PView, etc.).
- Page 69 USb bus of the recorder. Both internal and external devices will be shown. Fig. 13-6: USB Devices tab Grabber Boards This tab provides information on the grabber boards used in the recorder. Fig. 13-7: Grabber Boards tab Dallmeier electronic GmbH & Co.KG...
- Page 70 DMS 240 / DMS 160 / DMS 80 Dallmeier electronic GmbH & Co.KG...
-
Page 71: 14 Switching Unit Off
14 Switching unit off IMPORTANT Data can be permanently lost if the device is switched off without being shut down. Ensure that the DMS 240 / 160 / 80 is properly shut down. Shutting down is only possible via login with a password. - Page 72 DMS 240 / DMS 160 / DMS 80 Dallmeier electronic GmbH & Co.KG...
-
Page 73: 15 Maintaining The Unit
Open the front panel on the left side of the recorder. Remove the soiled filter mat. Remove lint/dust from the mesh with a dry cloth if necessary. Insert a new filter mat Close the panel. Dallmeier electronic GmbH & Co.KG... -
Page 74: Cleaning The Unit
DMS 240 / DMS 160 / DMS 80 15.2 Cleaning the unit If the housing of your system is soiled, use a dry cleaning cloth to clean it. IMPORTANT Do not use cleansing agents or detergents. Some cleansing agents and detergents contain solvents that can damage the surface of your system. -
Page 75: Declaration Of Conformity
Equipment: Hard Disk Recorder and Streamer Model name: DMS 240 / DMS 160 / DMS 80 Hereby the equipment is confirmed to comply with the requirements set out in the Council Directive on the Approximation of the Laws of the Member States relating to Electromagnetic Compatibility (89/336/EEC) and the Council Directive relating to Low Voltage 73/23/EEC.
Need help?
Do you have a question about the DMS 240 and is the answer not in the manual?
Questions and answers