
Related Manuals for Sartorius R 160 P


Summary of Contents for Sartorius R 160 P
- Page 1 Sartorius Research. R 160 P Electronic Semi-Microbalance Installation and Operating Instructions...
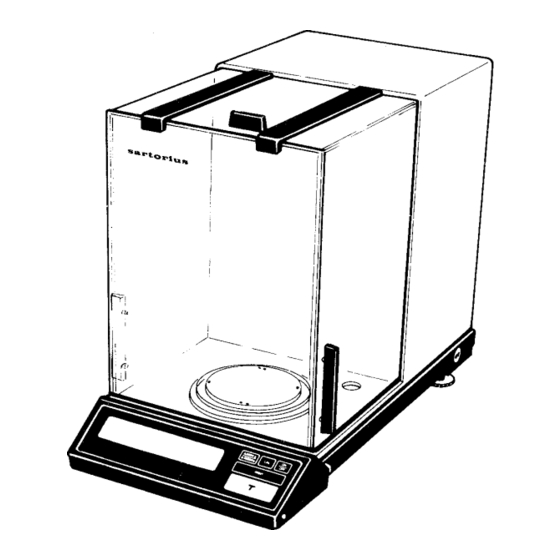
- Page 2 Power receptacle, fuse, Level indicator voltage selector ON/OFF key Menu access switch Print control (functions only if balance Interface has a built-in interface) Protective ring Tare control CAL key Shield plate Selector key Leveling foot Weight display...
- Page 3 Anlagen und Betriebsmittel (VBG 4)" [Electrical Installa- tions and Equipment] of April 1986, it is hereby certified that the equipment delivered, "Semi-Microbalance, model R 160 P" is manufactured and tested in compliance with the following DIN/VDE regulations DIN IEC 348/VDE 041 1:...
-
Page 4: Table Of Contents
Contents Page Equipment Supplied Installation Instructions Startup Operation Weighing Calibration Balance Operating program Troubleshooting Guide Interface Accessories (Options) Specifications... -
Page 5: Equipment Supplied
Do not miss out on the benefits of our full warranty. Please complete the warranty card, indicating the date of instal- lation, and return the card to your Sartorius dealer. The equipment supplied includes the components pictured on the left. -
Page 6: Installation Instructions
Your Sartorius balance will provide accurate readouts even when it is exposed to unfavorable weighing conditions. You can adapt it to your requirements simply by changing the menu code settings of the balance operating program. For this pur- pose, please refer to pages 13 -15. -
Page 7: Startup
Startup Install components (6 - 4) in the weighing chamber. The balance has been factory-set to 220 volts. How to change the voltage setting: Adjust the voltage selector (1) to your local line voltage rating. Write the new voltage setting on the manufacturer's label lo- cated on the rear panel of the balance. -
Page 8: Operation
Operation The weight display shows the following special Status messages for your information: BUSY The balance processor is still busy processing a function and will not accept any other commands to perform functions at this time. STANDBY The display has been turned off with the ON/OFF key (9) and the balance is now in the ready-to-operate state so that it does not require warmup. - Page 9 Press the ON/OFF key (9) to turn the display on or off. You can also turn it on with the tare control (11). After the balance is plugged into a wall outlet, the weight display will go out whenever you switch off the balance. All other cir- cuits will remain energized (indicated by STANDBY).
-
Page 10: Weighing
Weighing The R 160 P has a second display range which you can easily select at the touch of the soft key selector (13). lf you select the second range, only four decirnal places (instead offive) will be displayed. Standard display range: 0.00000 g Second display range: 0.0000 g... -
Page 11: Calibration
Calibration Internal Calibration: Unload the balance and zero the display (tare). As soon as the display shows a zero readout, press the« CAL key (12). The weight display will now read "C.' lf "CE" is displayed instead, zero the display by pressing the tare control and press the CAL key again. - Page 12 External Calibration: This requires an accurate calibration weight (100 g). Unload the balance and depress the tare control for at least 3 seconds until the calibration weight appears in the dis- play. Place the calibration weight in the center of the pan. Now the weight unit symbol "g"...
-
Page 13: Balance Operating Program
Balance Operating Program The balance operating program lets you adapt your balance to various ambient conditions and requirements. At the factory, we have set the codes for a Standard program, which is protected by a locking function to prevent accidental changes. - Page 14 After you have accessed the menu of the balance operating program, the display will show a continuous numerical se- quence from 0 to 3 for the "page", in addition to the Status code letter "L" or "C." When the first digit of the code you wish to check or change appears, press the tare control.
- Page 15 C 1 3 1 Page Line Word Digit Digit Digit Menu of the Balance Operating Program (Active Parameters) Code Ambient Conditions Code External Calibration Very stable Accessible C 1 1 1 C 1 6 1 Stable Access blocked C 1 1 2 C 1 6 2 Unstable C 1 1 3...
-
Page 16: Troubleshooting Guide
- Defective fuse (1) (If this problem - Replace fuse occurs again, please contact your nearest Sartorius service center) Weight display shows »L« or - The pan (5) is not in place - Position the pan »CH2«. -
Page 17: Interface
Interface (models starting with serial no. 39070001) For a description ofthe interface (3), see the enclosed "Interface Description ofthe MP8-6/6.1" Interfacing Devices with the Balance (RS Interface) Make sure that the interface port is electrically connected to the protective grounding conductor of the balance housing. The ca- bling supplied as accessory components is shielded and electri- cally connected on both ends to the cases of the connectors. -
Page 18: Accessories (Options)
Accessories (Options) Data Printer with date/time YDP02-0D V1 and statistics functions Print speed, approx. lines/sec. Printer housing (W x D x H) in mm 150 x 138 x 43 in inches 5.5 x 5.4 x 1.7 Data Control printer 73822 C & with LCD and program set, replace &... -
Page 19: Specifications
Specifications Model R 160 P Weighing capacity 30/60/162 Readability 0.01/0.02/0.05 Tare range (by subtraction) -162 Standard deviation ≤ ±0.02/0.03/0.05 Max. linearity ≤ ±0.03/0.05/0.1 Stabilization time (typical) Display update Adaption to ambient conditions by selection of one and application requirements of 4 optimized filter levels Stability range 0.25 ... - Page 20 All rights reserved. No part of this publication may be printed or translated in any form or by any means without the prior written permission of Sartorius AG. Sartorius AG reserves the right to make change to the technology, features, specification and design of the equipment without notice.
Need help?
Do you have a question about the R 160 P and is the answer not in the manual?
Questions and answers