Table of Contents
Advertisement
Quick Links
SRX100 Services Gateway Quick Start
Use the instructions in this quick start to help you connect the SRX100 Services
Gateway to your network. For details, see the SRX100 Services Gateway Hardware
Guide at http://www.juniper.net/techpubs/a059.html.
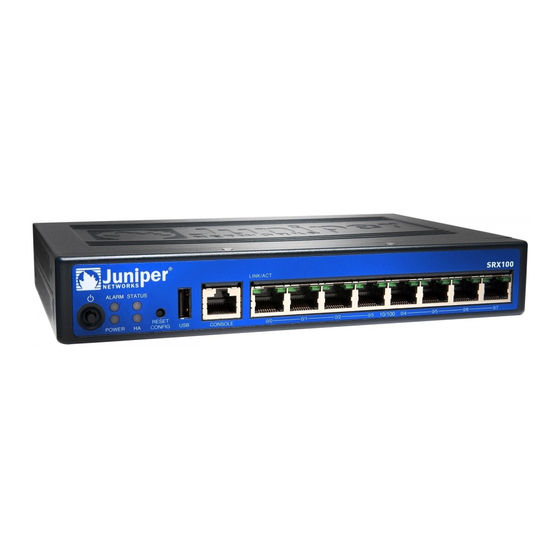
SRX100 Services Gateway Front Panel
Callout
Description
1
Power button
2
LEDs (ALARM, POWER,
STATUS, HA)
3
Reset Config button
SRX100 Services Gateway Back Panel
Callout
Description
1
Lock slot for security cable
2
Grounding point
3
Cable tie holder
4
Power supply input
Callout
Description
4
USB port
5
Console port
6
Fast Ethernet ports
SRX100 Services Gateway Models
The following two models of SRX100 Services Gateways are available:
Device
DDR Memory
SRX100B
512 MB
SRX100H
1 GB
Connecting and Configuring the SRX Series Device
Use the instructions below to connect and set up the SRX100 Services Gateway to
protect your network. Refer to the LEDs on the front of the device to help you determine
the status of the device.
Task 1: Overview
The SRX100 Services Gateway is a security device that requires these basic
configuration settings to function:
Interfaces must be assigned IP addresses.
Interfaces must be bound to zones.
Policies must be configured between zones to permit or deny traffic.
Source NAT rules must be set.
The device has the following default configuration set when you power it on for the first
time. To be able to use the device, you do not need to perform any initial configuration.
Factory-Default Settings:
Port Label
Interface
Security Zones
0/0
fe-0/0/0
untrust
0/1 to 0/7
fe-0/0/1 to fe-0/0/7
trust
Factory-Default Settings for Security Policies:
Source Zone
Destination Zone
trust
untrust
trust
trust
untrust
trust
Factory-Default Settings for NAT Rule:
Source Zone
Destination Zone
trust
untrust
DHCP State
IP Address
client
unassigned
server
192.168.1.1/24
Policy Action
permit
permit
deny
Policy Action
source NAT to untrust zone
interface
Advertisement
Table of Contents

Related Manuals for Juniper SRX100B


Summary of Contents for Juniper SRX100B
- Page 1 Use the instructions in this quick start to help you connect the SRX100 Services Gateway to your network. For details, see the SRX100 Services Gateway Hardware The following two models of SRX100 Services Gateways are available: Guide at http://www.juniper.net/techpubs/a059.html. Device DDR Memory...
- Page 2 If you are using this method to connect, proceed with the CLI configuration to the management device. instructions in the Getting Started Guide for the Branch SRX Series at http://www.juniper.net/techpubs/en_US/junos12.1x46/information-products If an IP address is not assigned to the management device, manually configure an ...
- Page 3 Task 5: Ensure That an IP Address Is Assigned to the Services Gateway Task 7: Configure the Basic Settings Use one of the following methods to obtain an IP address on the services gateway: Configure the basic settings, such as hostname, domain name, and root password, for your services gateway.
- Page 4 Juniper Networks, Inc. All other trademarks, service marks, registered trademarks, or registered service marks are the property of their respective owners. Juniper Networks assumes no responsibility for any inaccuracies in this document. Juniper Networks reserves the right to change, modify, transfer, or otherwise revise this publication without notice. Products made or sold by Juniper Networks or components thereof might be covered by one or more of the following patents that are owned by or licensed to Juniper Networks: U.S.
Need help?
Do you have a question about the SRX100B and is the answer not in the manual?
Questions and answers