Table of Contents
Advertisement
Quick Links
Advertisement
Table of Contents

Related Manuals for Jumbuck GEN-D325


Summary of Contents for Jumbuck GEN-D325
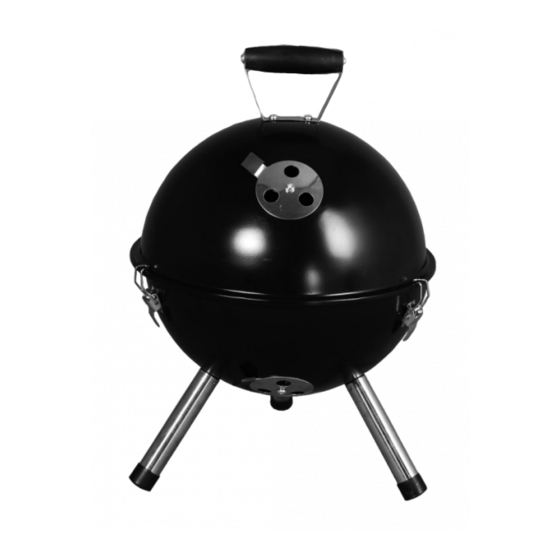
- Page 1 32 cm Portable Dome BBQ Charcoal Grill ∙ Powder coated black enamel bowl and lid ∙ Chrome cooking grill ∙ Bakelite handle ∙ Stainless steel legs ∙ Adjustable air vents ∙ Assembled size: 325D x 460Hmm Adjustable Solid Fuel Cooking Grill Side Ventilation...
- Page 2 Jumbuck 32cm Portable Dome BBQ (GEN-D325) IMPORTANT SAFETY INSTRUCTIONS ARDWARE PACK For outdoor use only. Improper installation, adjustment, alteration, service or maintenance can cause property damage, injury or death. Read the installation instructions thoroughly before installing this equipment.
- Page 3 EXPLODED VIEW & PARTS CODE Part Name Parts Code Reference# Body GEN-D325-01 GEN-D325-02 Charcoal Grid GEN-D325-03 Buckle Support GEN-D325-04 Buckle GEN-D325-05 Handle GEN-D325-06 Air Vent GEN-D325-07 GEN-D325-08 Cooking Grill GEN-D325-09 Cooking Grill Handle GEN-D325-10...
-
Page 4: Carton Contents
CARTON CONTENTS Reference# Description Part# Illustration Quantity Body GEN-D325-01 GEN-D325-02 Charcoal Grid GEN-D325-03 Buckle Support GEN-D325-04 Buckle GEN-D325-05 Handle GEN-D325-06 Air Vent GEN-D325-07 GEN-D325-08 Cooking Grill GEN-D325-09 Cooking Grill GEN-D325-10 Handle... -
Page 5: Hardware Pack Contents
HARDWARE PACK CONTENTS Reference# Description Illustration Quantity Bolt M6 x 20mm Flat Washer φ25 Bolt M3 x 8mm Nut M3 Bolt M5 x 10mm Wing Nut M5 Nut M5 Flat Washer φ16 Nut M5... -
Page 6: Assembly Tips
ASSEMBLY INSTRUCTIONS ASSEMBLY TIPS Remove all contents from packaging, and make sure all the parts are present before attempting to assemble! Tighten all bolt connections by hand first. When the BBQ is fully assembled, retighten the screws, nuts and bolts by using a wrench and screw driver. - Page 7 STEP 2 Assemble the air vent (part 7) on to the BBQ body (part 1) as shown below. Use bolt (part E), nut (part I) and wing nut (part F) to secure. Place charcoal grid (part 3) into the BBQ body (part 1) as per illustration below. STEP 3 Assemble the buckle support (part 4) and buckle (part 5) onto the BBQ body (part 1) as per illustration below.
- Page 8 STEP 4 Assemble the air vent (part 7) onto the BBQ body (part 1) by using bolt (part E), nut (part I) and wing nut (part F) as per illustration below. Assemble the handle (part 6) onto the BBQ body (part 1) by using bolt (part E), flat washer (part H) and nut (part G) as per illustration below.
- Page 9 Fully Assembled Your BBQ is now ready for use. Please take care when lighting your BBQ. Always keep children away from this BBQ at all times.
-
Page 10: Conditions Of The Warranty
PO Box 14436, the operating manual. Panmure, Auckland, 1471 Any repair does not extend the warranty period. NEW ZEALAND Any parts other than original Jumbuck parts will (09) 978 2200 void this warranty. marketing@bunnings.co.nz Proof of purchase must be presented. - Page 11 WARRANTY For New Zealand Customer For Australian Customers Any claim under this warranty must be made To make a claim under the warranty, please within 12 months of the date of purchase of the contact Genesis International at product. To make a claim under the warranty, take service@genesiscorp.com.au or return the product the product (with proof of purchase) to any...
-
Page 12: For Technical Assistance
Liability will only be accepted for loss or damage technical issues with your JUMBUCK BBQ, in the first instance review the instructions manual or during transit if at the time the product was being...
Need help?
Do you have a question about the GEN-D325 and is the answer not in the manual?
Questions and answers