Table of Contents
Advertisement
Quick Links
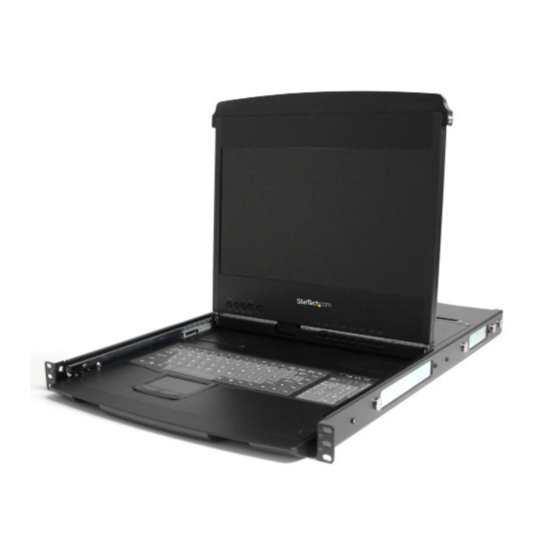
1U 17.3" HD 1080p Dual Rail Rackmount
Widescreen LCD Console
RACKCOND1701
RKCOND1701xx
DE: Bedienungsanleitung - de.startech.com
FR: Guide de l'utilisateur - fr.startech.com
ES: Guía del usuario - es.startech.com
IT: Guida per l'uso - it.startech.com
NL: Gebruiksaanwijzing - nl.startech.com
PT: Guia do usuário - pt.startech.com
For the most up-to-date information, please visit: www.startech.com
Manual Revision: 01/21/2015
*actual product may vary from photos
Advertisement
Table of Contents

Related Manuals for StarTech.com RACKCOND1701


Summary of Contents for StarTech.com RACKCOND1701
- Page 1 DE: Bedienungsanleitung - de.startech.com FR: Guide de l'utilisateur - fr.startech.com ES: Guía del usuario - es.startech.com IT: Guida per l'uso - it.startech.com NL: Gebruiksaanwijzing - nl.startech.com PT: Guia do usuário - pt.startech.com For the most up-to-date information, please visit: www.startech.com Manual Revision: 01/21/2015...
- Page 2 StarTech.com. Where they occur these references are for illustrative purposes only and do not represent an endorsement of a product or service by StarTech.com, or an endorsement of the product(s) to which this manual applies by the third-party company in question. Regardless of any direct acknowledgement elsewhere in the body of this document, StarTech.com hereby...
-
Page 3: Table Of Contents
Table of Contents Introduction ....................1 Packaging Contents ..........................1 Installation ....................1 Hardware Installation/Assembly ......................1 Connecting to a USB Controlled Computer ..................4 Connecting to a PS/2 Controlled Computer ................... 4 Connecting to a KVM Switch ........................ 4 Operation ....................5 Front Panel Controls .......................... -
Page 4: Introduction
Introduction Packaging Contents • 1U LCD Rack Console • KVM Module • 2 x KVM Module Extension Bracket • 2 x Rear Bracket • Universal Power Adapter • Instruction Manual Installation Hardware Installation/Assembly 1. Note the safety stopper on the console drawer. The safety stopper is designed to prevent the drawer from sliding out during transportation. - Page 5 3. The rear brackets, and slide rails have a tight fit. Carefully slide the rear brackets into the front rails, then fasten the brackets to the cabinet/rack posts. 4. Attach the extensions brackets to both sides of the KVM switch module. Please note the length of the extensions and mount them as shown.
- Page 6 7. Remove the safety stoppers on both sides of the rack console by unfastening the small screws. Please note that once the Safety Stopper is removed, the drawer is free to slide out when the console is tilted. Be cautious, as this could cause injury. Ensure the console is properly installed before removing the safety stoppers.
-
Page 7: Connecting To A Usb Controlled Computer
Please note: You can only connect to a computer using either the PS/2 or USB port, not both simultaneously. Connecting to a USB Controlled Computer Connect the standard VGA cable and a USB A-B cable to the computer and KVM Module as shown below. -
Page 8: Operation
Operation Front Panel Controls KVM Control and Status: (This section is effective only when a multi-port KVM switch module, not included, is connected.) • Computer Selection Buttons - Press one of these push buttons to select a computer. For 16 port models, 1~8 represent the lower 8 ports, while A~H indicates the higher 8 ports. -
Page 9: Alternative Input Devices
Alternative Input Devices In addition to the built-in keyboard and touchpad, this rack console also supports using an external keyboards and mouse, including wireless (cordless) keyboards and mice. A USB port is accessible on the rack console that allow for connecting input devices, as well as controls that can disable the touchpad in favour of an external mouse. -
Page 10: Keyboard Replacement
Keyboard Replacement The keyboard is replaceable in the event of language changes or maintenance. To replace the keyboard, pull out the keyboard tray, and remove 6 screws from the underside of the tray. There is a small hole on the bottom of the tray as well, that can be used to lift the keyboard out of the tray. -
Page 11: Touchpad Replacement
Touchpad Replacement The built-on Touchpad offers “wheel mouse” functionality. The area of the Touch Pad to the right side of the two small triangular marks is the simulated “wheel” as shown below: With the keyboard removed, to remove the Touch Pad, pull the small tab underneath it upward to release the latch (1). -
Page 12: Specifications
Specifications Display Size 17.3” Panel Type Active Matrix TFT LCD Maximum Screen Resolution 1920x1080 (60/70/75 Hz) Supported Colors 262K (RGB 6-bit) Response Time Back Lighting Contrast Ratio 500:1 Brightness 300 cd/m2 Pixel Pitch 0.199mm x 0.199mm Horizontal: -70 ~ 70 Viewing Angle Vertical: -60 ~ 60 Keyboard/Mouse... -
Page 13: Technical Support
Limitation of Liability In no event shall the liability of StarTech.com Ltd. and StarTech.com USA LLP (or their officers, directors, employees or agents) for any damages (whether direct or indirect, special, punitive, incidental, consequential, or otherwise), loss of profits, loss of business, or any pecuniary loss, arising out of or related to the use of the product exceed the actual price paid for the product. - Page 14 StarTech.com is an ISO 9001 Registered manufacturer of connectivity and technology parts. StarTech.com was founded in 1985 and has operations in the United States, Canada, the United Kingdom and Taiwan servicing a worldwide market.
Need help?
Do you have a question about the RACKCOND1701 and is the answer not in the manual?
Questions and answers