StarTech.com RKCOND17HD Manual
1-port vga/dvi rackmount lcd console - 17 in. - 1080p - 1u
Hide thumbs
Also See for RKCOND17HD:
- Quick start manual (2 pages) ,
- Manual (34 pages) ,
- User manual (16 pages)
Table of Contents
Advertisement
Quick Links
Download this manual
See also:
User Manual
Advertisement
Table of Contents

Related Manuals for StarTech.com RKCOND17HD


Summary of Contents for StarTech.com RKCOND17HD
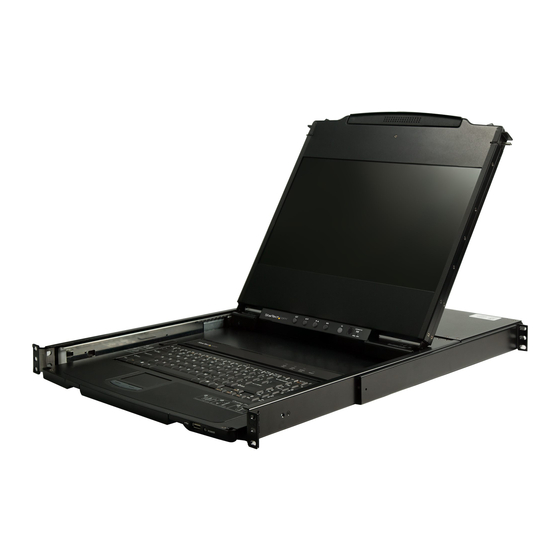
- Page 1 1-Port VGA/DVI Rackmount LCD Console - 17 in. - 1080p - 1U Actual product may vary from photos SKU: RKCOND17HD To view manuals, videos, drivers, downloads, technical drawings, and more visit www.startech.com/support...
- Page 2 • Connect the equipment into an outlet on a circuit different from that to which the receiver is connected • Consult the dealer or an experienced radio/TV technician for help For the State of California WARNING: Cancer and Reproductive Harm www.P65Warnings.ca.gov To view manuals, videos, drivers, downloads, technical drawings, and more visit www.startech.com/support...
- Page 3 This manual may make reference to trademarks, registered trademarks, and other protected names and/or symbols of third-party companies not related in any way to StarTech.com. Where they occur these references are for illustrative purposes only and do not represent an endorsement of a product or service by StarTech.com, or an endorsement of the product(s) to which this manual...
-
Page 4: Safety Statements
• Kablar (inklusive elkablar och laddningskablar) ska dras och placeras på så sätt att risk för snubblingsolyckor och andra olyckor kan undvikas. To view manuals, videos, drivers, downloads, technical drawings, and more visit www.startech.com/support... -
Page 5: Warnings
Versuchen Sie nicht ohne Hilfe, dieses Produkt zu montieren und Geräte zu installieren. Dichiarazioni di avvertenza • Assicurarsi di Assemblare il prodotto secondo le istruzioni. • Leggere l’intero manuale e assicurarsi di aver compreso tutte le istruzioni To view manuals, videos, drivers, downloads, technical drawings, and more visit www.startech.com/support... - Page 6 • Dit product moet met twee personen in elkaar worden gezet. Probeer dit product niet zonder hulp in elkaar te zetten en apparatuur te installeren. 注意 • 必ず取扱説明書に従って本製品の組み立てを行って下さい。 • 最初に取扱説明書を最後まで読み、本製品の組み立て方をすべて理解 してから組み立て作業を始めて下さい。 • 本製品は、二人がかりでの組み立てを想定しています。手助けなしに 単独で組み立てと設置を行わないで下さい。 To view manuals, videos, drivers, downloads, technical drawings, and more visit www.startech.com/support...
-
Page 7: Table Of Contents
KVM Audio Port ............................9 Console Connection ................9 Console USB Keyboard and Mouse Ports ..................9 Console VGA Port ............................9 Console DVI-D Port ........................... 10 Console Audio Port ........................... 10 To view manuals, videos, drivers, downloads, technical drawings, and more visit www.startech.com/support... - Page 8 Firmware Upgrade Switch........................23 Performing the Firmware Upgrade Procedure ................23 Firmware Upgrade Recovery......................... 23 Technical Support ..................24 Warranty Information ................24 Limitation of Liability ................24 UL Safety Statements ................24 To view manuals, videos, drivers, downloads, technical drawings, and more visit www.startech.com/support...
-
Page 9: Product Diagram
Actual product may vary from photos Front View (Open) LCD Screen LCD On / Off Button Firmware Upgrade Port Reset Button LCD Controls Keyboard Firmware Touchpad Upgrade Switch Keyboard Release Latches To view manuals, videos, drivers, downloads, technical drawings, and more visit www.startech.com/support... -
Page 10: Front View (Closed)
Front View (Closed) Front Mounting Brackets Rear Mounting Brackets Port Upper Handle Power Console Release Latches To view manuals, videos, drivers, downloads, technical drawings, and more visit www.startech.com/support... -
Page 11: Rear View
Rear View Console Console Mouse Audio Audio Port Port Port Console Power KVM VGA Switch Port Port Console Power DVI-D Socket USB-B DVI-D Port Port Port Console Keyboard Port To view manuals, videos, drivers, downloads, technical drawings, and more visit www.startech.com/support... -
Page 12: Product Information
• AC Electrical Outlet External Console: • Computer x 1 • VGA Cable x 1 • DVI-D Cable x 1 Note: DVI displays connected to RKCOND17HD will display DVI-D signals only. To view manuals, videos, drivers, downloads, technical drawings, and more visit www.startech.com/support... - Page 13 • 3.5 mm Audio Cable x 1 Devices: • USB Device x 1 Note: The USB ports support HID devices only. Operating Systems: • OS Independent (works with most Operating Systems) To view manuals, videos, drivers, downloads, technical drawings, and more visit www.startech.com/support...
-
Page 14: Hardware Installation
1. Select the 1U of Rack Space that you intend to use for installing the Console. 2. Install four M5 Cage Nuts into the front rails of your Rack. (figure 1) figure 1 To view manuals, videos, drivers, downloads, technical drawings, and more visit www.startech.com/support... - Page 15 Note: Ensure that your M5 Cage Nuts are installed in the same 1U of Rack Space in both the front and the rear of your rack. 4. While one person holds the RKCOND17HD unit in place, the second person must loosely screw the front Rack Mounting Brackets into the front of your Rack with four M5 Screws using a Phillips Head Screwdriver (not included).
- Page 16 Heavy-duty steel Minimum/Maximum 25.5 x 39 inches (647.7 – 990.6 mm) Mounting Depth Power Supply 100~240V AC Input Power Consumption 10.2W Operating Temperature 0°C to 40°C (32°F to 104°F) To view manuals, videos, drivers, downloads, technical drawings, and more visit www.startech.com/support...
-
Page 17: Kvm Connection
2. Connect the USB Cable from your Mouse to the Console USB Mouse Port. Console VGA Port 1. Connect the VGA Cable to the VGA Port on your Display. To view manuals, videos, drivers, downloads, technical drawings, and more visit www.startech.com/support... -
Page 18: Console Dvi-D Port
2. Power on your KVM, Computer, and any USB Peripheral Devices requiring external power. 3. Press and release the LCD On/Off Button on the LCD Console. 4. Toggle the Power Switch to the On position. To view manuals, videos, drivers, downloads, technical drawings, and more visit www.startech.com/support... -
Page 19: Hardware Operation
Opening the Console To access the LCD Screen, slide the RKCOND17HD Console out and raise the cover. To slide the Keyboard and the LCD Screen unit out of the closed position in your rack: figure 3 To view manuals, videos, drivers, downloads, technical drawings, and more visit www.startech.com/support... -
Page 20: Closing The Console
1. Simultaneously slide both Console Release Latches toward the center of the RKCOND17HD Console, and pull the unit out from the rack. (figure 3) 2. Lift the Upper Handle to reveal the LCD Screen. 3. Continue to pull the Keyboard Module towards you until you hear an audible ‘click’... - Page 21 (figure 4) 5. Slide the LCD Screen until it contacts the Keyboard Module. 6. Continue to slide both modules into your rack until you hear an audible click. To view manuals, videos, drivers, downloads, technical drawings, and more visit www.startech.com/support...
-
Page 22: Lcd Buttons
If you have already entered the OSD Menu function, pressing this button exits the OSD Menu. If you are at the Main Menu, pressing this button exits the Menu function that is currently selected. To view manuals, videos, drivers, downloads, technical drawings, and more visit www.startech.com/support... -
Page 23: Adjustment Settings
Lets you set the amount of time the OSD displays on the Duration screen. If there is no input for the amount of time you choose, the OSD display turns off. To view manuals, videos, drivers, downloads, technical drawings, and more visit www.startech.com/support... - Page 24 Resets the adjustments on all menus and submenus to their factory default settings. Note: The Language setting does not return to the factory default, but remains at the one that you have set it to. To view manuals, videos, drivers, downloads, technical drawings, and more visit www.startech.com/support...
-
Page 25: Keyboard Emulation
Ctrl + F6 Copy Ctrl + F7 Open Ctrl + F8 Paste Ctrl + F9 Find Ctrl + F10 Ctrl + 1 Ctrl + 2 Ctrl + 3 To view manuals, videos, drivers, downloads, technical drawings, and more visit www.startech.com/support... -
Page 26: Mac Keyboard Emulation
MAC keyboard. The emulation mappings are listed in the table below: PC Keyboard MAC Keyboard Note: Always press and release each key in the PC Keyboard sequence. Shift Shift Ctrl Ctrl Ctrl + 1 To view manuals, videos, drivers, downloads, technical drawings, and more visit www.startech.com/support... - Page 27 Ctrl + 2 Ctrl + 3 Ctrl + 4 Print Screen Scroll Lock Enter Return Backspace Delete Insert Help Ctrl + To view manuals, videos, drivers, downloads, technical drawings, and more visit www.startech.com/support...
-
Page 28: Hotkeys
Note: Press the keys in sequence – one key at a time - first Ctrl, then Alt, then Shift, etc. Note: Console selections are not saved. If RKCOND17HD is powered off then the unit reverts to the default settings. Ctrl + Alt +... - Page 29 Enter mouse mode [U] [M] is the default) Ctrl + Alt + Configures the front USB Port None Shift + U + P + to peripheral mode Enter To view manuals, videos, drivers, downloads, technical drawings, and more visit www.startech.com/support...
-
Page 30: Troubleshooting
StarTech.com support team. Accessing the Firmware Upgrade Mode The RKCOND17HD firmware upgrade mode can be accessed one of two ways: by entering a hotkey sequence (see Hotkeys - Page 20), or by placing the RKCOND17HD in firmware upgrade recovery mode (see Firmware Upgrade Switch - Page 24). -
Page 31: Firmware Upgrade Switch
• When a firmware upgrade procedure fails. To perform a firmware upgrade recovery, do the following: 1. Power off the RKCOND17HD Console by toggling the Power Switch to the Off position. 2. Connect the Firmware Upgrade Cable to the Firmware Upgrade Port. -
Page 32: Technical Support
Limitation of Liability In no event shall the liability of StarTech.com Ltd. and StarTech.com USA LLP (or their officers, directors, employees or agents) for any damages (whether direct or indirect, special, punitive, incidental, consequential, or otherwise), loss of profits, loss of business, or any pecuniary loss, arising out of or related to the use of the product exceed the actual price paid for the product. - Page 33 Mise à la terre appropriée: Assurez-vous que l'équipement monté en rack est correctement mis à la terre. Une attention particulière doit être apportée aux circuits parallèles (par exemple : rallonges électriques/multiprises). To view manuals, videos, drivers, downloads, technical drawings, and more visit www.startech.com/support...
- Page 34 Hard-to-find made easy. At StarTech.com, that isn’t a slogan. It’s a promise. StarTech.com is your one-stop source for every connectivity part you need. From the latest technology to legacy products — and all the parts that bridge the old and new — we can help you find the parts that connect your solutions.
Need help?
Do you have a question about the RKCOND17HD and is the answer not in the manual?
Questions and answers