Table of Contents
Advertisement
Quick Links
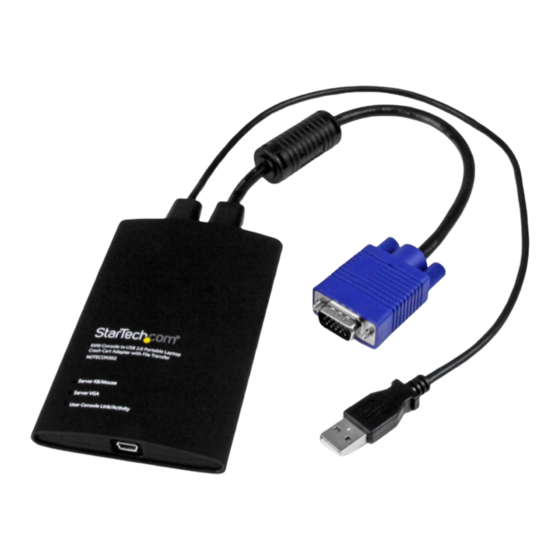
KVM Console to USB 2.0 Portable Laptop Crash Cart
Adapter with File Transfer & Video Capture
NOTECONS02
DE: Bedienungsanleitung - de.startech.com
FR: Guide de l'utilisateur - fr.startech.com
ES: Guía del usuario - es.startech.com
IT: Guida per l'uso - it.startech.com
NL: Gebruiksaanwijzing - nl.startech.com
PT: Guia do usuário - pt.startech.com
For the most up-to-date information, please visit: www.startech.com
Manual Revision: 10/07/2014
*actual product may vary from photos
Advertisement
Table of Contents

Related Manuals for StarTech.com NOTECONS02


Summary of Contents for StarTech.com NOTECONS02
- Page 1 DE: Bedienungsanleitung - de.startech.com FR: Guide de l'utilisateur - fr.startech.com ES: Guía del usuario - es.startech.com IT: Guida per l'uso - it.startech.com NL: Gebruiksaanwijzing - nl.startech.com PT: Guia do usuário - pt.startech.com For the most up-to-date information, please visit: www.startech.com Manual Revision: 10/07/2014...
- Page 2 StarTech.com. Where they occur these references are for illustrative purposes only and do not represent an endorsement of a product or service by StarTech.com, or an endorsement of the product(s) to which this manual applies by the third-party company in question. Regardless of any direct acknowledgement elsewhere in the body of this document, StarTech.com hereby...
-
Page 3: Table Of Contents
Table of Contents Introduction ....................1 Packaging Contents ..........................1 System Requirements ..........................1 Installation ....................2 Hardware Installation ..........................3 LED Indicators............................. 3 Operation ....................4 Toolbar ................................4 Zoom Menu ..............................6 Video Menu ..............................7 File Transfer Menu ............................. 13 Keyboard Menu ............................ -
Page 4: Introduction
Introduction You must install the provided software on the laptop to be able to use the USB Crash Cart Adapter. No changes are needed on the server(s) being controlled. The USB Crash Cart Adapter can be connected or disconnected any time you wish. The software does not need to be started first, nor do you need to shut it down before unplugging the USB Crash Cart Adapter. -
Page 5: Installation
Installation Windows Before installing the software on Windows, please disconnect the USB Crash Cart Adapter and cancel any “Add new hardware” dialog windows. These windows can interfere with the installation process. 1. Insert the provided USB flash drive and run the setup.exe installation program. 2. -
Page 6: Hardware Installation
Connect the attached VGA cable and the USB type A cable into the desired server. For DVI-I (analog) computer systems, please use a DVI to VGA adapter (StarTech.com ID: DVIVGAMF). USB Keyboard/mouse... -
Page 7: Operation
Operation Once connected, the real-time video from the attached host computer is shown centered in the main window. Toolbar There is an optional toolbar along the top edge of the window. This toolbar may be hidden, detached or dragged onto the other three edges of the window. It provides a number of shortcuts and some status information. - Page 8 From left to right: 1. Change orientation of tool bar between horizontal (shown) and vertical. 2. Quit the Pocket Console application immediately. 3. Fine-tune video picture. 4. Open Video-related settings window. 5. Take a screenshot, save as PNG, JPG, BMP file. 6.
-
Page 9: Zoom Menu
Zoom Menu In the Zoom menu there are a number of options to set the zoom factor and resize the window to achieve that zoom factor. For example, if the attached server is running at XGA resolution (1024 x 768), and you select 50% zoom, the main window will be set to a size of approximately 512 x 384. -
Page 10: Video Menu
Video Menu There are a number of options available under the Video menu, including: Auto fine- tune picture, Video Settings, Video capture and Save PNG snapshot. Auto fine-tune picture Use to automatically adjust the sampling phase of the video. This makes the picture sharper and reduces USB traffic. - Page 11 Sampling Phase (Sharpness) - This slider allows you to override the automatic phase adjustment. Press Auto to perform auto phase again. The numbers shown under the slider are the phase (angle) of the control. Click Save to keep your changes. Noise Filters - The hardware implements two filters to reduce USB traffic and improve picture quality.
- Page 12 The record function captures the current display until stopped by the user, or until the user-defined period is reached (functions only when the NOTECONS02 is connected). Clicking the Record button or selecting Video > Record from the drop-down menu will bring up a dialog box where you can choose a destination folder where the recorded files will be stored.
- Page 13 Playback/Pause The Playback / Pause functions enable viewing of Recorded or Loop Recorded files (functions if the NOTECONS02 is connected or disconnected). Clicking the Playback button or selecting Video->Playback from the drop-down menu will bring up a dialog box for you to choose which recorded folder you would like to play.
- Page 14 Clicking the Movie icon or selecting Video > MakeMovie from the drop-down menu will bring up a dialog for you to choose a source folder. Choose a valid record folder, which contains the private record files made by the NOTECONS02, starting with 0.out. Instruction Manual...
- Page 15 From the next window, choose the output resolution of the avi file. Note: If the recording was created using a resolution larger than the chosen output resolution, the output movie may look squished. Note: The Record, Loop Record, Playback and File Transfer functions are disabled when using the Make a Movie function.
-
Page 16: File Transfer Menu
File Transfer Menu File transfer works like a removable USB drive. Instead of a real drive, it creates a Disk Image on the host computer that holds the files. Only one computer at a time may access the image. When created (like plugging in the USB drive) the target computer can read and write to the disk image but the host cannot. - Page 17 Browse - Open an existing image file (supports dynamic VHD files and ISO images). New - Create a new disk image (you will be prompted to specify your desired size). Insert - Connect disk image to target computer. If no disk image is loaded it will create a temporary one.
-
Page 18: Keyboard Menu
Keyboard Menu Most keystrokes are forwarded directly to the connected host computer. However, some special key combinations, such as Ctrl-Alt-Del, are blocked by the notebook’s operating system. ), or use the menu option More special Click on the keyboard icon of the toolbar ( keys to bring up a dialog box with common special key sequences that you can send manually. -
Page 19: Mouse Menu
Simulate Hotplug (reset) Clicking on this menu item will ‘hotplug’ the USB going to the host keyboard and mouse. Hot plugging simulates unplugging the USB cable and immediately reconnecting it. It will reset the USB keyboard and mouse emulation completely. Note: When hot-plugging, the keyboard and mouse are not available until the host OS device driver re-initializes the emulated keyboard and mouse. - Page 20 This setting is remembered on the laptop. Please keep in mind that the operating system may also be swapping buttons to suit your preferences. It’s not always clear how many swaps are needed, and which layer is doing the swapping. Experimentation is suggested.
-
Page 21: Toolbar Menu
Relative vs. absolute motion Conventional mice are very simple devices. When they are moved across a desk, they simply report to the computer how far they have been moved. If you move the mouse left an inch, a relative number (say X=-400, Y=0) is reported to the computer. The host O/S takes this number and applies some user preferences to it and moves the on- screen mouse pointer to the left. -
Page 22: Toubleshooting
Toubleshooting Symptom Problem/Suggested Course of Action Adapter has no power from either USB No lights connection. Try other USB ports. Use the Picture Positioning arrows on the Video Settings dialog to shift the image leftwards / Black bar on left/top of image upwards until no black can be seen. -
Page 23: Specifications
Specifications PC Interface PC Video Type Console Interface(s) USB Mini-B (5 pin) Female 1 - USB A (4 pin) Male Host Connectors 1 - VGA (15 pin; High Density D-Sub) Male Maximum Analog Resolutions 1920x1200 @ 60Hz Power Adapter USB-Powered Power Adapter Plastic Operating Temperature... -
Page 24: Technical Support
Limitation of Liability In no event shall the liability of StarTech.com Ltd. and StarTech.com USA LLP (or their officers, directors, employees or agents) for any damages (whether direct or indirect, special, punitive, incidental, consequential, or otherwise), loss of profits, loss of business, or any pecuniary loss, arising out of or related to the use of the product exceed the actual price paid for the product. - Page 25 StarTech.com is an ISO 9001 Registered manufacturer of connectivity and technology parts. StarTech.com was founded in 1985 and has operations in the United States, Canada, the United Kingdom and Taiwan servicing a worldwide market.
Need help?
Do you have a question about the NOTECONS02 and is the answer not in the manual?
Questions and answers