
Subscribe to Our Youtube Channel
Related Manuals for gio Cobra


Summary of Contents for gio Cobra
- Page 1 Powered Personal Transportation ------------------GIO Cobra 1000WATT ELECTRIC SCOOTER------------------ READ INSTRUCTIONS BEFORE USING YOUR NEW SCOOTER...
-
Page 2: Table Of Contents
TABLE OF CONTENTS IMPORTANT INFORMATION ………………………………………………………2-3 QUICK REFERENCE………………………………………………………………..4 GETTING TO KNOW YOUR SCOOTER…………………………………………….5 PACKAGE CONTENTS………………………………………………………………..6 GETTING STARTED…………………………………………………………………...6 ASSEMBLY……………………………………………………………………………6-7 FUSE INSTALLATION………………………………………………………………….7 SEAT&SEAT POST INSTALLATION…………………………………………………7 CHARGING……………………………………………………………………………...8 RIDING&BRAKING……………………………………………………………………..8 FOLDING AND STORAGE…………………………………………………………….9 BRAKING SYSTEM…………………………………………………………………..9 ADJUSTING BRAKES………………………………………………………………….9 TIRE PRESSURE………………………………………………………………………10 RECOMMENDED TOOLS…………………………………………………………….10 ADJUSTING THE HEAD UNIT……………………………………………………….11 ADJUSTING THE CHAIN…………………………………………………………11-12 MAINTENANCE SCHEDULE………………………………………………………...12 TROUBLESHOOTING GUIDE………………………………………………………..13... -
Page 3: Important Information
PLEASE BE SAFE WHEN RIDING ALWAYS WEAR A HELMET AND OBEY ALL LAWS! IMPORTANT BATTERY MAINTENANCE and CHARGING INSTRUCTIONS 1. You MUST charge completely prior to initial use. (Follow charging instructions in manual) 2. Charge immediately after each use. 3. Charge before storage. You must charge every 30 days if not in use. - Page 4 IMPORTANT PLEASE READ THIS BEFORE USING THIS PRODUCT READ THIS FIRST! WARNING This product does not conform to Federal Motor Vehicle Standards and is not intended for operation on public streets, roads or highways. Serious injury can result from the unsafe operations of this product. Operator can minimize these risks by using certain safety equipment such as: safety helmet, goggles, gloves, elbow and kneepads and appropriate footwear.
-
Page 5: Quick Reference
QUICK REFERENCE SAFETY GUIDE SAFETY GUIDE • The recommended minimum age for riding this scooter is 16 years old. • To avoid damage to the motor and footplate, do not overload the scooter. • Never ride with more than one person. •... -
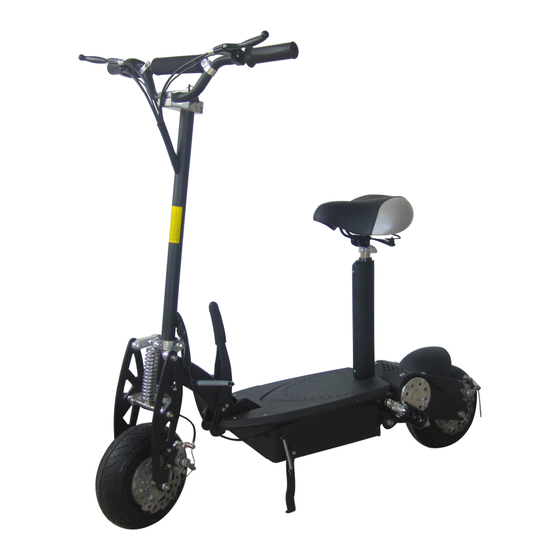
Page 6: Getting To Know Your Scooter
GETTING TO KNOW YOUR SCOOTER Variable Speed Throttle Front & Rear Hand Brakes Optional Seat Kit Included Ignition Key Handle for Fold Design PP Deck Front Shocks Rear Disc Brakes Front Inflatable Tire Kick Stand Front Disc Brakes Rear Shock Power Motor Rear Inflatable Tire (Photo’s may vary) -
Page 7: Getting Started
GETTING STARTED Please read and understand these instructions and the OPERATING PROCEDURES section, prior to starting or riding your scooter Assembly 1. Carefully remove the scooter from the box. Then install the wheel ,longer spacer on the left and shorter spacer on the right,the wheel in the middle of both spacers,be sure to tightening screw.(FIG.1) 2. -
Page 8: Fuse Installation
Assembly – Cont: 6. Open outward metal lock at both side of PP deck and lift PP deck as shown.(FIG.6) (FIG.6) 7. Insert the 30 amp fuse by opening the PP deck. Insert the fuse into the fuse holder ,then close PP deck. -
Page 9: Charging
CHARGING Your scooter comes charged out of the carton. We still recommend charging the unit for 6-8 hours prior to it’s first use. We also recommend charging your scooter after each use and prior to storage. WARNING: DO NOT allow your scooter to go into deep discharge, as this will damage the batteries. -
Page 10: Folding And Storage
FOLDING & STORAGE When you are done riding the scooter you can fold it down for compact storage and transportation. First remove the seat post and seat, then using one hand, push down on the folding handle while gently pushing down on the handlebars. -
Page 11: Tire Pressure
To adjust the front brakes: For brakes that are adjusted too loose: 3. Adjust the tension screw on the left hand brake lever by rotating it counter-clockwise until the wheel spins freely. For brakes that are adjusted too tight: Tighten the tension screw on the left hand brake lever by rotating it clockwise until the wheel has a (FIG.16) -
Page 12: Adjusting The Head Unit
Wrenches: 8/10/13/14/17 mm Open end wrench Large Adjustable Crescent Wrench Philips Head Screwdrivers Oil, Grease or Lubricant ADJUSTING THE HEAD UNIT The head unit will come adjusted from the factory. However, riding on rough terrain and general use may cause the head unit to become loose over time. It may be necessary to adjust the head unit from time to time. -
Page 13: Maintenance Schedule
To tighten the chains: Slightly loosen the two axle bolts on both sides of the rear wheel. Then slowly adjust the two adjusting screws on each side of the rear tire until chain reaches the proper tension. (FIG.19) Rotate the rear wheel to make sure the chain is aligned. -
Page 14: Troubleshooting Guide
TROUBLESHOOTING GUIDE SYMPTOMS POTENTIAL CAUSE SOLUTION The charger light turns 1. This indicates the 1.Continue to charge the green & red right away. batteries are batteries for 6-8 hours adequately charged. prior to initial use. 2. Bad Fuse or open 2.
Need help?
Do you have a question about the Cobra and is the answer not in the manual?
Questions and answers