
Subscribe to Our Youtube Channel
Related Manuals for gio Tron


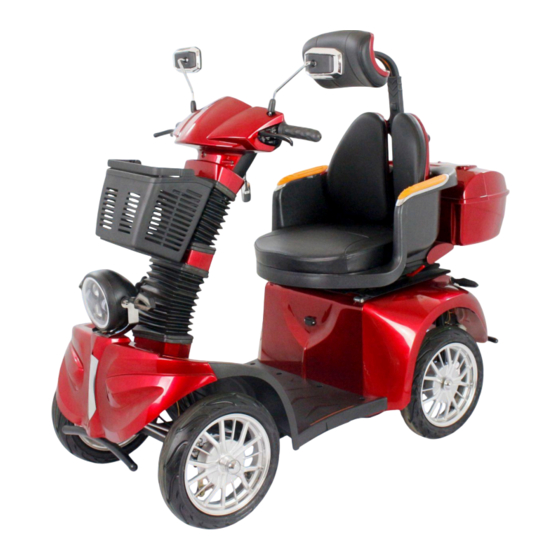
Summary of Contents for gio Tron
- Page 2 SAFETY INFORMATION Please note the following information to ensure rider safety and get better use out of the GIO TRON Mobility Scooter. Keep this manual safe for future reference. Please read the manual prior to first use and do not permit anyone who has not, to operate the vehicle.
- Page 3 TABLE OF CONTENTS Riding Safety Overview Scooter Assembly Scooter & Control Diagrams Operating & Adjusting Maintenance & Care Specifications & Troubleshooting Warranty Information RIDING SAFETY ALWAYS practice riding the scooter in an open area prior to driving amongst vehicle/pedestrian traffic ALWAYS wear an approved helmet if required by law ALWAYS accelerate slowly and steer with both hands ALWAYS drive with caution at appropriate speeds...
- Page 4 This stylish recreational mobility scooter doesn’t require any licensing, registration or insurance.* (*unless required locally) Inspired by motorcycle design, the Tron is packed with features from a backup claxon to generous top speeds, long driving range, rear shock suspension, a highly adjustable smart seat and more! This manual contains...
- Page 5 ASSEMBLY The Tron arrives 95% assembled and is ready in a few simple steps and only requires a basic screwdriver and adjustable wrench. Step 1 - Unboxing We recommend slicing the shipping box at the corners and flattening it out to gain easy access to the frame within.
- Page 6 ASSEMBLY continued… Step 2 - Steering Column & Front Basket Loosen the large plastic knobs on the steering column, adjust the steering column into a fully upright position, and retighten the knobs. With the steering column in place, the basket lowers into place on the front basket bracket.
- Page 7 Step 4 - Headrest Insert the headrest into the mounting bracket on the rear of the seat. Install the quick adjust button by inserting the plastic push button, with spring slid over it, into the rear hole at the base of the mounting bracket and the bolt, with washer added, into the corresponding hole on the front of the bracket.
- Page 8 ASSEMBLY continued… Step 6 - Breaker The breaker on the scooter ships in the off position. It must be turned on before charging or using the scooter. Open the under-seat compartment from the rear lock and locate the breaker at the front right side. Push the breaker to the on position, the scooter is now ready to charge and use.
- Page 9 SCOOTER DIAGRAM Adjustable headrest Tip protection wheels Headrest quick adjust button Rearview mirrors Adjustable seat back Handlebars, controls, display Swivel seat bucket w/ cushion n Ignition Rear storage container w/lock o Removable shopping basket Seat distance adjustment Steering column adjustment handle knobs Charging port...
- Page 10 CONTROL DIAGRAMS High/low beam switch Speed (km/hr) Turn signal switch Speed setting Horn buttons Battery level Lights switch Battery voltage Speed switch Traveled distance Reverse button...
- Page 11 When driving downhill it is recommended to release the throttle & apply brakes as needed to control the scooter’s speed. ⚠ The Tron features control switches next to the throttle grip that adjust driving features. The upper switch labeled 1-3 sets the current speed setting of the scooter.
- Page 12 OPERATING & ADJUSTING continued… ⚠ ALWAYS APPLY BRAKES WHILE GOING DOWNHILL TO CONTROL SPEED AND AVOID SHARP TURNS AT HIGHER SPEEDS TO PREVENT TIPPING SIDEWAYS! ⚠ The brake handle also features a parking brake option. Once stopped, the parking brake can be applied by squeezing the brake normally and then pressing in the small parking brake lever on the brake handle.
- Page 13 The scooter will only charge and operate with the breaker in the ON position! ⚠ Adjusting the scooter The “smart” seat on the Tron has several possible adjustments. Headrest To adjust the height of the headrest, press the quick adjust button and shift the headrest to the desired position.
- Page 14 OPERATING & ADJUSTING continued… Seat The seat of the Tron swivels to allow the rider easy access, as well as shift forward and backward. To adjust either, while stopped, locate the seat adjustment handle located on the right side of the base of the seat. Engage the handle, adjust the seat to the desired position and release the handle.
- Page 15 LCD screen, perfect for shopping bags or a purse. MAINTENANCE & CARE The GIO Tron requires minimal maintenance which can be performed by most users, a friend or family member, or a scooter technician. Visually inspect the scooter regularly for any signs of damage, especially after any collisions or accidents.
- Page 16 ⚠ To ensure the safety and reliability of the scooter, do not make modifications to it, and always use parts, specifically designed for the GIO Tron. Always make sure the scooter is turned off before performing any maintenance! ⚠ Battery The scooter’s batteries have a lifespan of 250-300 charge cycles, this on...
- Page 17 ⚠ Tires The Tron is equipped with tubeless tires, these require less maintenance and are less prone to flats compared to traditional tube tires. However, damage and flats are still possible. The condition of the tires not only directly affects the ability to drive the scooter but also its general performance.
- Page 18 TROUBLESHOOTING Issue Possible Cause Solution Scooter won’t move Ignition not turned on Turn key to ON position Battery not connected or empty Check connections or charge battery Breaker not turned on Turn breaker to ON position Brakes engaged Release brakes or replace brake handles if defective Motor malfunction Check motor connections, tighten...
- Page 19 (157x72x130cm) WARRANTY The following details are applicable to all scooters sold directly to customers by GIO. If this product was purchased via an Authorized Dealer please refer to the warranty coverage provided by the dealer and contact them directly for warranty related claims or assistance.
Need help?
Do you have a question about the Tron and is the answer not in the manual?
Questions and answers