Advertisement
Advertisement

Related Manuals for gio ITALIA-ULTRA LSM 2023


Summary of Contents for gio ITALIA-ULTRA LSM 2023
- Page 2 ⚠ PLEASE INSPECT YOUR ELECTRIC ITALIA-ULTRA LSM E-SCOOTER UPON ARRIVAL AND REPORT ANY DAMAGES THAT MAY HAVE OCCURRED DURING SHIPPING TO YOUR GIO DEALER OR GIO ELECTRIC DIRECTLY IF PURCHASED DIRECTLY...
-
Page 3: Table Of Contents
8. Illustrations/images in this manual may differ from the final product. 9. If you have any concerns or questions in regards to you e-Scooter please contact the GIO Dealer from which your purchased or GIO Electric Customer Service Table of Contents... -
Page 4: Safe Operation Guide
Allow for extra braking room in slippery conditions, ice, snow, rain, etc. Always inspect your GIO scooter before each use to make sure it is in safe operating condition. Check for loose screws, nuts, bolts, parts, brakes, drive chain, etc. -
Page 5: Assembly
⚠ Do Not Make Any Alterations Or Modifications To This Gio E-Scooter Or Add Any Parts Not Authorized By Gio Except Those Discussed In This Manual Or Those Required By Law. Do Not Remove Any Reflectors, Lights Or Other Standard Equipment. Failure To Follow These Operation Instructions Can Result In Serious Injury Or Death Or Could Result In An Electrical Short And Or Fire. -
Page 6: Diagrams
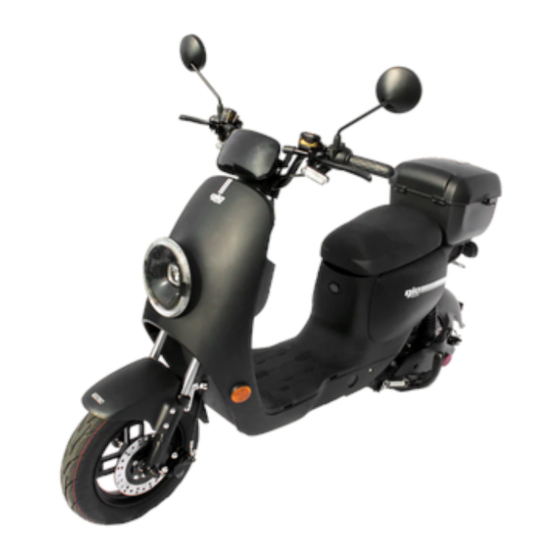
Scooter Diagrams a Mirrors g Charging port b LCD display, controls (see below) h Seat, battery & controller (internal) c Ignition, bag hook (2.5lb capacity) Cargo container d Cupholder, usb power port Taillights, license plate mount e LED headlight k Kickstands (Side & Main) Front wheel, fender, brakes Rear wheel with motor, brakes, fender m Mirrors (L/R) -
Page 7: Scooter Operation
LCD Display Icons Speedometer in MPH - Displays P when parking mode activated Speed Settings (Displays current setting only) Odometer - Displays total mileage Battery Level - Illuminates current battery level, displays charging icon when charging Turn Signal Indicators (Left,ON,Right) Headlight Indicator Indicators (in order left to right) Motor Error, Throttle Error, Controller Error, Brake Indicator... - Page 8 Accelerating Acceleration for your scooter is controlled by the twist grip throttle on the right handlebar. Rotate throttle towards you to accelerate and release to slow down. It’s more efficient if you add power gradually when accelerating and coast as far as possible before braking.
- Page 9 Horn Press the red button label with “ ” to activate the scooter's horn. Security Features Your Italia-Ultra features a pair of security features. The first is a steering lock. Turn the handlebars all the way to the left. Then with the key inserted in the ignition, push the key inwards and turn clockwise to the locked position.
- Page 10 12 hours, it is likely a problem has developed, unplug the charger and contact your dealer or GIO Customer Service. It is normal for the charger to get warm, and always be sure it is well ventilated, unobstructed and kept dry at all times.
-
Page 11: Maintenance And Care
Cleaning Cleaning is the number one thing you can do in order to ensure your GIO will serve you for a long time. In the long run, it will save you money and a lot of time waiting for the scooter to be repaired. - Page 12 Brakes The Italia-Ultra is equipped with front and rear hydraulic disc brakes. Each caliper’s brake pad is provided with wear indicators, which allows you to check the brake pad wear without having to disassemble the brake. To check the brake pad wear, check the position of the wear indicators while applying the brake.
- Page 13 If this should occur, rinse with plenty of water and call emergency services immediately. Your Gio Italia Ultra, its batteries and charger are specifically designed for each other, and are not interchangeable with other models of scooters. There are many chargers in the market that look similar, use of any other chargers may result in serious damage to all components.
- Page 14 In the event of any abnormalities upon inspection or during use, stop using the scooter and contact your dealer or GIO Electric Customer Service for more information. All batteries are sealed and SHOULD NOT be taken apart without proper knowledge.
- Page 15 Brakes Your Italia-Ultra features hydraulic brakes that are free of basic adjustments. ⚠ If your brakes are not working properly , please contact your GIO dealer or GIO customer service.
- Page 16 Suggested Maintenance Schedule The following is a suggested minimum inspection ( ) & maintenance ( �� �� schedule, however it is advisable to inspect ( ) your machine regularly to identify and fix any problems. Perform any adjustment ( �� ), cleaning ( ��...
-
Page 17: Troubleshooting
Brake cable loose Place brake cable in proper position In the event that you are having difficulty with your scooter outside of these issues or these solutions are not correcting your issue please contact a technician at GIO customer service. - Page 18 Wiring Schematic Please write down the VIN (vehicle identification number) for registration, application for insurance or in the event the vehicle should be stolen.The number is stamped into the frame, located behind the cover plate on the steering column just above the foot rest.
-
Page 19: Warranty
Warranty When purchased from a GIO Dealer: Please refer to the warranty details provided by your GIO Dealer. In the event of shipping damages or warranty issues please contact them directly. When purchased from GIO Electric directly: The limited warranty as contained herein is exclusive and in lieu of all other warranties expressed or implied.
Need help?
Do you have a question about the ITALIA-ULTRA LSM 2023 and is the answer not in the manual?
Questions and answers