
Related Manuals for gio H2 VOLT


Summary of Contents for gio H2 VOLT
- Page 1 DO NOT RETURN TO STORE! Illustrations may not be exact appearance of actual product. Please contact GIO Customer Care Center @ 1-877-274-0480 for any concern or/and inquiry.
-
Page 2: Table Of Contents
Table of Contents SECTION 1: Introduction ..........................3 Recording Your E-bike Info........................4 SECTION 2: Electric bicycle and its components ................... 5 SECTION 3: ASSEMBLY ..........................7 Front wheel installation: ........................... 7 Unfolding the Frame ..........................7 Unfold the Handlebars ..........................8 Adjusting the Seat ............................. -
Page 3: Section 1: Introduction
SECTION 1: Introduction Dear Customer, ! Aren’t you excited! You have just received your brand new e-bike. We, too, are excited because as designers and developers of our bikes, we love to make you happy, and we believe your new e-bike will give you lots of fun. -
Page 4: Recording Your E-Bike Info
Please take time to record the following information: Recording Your E-bike Info Serial Number: _______________________________________________________ Model: ___________________-________________________________ Color: _______________________________________________________ Date of Purchase: _______________________________________________________ Dealer’s Name: _______________________________________________________ Dealer’s Ph. #: _______________________________________________________ Dealer’s Email: _______________________________________________________... -
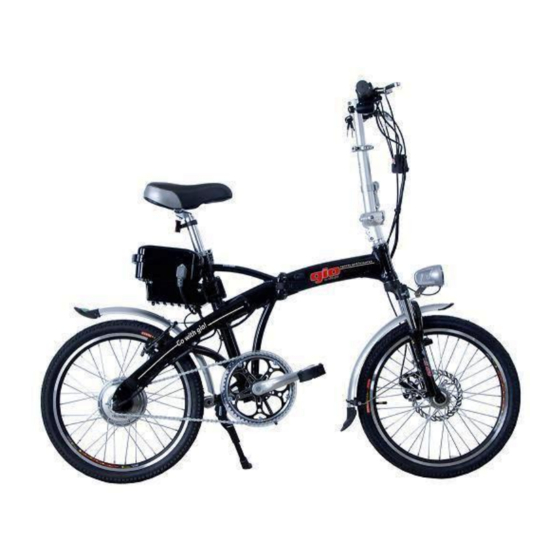
Page 5: Section 2: Electric Bicycle And Its Components
SECTION 2: Electric bicycle and its components... - Page 6 No’ Component No’ Component Left brake lever (Rear Brakes) 15 Saddle height adjustment clamp Handlebar folding hinge Saddle Headlight Rear reflector Front mudguard Rear sprocket Front rotor Chain Front wheel quick release handle Kick stand Front disc brakes Front sprocket Foldable pedal Front suspension adjustable Pedal crank...
-
Page 7: Section 3: Assembly
SECTION 3: ASSEMBLY Only minimal assembly is required for your new e-bike. You will be required to do the following: Front wheel installation: First, make sure all hardware is exists. You should have front axle + spacer + 2 springs (some models will have only 1 spring) + nut. -
Page 8: Unfold The Handlebars
Your bike upper handlebar stem is inserted into the lower stem and is tightened with the quick-release handle as in picture. You can snug up the quick release with the hand nut opposite the handle to get the proper tightness. Quick-release handle Unfold the Handlebars Unfold the handlebars and lock into place. -
Page 9: Adjusting The Seat
Adjusting the Seat The seat is adjusted with the quick-release. The tightness of the quick-release clamp can be adjusted with the hand nut on the opposite side of the handle. Quick-release clump Hand nut Brake Adjustment Your bike’s front and rear brakes have a pad that ride on the rim of the wheel for braking. These are adjusted by tightening the cable and by adjusting the stem of the pad. -
Page 10: Pedals Installation
Front Brakes Rear Brakes Pedals Installation Attached the pedals by screwing them on to the crank, (L) Left (R) Right Note, there are Left and Right pedals. Left pedal attached to the left side crank by screwing it counter-clockwise. Right pedal attached to the right side crank by screwing it clockwise Pedals folding Press knobs and push the pedal inside Fold the pedal... -
Page 11: Section 4: Important Instructions
SECTION 4: Important Instructions Safeguard your battery to insure continued high performance. It should be recharged after each use. The normal full-cycle battery life, if it is continuously discharged and recharged, is between 300–1000 cycles (depending on which battery came with your bike) after which the storage capacity of the battery will gradually decline. -
Page 12: Section 5: Safety Precautions
Battery chargers contain sensitive electronics. Improper use, dropping, or sudden jolts can damage the charger and its internal electronics which is NOT covered by warranty. Do not leave the charger on for more than 10 hours! Check all nuts, bolts, screws, and spokes to make sure they are tight before riding. If any screws, nuts, or bolts are loose, put some thread lock on the threads and then tighten. -
Page 13: Section 6: General Operating Instructions
SECTION 6: General Operating Instructions BEFORE YOU RIDE 1. Charge your battery until the green indicator light on the charger comes on, but do not allow it to charge more than 10 hours. 2. Check the air pressure of the tires. Make sure they are at the recommended psi embossed on the sidewall of the tire. -
Page 14: Battery Precautions
While charging, put the battery in a secure place where children can't reach. Do not use any charger other than the one that came with your GIO Electric Bike. If you ever do need to replace the charger, contact your local dealer. -
Page 15: Removing The Battery From The Bike
Removing the Battery from the Bike A. Loosen the quick-release from the seat and lift seat from the seat post. B. Turn the key to release the locking pin. C. Slide out battery from its position in the bike. SECTION 8: Specific Operating Instructions A battery meter is located on the top of the battery which shows the charge if you press the button next to the battery meter. -
Page 16: Section 9: Maintenance
SECTION 9: MAINTENANCE Wheels - Wheels should be properly placed in the fork or dropouts. If you hear any irregular noise from the wheels or brakes, they should be checked and adjusted. The wheels should rotate smoothly without wobbling from side to side. Check the bearing play of the hubs regularly by lifting the bicycle and spinning the wheel. -
Page 17: Section 10: Troubleshooting
2. Check whether the charger is plugged in properly to both the battery and the outlet. 3. Check the voltage of the charger and battery – consult your local dealer. If all above mentioned situations are normal and/or there is some other problem, please contact your local GIO dealer. -
Page 18: Section 11: Warranty
We will repair or replace, at our option, any product or part that is defective in material or workmanship without charge if the product is presented to us at our authorized GIO Electric Bike Service Center with dated proof of purchase inside of warranty period. Shipping charges are not covered under this warranty.
Need help?
Do you have a question about the H2 VOLT and is the answer not in the manual?
Questions and answers