Table of Contents
Advertisement
Quick Links
Advertisement
Table of Contents

Subscribe to Our Youtube Channel
Related Manuals for Black Horse Model Home Run


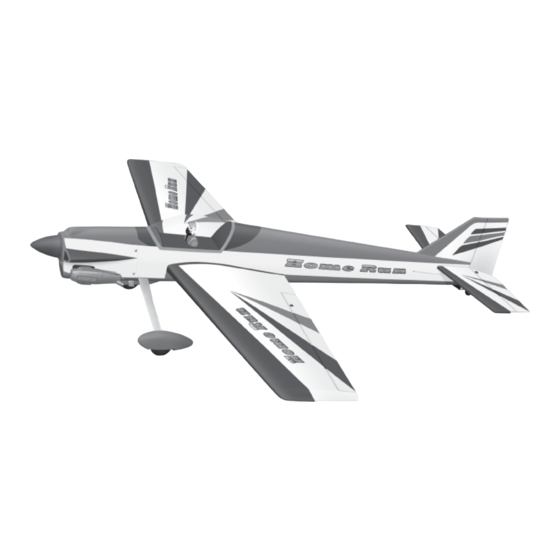
Summary of Contents for Black Horse Model Home Run
- Page 1 Instruction Manual book SPECIFICATION Wingspan : 1,420 mm 55.9 in Wing Area: 38.3 dm 594 sq.in Length 1,440 mm 56.8in Weight 2,650 gr 5.8 lbs Engine 46 cu.in 2 stroke 72 cu.in 4 stroke Radio 4 channels ...
-
Page 2: Parts List
HOME RUN. Instruction Manual This instruction manual is designed to help you build a great flying aeroplane. Please read this manual thoroughly before starting assembly of your HOME RUN. Use the parts listing below to identify all parts. WARNING Please be aware that this aeroplane is not a toy and if assembled or used incorrectly it is capable of causing injury to people or property. -
Page 3: Safety Precaution
HOME RUN. INSTRUCTION MANUAL SAFETY PRECAUTION + This is not a toy + Be sure that no other flyers are using your radio frequency. + Do not smoke near fuel + Store fuel in a cool, dry place, away from children and pets. -
Page 4: Instruction Manual
HOME RUN. Instruction Manual 3) Using a modeling knife, remove the covering at possition show below. Remove the covering. C/A glue. Bottom of wing. 4) Using the thread as a guide and using masking tape, tape the servo lead to the end of the thread: carefully pull the thread out. - Page 5 HOME RUN. INSTRUCTION MANUAL INSTALLING THE AILERON CONTROL HORN Control Horn 1) Using a ruler & pen to draw a straight line as below picture. Mounting Screws Mounting Plate 4) Using a 1mm drill bit and the control horns as a guide, drill the mounting holes through the aileron halves.
-
Page 6: Joining The Wing Halves
HOME RUN. Instruction Manual Cut. Dowel. Alumium brace. Dowel brace. Repeat the procedure for the other wing half. JOINING THE WING HALVES INTALLING THE ENGINE MOUTH 1. Locate the aluminium wing dihedral brace. 2. Test fit the dihedral brace into each wing half. -
Page 7: Installing The Stopper Assembly
HOME RUN. INSTRUCTION MANUAL 5. Test fit the stopper assembly into the FUEL TANK tank. It may be necessary to remove some of the flashing around the tank opening using INSTALLING THE STOPPER ASSEMBLY a modeling knife. If flashing is present, make ... - Page 8 HOME RUN. Instruction Manual Fuel tank. Pushrod wire. COWLING 1) Slide the fiberglass cowl over the en- gine and line up the back edge of the cowl with the marks you made on the fuselage. INTALLING THE ENGINE-THROTTLE Trim and cut.
-
Page 9: Installing The Spinner
HOME RUN. INSTRUCTION MANUAL INSTALLING THE SPINNER Install the spinner backplate, propeller and spinner cone. The spinner cone is held in place using two 3mm x 12mm wood screws. SERVO INSTALLATION 2) While keeping the back edge of the... - Page 10 HOME RUN. Instruction Manual A+B Epoxy PLUS glue C/A glue. A+B Epoxy Plus glue. C/A glue. C/A glue. C/A glue.
- Page 11 HOME RUN. INSTRUCTION MANUAL Check to mark sure the wing and stabi- lizer are paralell. If they are not, lightly sand C/A glue. the opening in the fuselage for the stabilizer until the stabilizer is paralell to the wing. 2) Slide the stabilizer into place in the pre- cut slot in the rear of the fuselage.
-
Page 12: Vertical Stabilizer Installation
HOME RUN. Instruction Manual 4) Remove the stabilizer. Using the lines VERTICAL STABILIZER you just drew as a guide, carefully remove the INSTALLATION covering from between them using a modeling knife. When cutting through the covering to remove it, cut with only enough pressure to only cut through the covering it’s self. - Page 13 HOME RUN. INSTRUCTION MANUAL Pen. C/A glue. 1) Using a modeling knife, remove the 4) Remove the stabilizer. Using a mod- covering from over the precut hinge slot cut eling knife, remove the covering from below into the lower rear portion of the fuselage. This the lines you drew.
-
Page 14: Pushrod Installation
HOME RUN. Instruction Manual mounting area. Apply epoxy to the bottom and Control clasp. top edges of the filler block and to the lower hinge also. Set the stabilizer in place and re- align. Double check all of your measurements once more before the epoxy cures. -
Page 15: Installing The Throttle Pushrod
HOME RUN. INSTRUCTION MANUAL INSTALLING THE THROTTLE PUSHROD 1) Install one adjustable metal connector through the third hole out from the center of one servo arm, enlarge the hole in the servo arm using a 2mm drill bit to accommodate the servo connector. -
Page 16: Installing The Main Landing Gear
HOME RUN. Instruction Manual 3) Secure the tail wheel bracket in place using three 3mm x 12mm wood screws. Be careful not to overtighten the screws. Landing gear. WHEEL PAN INSTALATION PARTS REQUIRED 1) Assemble and mounting the wheel pants Secure. -
Page 17: Wing Attachment
HOME RUN. INSTRUCTION MANUAL 3) Using the hardware provided, mount the main landing gear to the fuselage. Switch. WING ATTACHMENT See picture wing attach to fuselage. Wing bolt. INSTALLING THE RECEIVER AND BATTERY ... -
Page 18: Pre-Flight Check
HOME RUN. Instruction Manual BALANCING PRE-FLIGHT CHECK 1) It is critical that your airplane be balanced 1) Completely charge your transmitter and correctly. Improper balance will cause your receiver batteries before your first day of plane to lose control and crash.
Need help?
Do you have a question about the Home Run and is the answer not in the manual?
Questions and answers