Yealink VC400 User Manual
Full hd video conferencing system
Hide thumbs
Also See for VC400:
- Administrator's manual (319 pages) ,
- User manual (171 pages) ,
- Manual (18 pages)
Table of Contents
Advertisement
Quick Links
Advertisement
Table of Contents

Related Manuals for Yealink VC400


Summary of Contents for Yealink VC400
-
Page 2: Declaration Of Conformity
Copyright Copyright © 2014 YEALINK NETWORK TECHNOLOGY CO., LTD. Copyright © 2014 Yealink Network Technology CO., LTD. All rights reserved. No parts of this publication may be reproduced or transmitted in any form or by any means, electronic or mechanical, photocopying, recording, or otherwise, for any purpose, without the express written permission of Yealink Network Technology CO., LTD. -
Page 3: Weee Warning
Do not dispose of WEEE as unsorted municipal waste and have to collect such WEEE separately. Customer Feedback We are striving to improve our documentation quality and we appreciate your feedback. Email your opinions and comments to DocsFeedback@yealink.com. - Page 4 Yealink VC400 video conferencing system firmware contains third-party software under the GNU General Public License (GPL). Yealink uses software under the specific terms of the GPL. Please refer to the GPL for the exact terms and conditions of the license.
-
Page 5: About This Guide
First, verify with your system administrator that the IP network is ready for system configuration. Also be sure to read the Overview and Getting Started sections in this guide before you set up and use the VC400 video conferencing system. In This Guide... - Page 6 User Guide for the VC400 Video Conferencing System...
-
Page 7: Table Of Contents
Web User Interface ......................27 Documentations ........................28 Getting Started ................29 System Installation ........................ 29 Installing the VC400 Video Conferencing System ............30 Installing the Camera ....................... 31 Installing Batteries for the Remote Control ..............32 Connecting the CPE80 Expansion Microphone ............33 Powering the System On and Off .................. - Page 8 User Guide for the VC400 Video Conferencing System Audio Setting ......................... 73 Audio Output Device ....................... 73 Audio Input Device ......................74 Far-end Camera Control ..................... 75 Using VC400 Video Conferencing System ......77 Placing Calls .......................... 77 Placing a Call Using the Remote Control ..............78 Placing a Call Using the VCP40 Phone ................
-
Page 9: Overview
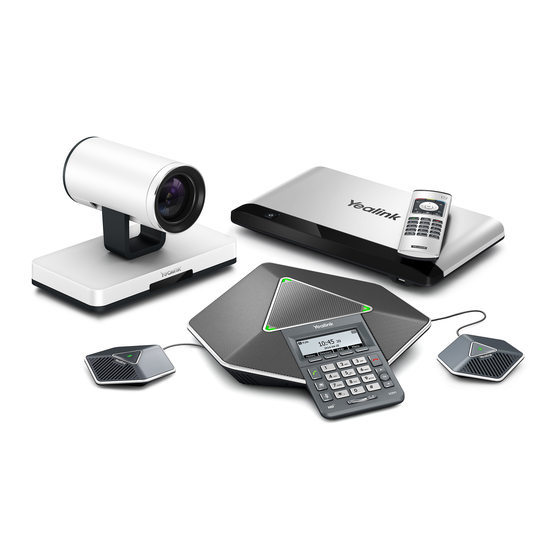
Overview Overview This chapter provides the overview of the VC400 video conferencing system. Topics include: Packaging Contents System Component Instructions Icon Instructions LED Instructions User Interfaces Documentations If you require additional information or assistance with your new system, contact your system administrator. - Page 10 User Guide for the VC400 Video Conferencing System VCP40 Video Conferencing Phone L-Bracket ( for installing the camera) Camera Mounting Accessories VCR10 Remote Control 2 AAA Batteries Power Adapter ...
-
Page 11: Optional Accessory
The following item is optional. You should purchase it separately if necessary. The CPE80 expansion microphone is used for expanding the audio pickup range. CPE80 Expansion Microphone System Component Instructions Before installing and using VC400 video conferencing system, you need to be familiar... -
Page 12: Vc400 Codec
It supports 16:9 and 4:3 aspect ratios. It can be compatible with different audio output devices, and can adapt to the display devices automatically. You do not need to operate the VC400 codec once it has been properly installed in your environment. VC400 codec front panel... -
Page 13: Vcc18 Hd Camera
Resets the system to factory defaults Reset Key ⑬ Allows you to connect a universal security cable to VC400 codec, so you can lock down it. The system will ⑭ Security Slot not be removed after locked. VCC18 HD Camera VCC18 HD camera supports 18x optical zoom, white balance and automatic gain. -
Page 14: Vcp40 Video Conferencing Phone
(± 100 degrees range), tilted (± 30 degrees range). Infrared Sensor The infrared sensor locates at the field of Yealink logo. Aim the remote control at the camera IR sensor to operate the unit. VCP40 Video Conferencing Phone VCP40 video conferencing phone supports 360-degree audio pickup and AAC-LC Codec to achieve ultra-HD voice. - Page 15 Overview Connect the VCP40 phone to the VC400 codec. It can work as an audio device for the system. You can also place calls, answer calls or view directory and history on the VCP40 phone.
- Page 16 User Guide for the VC400 Video Conferencing System System component instructions of the VCP40 phone are: Item Description Shows information about calls, messages, soft keys, time, date and other relevant data: • Call information—call duration ① LCD Screen • Icons (for example, •...
-
Page 17: Vcr10 Remote Control
Overview VCR10 Remote Control VCR10 remote control provides 3 shortcut keys. It can help users organize conference easily with intuitional and efficient operating in all screens. Hardware components of the remote control: Item Description ① Sleep Key Puts the system to sleep or wakes up the system. Locates at the bottom left of the screen. - Page 18 User Guide for the VC400 Video Conferencing System Item Description Locates at the bottom right of the screen. Label automatically to identify their context-sensitive features. ④ Blue Shortcut Key In the idle screen, it is used to save and check the camera preset position, and corresponds to the Preset soft key.
-
Page 19: Icon Instructions
Overview Item Description Captures the on-screen image of the display device when the phone is idle. Icon Instructions Icon on Display Device Icons appearing on the display device are described in the following table: Icon Description Network is disconnected (flashing) Network is available Packet loss... -
Page 20: Icon On Vcp40 Video Conferencing Phone
User Guide for the VC400 Video Conferencing System Icon Description Call mute Call encryption The content of the local camera Focus content Camera position Record a video Dialed calls Received calls Missed calls Dual screen mode Dual video sources (when a PC is... -
Page 21: Led Instructions
Flashing red The VC400 codec is upgrading firmware. Solid red The VC400 codec is in sleep mode. System exception (e.g., network unavailable, update Solid orange failure). The VC400 codec is powered off, or does not connect to the power adapter. -
Page 22: User Interfaces
Detailed operation steps will be introduced in the feature section. Remote Control You can use the remote control and display device to configure and use the VC400 video conferencing system. For more information about the function of each key on the remote control, refer to VCR10 Remote Control on page 21. -
Page 23: Web User Interface
Overview Web User Interface You can customize your system via web user interface. In order to access the web user interface, you need to know the IP address of your new system. To obtain the IP address, do one of the following: The IP address of the system is shown on the top right corner of the display device. -
Page 24: Documentations
User Guide for the VC400 Video Conferencing System Documentations The following table shows documentations available for the VC400 video conferencing system. Name Contents Where found Language In the package Yealink VC Series Video System installation Conferencing and network Chinese/English System Quick Start... -
Page 25: Getting Started
Connecting the CPE80 expansion microphone Up to two display devices can be connected to VC400 codec. As the display device is Note not included in the package, you need to purchase it separately if required. Ensure that the purchased display device supports HDMI input. -
Page 26: Installing The Vc400 Video Conferencing System
Connect the power line of the display device. (Optional.) Connect the VGA cable to the PC port on the VC400 codec and a PC. Connect power adapter to the DC19V port on the VC400 codec and power outlet. -
Page 27: Installing The Camera
Getting Started Installing the Camera You can mount the camera on the TV or on the wall based on your actual needs. Mounting the Camera on the TV When the thickness of the TV is less than 120 mm, you can choose to mount the camera on the TV. -
Page 28: Installing Batteries For The Remote Control
User Guide for the VC400 Video Conferencing System Installation location of the expansion bolts and punching requirement are shown below: Connect one end of the DVI cable to the camera and put the other end of the cable through the L-bracket. -
Page 29: Connecting The Cpe80 Expansion Microphone
Getting Started Open the battery cover on the back of the remote control. Insert the batteries in the correct polarity. Install the battery cover. Note Dispose waste batteries properly. Remove the batteries if they are not in use for a long period of time. Connecting the CPE80 Expansion Microphone If your video conferencing room is large, you can add a CPE80 expansion microphone to the MIC port on the VCP40 phone to expand the audio range of the conference... -
Page 30: Setup Wizard
User Guide for the VC400 Video Conferencing System To power on the system: After all components are connected, press on the VC400 codec. The indicator LED on the VC400 codec illuminates solid green. To power off the system: Do one of the following: –... - Page 31 (Next soft key) to continue or press (Previous soft key) to return to the previous screen. Edit the site name. The default site name is” Yealink VC400”. Press (Next soft key) to continue or press (Previous soft key) to return to the previous screen.
- Page 32 User Guide for the VC400 Video Conferencing System Press (Next soft key) to continue or press (Previous soft key) to return to the previous screen. The display device displays firewall presets information. Press (Next soft key) to continue or press (Previous soft key) to return to the previous screen.
-
Page 33: Registration
Editing Fields on page 40. For more information on how to configure language, time and date, refer to Customizing VC400 Video Conferencing System on page 43. Note Wrong network settings may result in inaccessibility of your system and may also have an impact on your network performance. - Page 34 User Guide for the VC400 Video Conferencing System figure is an example of what is displayed on the LCD screen: Name Description The phone’s time and date are displayed on Time and Date the left of the status bar. Site name The site name of the system.
-
Page 35: Navigating Menus On The Display Device
Getting Started Idle screen of the VCP40 phone Name Description Status icon Displays the status icon of the phone. Displays four soft keys. History: Enters the History screen Directory: Enters the Directory screen Soft Keys DND: Enables or disables the Do Not ... -
Page 36: Entering Data And Editing Fields
User Guide for the VC400 Video Conferencing System If you want to You can Select a value from the From the pull-down list, Press to scroll pull-down list to the value and then press Enable or disable features Press Entering Data and Editing Fields... -
Page 37: System Status
Getting Started If you want to You can seconds to delete the entire field of text. Press to save. System Status When the system is idle, you can view its status via the remote control, VCP40 phone or web user interface. Available information of system status includes: System information (device model, firmware, hardware version, product ID and ... - Page 38 User Guide for the VC400 Video Conferencing System To view the system status via web user interface: Click Status. The system status is displayed on the web user interface. To view the system status via phone user interface: Press Press to select the desired list.
-
Page 39: Customizing Vc400 Video Conferencing System
Customizing VC400 Video Conferencing System Customizing VC400 Video Conferencing System You can customize your VC400 video conferencing system by personally configuring certain settings, for example, site name, time & date and language. You can add contacts to the local directory manually or from the call history. -
Page 40: Backlight
User Guide for the VC400 Video Conferencing System Select desired time from the pull-down list of Automatically Sleep Time. If Always On is selected, the system will not enter the sleep mode automatically. Press (Save soft key)to accept the change. -
Page 41: Site Name
Customizing VC400 Video Conferencing System Select the desired value from the pull-down list of Backlight Time. Click Confirm to accept the change. Site Name Site name is displayed on the status bar of display device and VCP40 phone. When you make an IP address call to the other party, the site name will be displayed on the remote display device. -
Page 42: Language
User Guide for the VC400 Video Conferencing System Press (Save soft key) to accept the change. Site name is configurable via web user interface at the path Setting->General->Site Name. Language The default language of the display device is English, and you can change it via the remote control. -
Page 43: Time & Date
Customizing VC400 Video Conferencing System Select the desired language from the pull-down list of Language. Text displayed on the web user interface will change to the selected language. Time & Date The time and date are displayed on the LCD screen of the VCP40 phone and display device. - Page 44 User Guide for the VC400 Video Conferencing System Select the desired time format from the pull-down list of Time. Select the desired date format from the pull-down list of Date. Select SNTP Settings from the pull-down list of Time Type.
-
Page 45: Key Tone
Customizing VC400 Video Conferencing System Select the desired minute from the pull-down list of Minute. 10. Select the desired second from the pull-down list of Second. 11. Press (Save soft key) to accept the change. Time and date are configurable via web user interface at the path Setting->Date. -
Page 46: Audio Settings
User Guide for the VC400 Video Conferencing System Press to scroll to Key Tone, and then press to enable or disable this feature. Press (Save soft key) to accept the change. Key tone is configurable via web user interface at the path Setting->General->Key Tone. - Page 47 Customizing VC400 Video Conferencing System The current ringer volume of the system is displayed on the left of the display device. Press on the VCP40 phone to adjust the ringer volume. The LCD screen of the VCP40 phone displays the current ringer volume.
-
Page 48: Local Directory
You can create a conference with other parties (up to 4 parties, including yourself). VC400 system can store up to 500 local contacts and 100 conference contacts. You can manage the local directory via the remote control or web user interface. -
Page 49: Adding Contacts
Customizing VC400 Video Conferencing System This chapter provides operating instructions for the local directory. Topics include: Adding Contacts Placing Calls to Contacts Editing Contacts Deleting Contacts Searching for Contacts Search Source List in Dialing ... - Page 50 User Guide for the VC400 Video Conferencing System You can repeat the step 6 to add the third number to the contact, and enter the third number in the Number 3 field. Press (Save soft key) to save the local contact.
- Page 51 Customizing VC400 Video Conferencing System You can also add conference contacts directly without searching action: press to select the desired local contact, and then press to add the desired local contact to the Member List. Press (Save soft key) to save the conference contact.
- Page 52 User Guide for the VC400 Video Conferencing System You can also select Conference from the pull-down list of All Contacts, and then press to highlight the conference contact Press The system will call the first member of the conference contact. When the first member answers the call, the system will call the second member and repeat this until all conference members are joined to the conference.
-
Page 53: Editing Contacts
Customizing VC400 Video Conferencing System Press to select the desired directory list (All Contacts or Conference). Press the Enter soft key or to view the contacts in the selected directory. Press to highlight the desired contact. Press the Dial soft key, The system will call the first member of the conference contacts. -
Page 54: Deleting Contacts
User Guide for the VC400 Video Conferencing System Press (Call soft key). Press to select the Directory menu. Press to select the desired conference contact. Press (Detail soft key). Edit contact information. Press (Save soft key) to accept the change or press (Back soft key) to cancel. -
Page 55: Searching For Contacts
Customizing VC400 Video Conferencing System Directory->Local. Searching for Contacts You can search local contacts or conference contacts via the remote control or web user interface. To search contacts via the remote control: Press (Call soft key). Press to select the Directory menu. - Page 56 User Guide for the VC400 Video Conferencing System If you want to match the LADP list, make sure LDAP is configured already. For more information on how to configure LDAP, contact your system administrator. To configure search source list in dialing via web user interface: Click on Directory->Setting.
-
Page 57: Importing/Exporting Contact Lists
You can import or export the contact list to share contacts between different systems or between system and application software (e.g., Outlook). VC400 video conferencing system only supports the XML and CSV format contact lists. import or export the contact list via web user interface only. - Page 58 User Guide for the VC400 Video Conferencing System Click Browse to locate a contact list file (file format must be *.xml) from your local system. Click Confirm to import the contact list. The web user interface prompts "The original contact will be covered, continue?".
- Page 59 Customizing VC400 Video Conferencing System The web user interface is shown as below: (Optional.)Check the The first line as the title checkbox. It will prevent importing the title of the contact information which is located in the first line of the CSV file.
-
Page 60: Call History Management
The contact list is saved to your local system. Call History Management The VC400 video conferencing system maintains call history lists of All Calls, Missed Calls, Placed Calls and Received Calls. The system supports up to 400 history lists. You can view the call history, place a call or delete an entry from the call history list. - Page 61 Customizing VC400 Video Conferencing System Press to select the Call Features menu.
-
Page 62: Viewing Call History
User Guide for the VC400 Video Conferencing System Press to scroll to History record, and then press to enable or disable this feature. Press (Save soft key) to accept the change. History record feature is configurable via web user interface at the path Setting->Call Features->History Record. - Page 63 Customizing VC400 Video Conferencing System If the call history is more than one page, you can press to turn pages. To view call history via VCP40 phone: Press the History soft key. Recent call history is displayed on the LCD screen of the VCP40 phone.
-
Page 64: Deleting An Entry From The Call History List
User Guide for the VC400 Video Conferencing System If the call history is more than one page, you can press to turn pages. Press To place a call from the call history list via VCP40 phone: Press the History soft key. - Page 65 Customizing VC400 Video Conferencing System Press (Delete soft key) to delete the entry. To clear call history via the remote control: Press (Call soft key). Press to select the History menu. The display device displays recent call history. Press (Clear soft key).
-
Page 66: Adding A Contact From The Call History List
User Guide for the VC400 Video Conferencing System Press to select OK. Press to clear the call history. Adding a Contact from the Call History List Press (Call soft key). Press to select the History menu. The display device displays recent call history. -
Page 67: Call Type
Directory->History. Call Type VC400 video conferencing system supports SIP and H.323 call types. You can configure which type to be used when the system is making calls. When Auto call type is used, the system preferentially uses the H.323 protocol to place calls. If there is no available H.323 account on the system, the system will switch to the SIP protocol. -
Page 68: Bandwidth Settings
User Guide for the VC400 Video Conferencing System Press to scroll to Call Type, and then press Select desired type or Auto from the pull-down list of Call Type. Press (Save soft key)to accept the change. Call type is configurable via web user interface at the path Setting->Call Features-> Call Type. -
Page 69: Audio Setting
Audio Output Device By default, the system automatically selects the available audio output devices. If the VCP40 phone is connected to the Audio In port on the VC400 codec, the system will use the VCP40 phone as the audio output device. -
Page 70: Audio Input Device
If VCS phone is selected as the audio input device and the Audio In port on the VC400 codec is connected to the VCP40 phone, the system will use the VCP40 phone as audio input device. You can configure which audio input device to be used according to the current environment. -
Page 71: Far-End Camera Control
Customizing VC400 Video Conferencing System To configure audio output device via the remote control: Press (Menu soft key) to enter main menu. Press to select the Video & Audio menu. Press to scroll to Audio Setting, and then press Select desired audio output device from the pull-down list of Audio Input. - Page 72 User Guide for the VC400 Video Conferencing System Press to select the Video & Audio menu. Press to scroll to Far-end Camera Control, and then press Press to scroll to Far Control of Near Camera, and then press to enable or disable this feature.
-
Page 73: Using Vc400 Video Conferencing System
Using VC400 Video Conferencing System Using VC400 Video Conferencing System VC400 video conferencing system can be used to place calls, answer calls, or conduct a conference call, you can switch layout, record videos or capture the screenshots during a call. -
Page 74: Placing A Call Using The Remote Control
User Guide for the VC400 Video Conferencing System If the system fails to call, you can troubleshoot the problems according to the following prompts: Prompts Description The remote system rejects the incoming Call Failed Busy here call. Network disconnected Local network is disconnected... -
Page 75: Placing A Call Using The Vcp40 Phone
Click Video Call or Voice Call. Placing Multiple Calls VC400 video conferencing system can support up to 5 parties (4 video calls and 1 voice call, including the conference initiator) in a conference call. You can use remote control, VCP40 phone or web user interface to place multiple calls. - Page 76 User Guide for the VC400 Video Conferencing System To place a multiple call via the remote control: Place a call to the first party. When the first party answers the call, press (More soft key)to open More window. Press to scroll to New Call, and then press to place a new call.
-
Page 77: Answering Or Rejecting Calls
Using VC400 Video Conferencing System Answering or Rejecting Calls When the system is receiving a call, you can answer or reject the call in the following ways: Using the remote control Using the VCP40 phone If the system receives multiple calls, a conference call will be established. -
Page 78: Do Not Disturb (Dnd)
User Guide for the VC400 Video Conferencing System disable this feature. Press (Save soft key) to accept the change. If auto answer feature is enabled, the icon will appear on the status bar of display device. The icon will appear on the LCD screen of the VCP40 Phone. - Page 79 Using VC400 Video Conferencing System Press to scroll to DND, and then press to enable this feature. Press (Save soft key) to accept the change. icon will appear on the status bar of display device, and “DND ON!” will be prompted at intervals. The icon will appear on the LCD screen of the VCP40 phone.
- Page 80 User Guide for the VC400 Video Conferencing System Press (Back soft key) to return. You can also press the DND soft key on the VCP40 phone to enable or disable DND feature during an active all. DND during an active all feature is configurable via web user interface at the path Home->DND.
- Page 81 Using VC400 Video Conferencing System The interface prompts” Hang up?” Click Confirm to end the call. During a multi-way call, you can remove any party via the remote control or web user interface. To remove any party via the remote control: Press (More soft key) during a multi-way call.
-
Page 82: Call Management
User Guide for the VC400 Video Conferencing System Call Management You can enable mute mode, record video, control the video and change video layout during an active call. Call Mute You can enable mute mode to mute the microphone of the active audio device during an active call, and then the other party cannot hear you. -
Page 83: Call Statistics
Troubleshooting The LED indicators on the VCP40 phone illuminate solid red, the LCD screen is shown as below: Login to the web user interface, check the Mute checkbox. icon will appear on the local video of the web user interface. Call Statistics If voice quality is poor during a call, you can enter the Call Statistics screen to view the current status of the call to find out the reason. -
Page 84: Presentation
You can also start/end presentation during a call via the remote control or VCP40 phone (ensure a PC is connected to the VC400 codec). If you disconnect the PC, the presentation will end automatically. - Page 85 Far end PC presentation Loca If two display devices are connected to the VC400 codec (dual screen), the default screen layout during a call is: If there is one active call and local system does not start the presentation. ...
- Page 86 User Guide for the VC400 Video Conferencing System The second display device displays local video image in full size. Far end 1 Far end 2 Local Far end 3 Local Main display device Second display device If there is one active call and local system is during the presentation.
- Page 87 Troubleshooting To change screen layout via the remote control: Press (Layout soft key) during an active call. The display device displays all video thumbnails and three layout soft keys. Press to select a video. Press the desired layout soft key. The selected video will be shown in the selected layout.
-
Page 88: Controlling The Camera
User Guide for the VC400 Video Conferencing System Controlling the Camera Before placing a video call, you need to be familiar with how to adjust the angle and focus of the camera. After the adjustment, you can long press number keys 0-9 to save the current position of the camera. - Page 89 Troubleshooting The display device displays the focus of the camera. To save preset of the camera: Press (Preset soft key). Long press any number key (0-9) on the remote control until the screen prompts ”Preset Key ‘X’ successfully saves, short press it to adjust the camera direction”, (“X”...
-
Page 90: Changing Video Input Source
VC400 video conferencing system supports two video input sources: camera and PC. When camera and PC are connected to the VC400 codec, the display device displays the presentation of the connected PC. If two display devices are connected to the VC400 codec, the video image is shown on the main display device, and the presentation of the PC is shown on the second display device. - Page 91 The system only supports USB flash drive in FAT32 format. After the USB flash drive is inserted to the USB port on the VC400 codec, the display device prompts "USB device available, press * to record or press # to screenshot" .The...
- Page 92 User Guide for the VC400 Video Conferencing System Press to scroll to Videos, and then press Press to select desired Video. Press (Play soft key). You can do the following: Press to rewind or skip the video. Each press will rewind the video 8 seconds or skip the video forward 8 seconds.
- Page 93 The system only supports USB flash drive in FAT32 format. After the USB flash drive is inserted to the USB port on the VC400 codec, the display device prompts "USB device available, press * to record or press # to screenshot" .The...
- Page 94 User Guide for the VC400 Video Conferencing System The display device prompts”Delete this screenshot?” Select OK, and then press to delete the screenshot. Capture screenshot via web user interface at the path Home->Screenshot.
-
Page 95: Troubleshooting
Troubleshooting Troubleshooting This chapter provides general troubleshooting information to help you solve the problems you might encounter when using your VC400 system. If you require additional information or assistance with your new phone, contact your system administrator. System Diagnostics Diagnostic menus include: Audio Diagnose: Check whether the audio output device can pick up voice and ... - Page 96 User Guide for the VC400 Video Conferencing System...
-
Page 97: General Issues
Troubleshooting Network diagnosis: Press (Menu soft key) to enter main menu. Press to select the Diagnose menu. Press to scroll to Ping, and then press Enter IP address (for example, the IP address of the remote system) Press to select Start, and then press Press (Back soft key) to return to Diagnose menu. -
Page 98: Camera Issues
User Guide for the VC400 Video Conferencing System The IP address of the system is shown on the top right corner of the display device. Press (Menu soft key) on your remote control and select Network. The display device displays the network information about the system. -
Page 99: Display Issues
If you select VCS Phone as the audio output device, Ensure that VCP40 phone is connected to the VC400 codec, and LED indicators on the phone illuminate solid green. Ensure that proper volume level on the system. ... -
Page 100: System Maintenance
User Guide for the VC400 Video Conferencing System Ensure that the ring volume is not set to 0, if it is, the icon will appear on the status bar of display device, and the icon will appear on the LCD screen of the VCP40 phone. - Page 101 Troubleshooting To export a PCAP trace via web user interface: Click on Settings->Configuration. Click Start to begin capturing signal traffic. Recreate the error to be documented in the trace. Click Stop to stop the capture. Click Export to open file download window, and then save the file to your local system.
- Page 102 User Guide for the VC400 Video Conferencing System The web user interface prompts “Operating…Please wait…”. Export the system log referring to the following steps. Recreate the error to be documented in the trace. Click Export to save the file to your local system.
- Page 103 Troubleshooting Click Browse to locate a configuration file from your local system. Click Import to import the configuration file. Note The file format of configuration file must be *.bin. How to upgrade firmware? To upgrade firmware via web user interface: Click on Setting->Upgrade.
- Page 104 User Guide for the VC400 Video Conferencing System The web user interface is shown as below: How to reset the system? Reset the system to factory configurations after you have tried almost all troubleshooting suggestions but still do not solve the problem. You need to note that all customized settings will be overwritten after reset.
- Page 105 Troubleshooting The display device prompts” Reset to Factory? ” Select OK, and then press The system reboots automatically, the LCD screen of the VCP40 phone prompts” Rebooting Please wait…”. The phone will be reset to factory sucessfully after startup. Reset of the system may take a few minutes. Do not power off until the phone starts up Note successfully.
-
Page 106: Regulatory Notices
Without prior written consent, no organization or individual is permitted to make any change to the structure or the safety design of the device. Yealink is under no circumstance liable to consequences or legal issues caused by such changes. - Page 107 Regulatory Notices Please refer to the relevant laws and statutes while using the device. Legal rights of others should be respected as well. Environmental Requirements Place the device at a well-ventilated place. Do not expose the device under direct sunlight. Keep the device dry and free of dusts.
-
Page 108: Restriction Of Hazardous Substances
User Guide for the VC400 Video Conferencing System Cleaning Requirements Before cleaning the device, stop using it and disconnect it from the power supply. Use a piece of soft, dry and anti-static cloth to clean the device. Keep the power plug clean and dry. Using a dirty or wet power plug may ... - Page 109 Appendix A - Time Zones...
-
Page 110: Appendix A - Time Zones
User Guide for the VC400 Video Conferencing System Appendix A - Time Zones Time Zone Time Zone Name −11:00 Samoa −10:00 United States-Hawaii-Aleutian −10:00 United States-Alaska-Aleutian −09:00 United States-Alaska Time −08:00 Canada(Vancouver, Whitehorse) −08:00 Mexico(Tijuana, Mexicali) −08:00 United States-Pacific Time −07:00... - Page 111 Appendix A - Time Zones Time Zone Time Zone Name Ireland(Dublin) Portugal(Lisboa, Porto, Funchal) Spain-Canary Islands(Las Palmas) United Kingdom(London) Morocco +01:00 Albania(Tirane) +01:00 Austria(Vienna) +01:00 Belgium(Brussels) +01:00 Caicos +01:00 Chad +01:00 Spain(Madrid) +01:00 Croatia(Zagreb) +01:00 Czech Republic(Prague) +01:00 Denmark(Kopenhagen) +01:00 France(Paris) +01:00 Germany(Berlin)
- Page 112 User Guide for the VC400 Video Conferencing System Time Zone Time Zone Name +04:00 Georgia(Tbilisi) +04:00 Kazakhstan(Aktau) +04:00 Russia(Samara) +04:30 Afghanistan +05:00 Kazakhstan(Aqtobe) +05:00 Kyrgyzstan(Bishkek) +05:00 Pakistan(Islamabad) +05:00 Russia(Chelyabinsk) +05:30 India(Calcutta) +06:00 Kazakhstan(Astana, Almaty) +06:00 Russia(Novosibirsk, Omsk) +07:00 Russia(Krasnoyarsk) +07:00...
- Page 113 Index...
-
Page 114: Index
User Guide for the VC400 Video Conferencing System Index Documentation Deleting Contacts About This Guide Deleting an entry from the call history list Automatically Sleep Time Display Issues Adding Contacts Audio Settings Auto Answer Audio Setting Editing Contacts Audio Input Device... - Page 115 Index Network Connection User Interfaces Navigating Menus on the Display Device Using VC400 Video Conferencing System Packaging Contents V400 Codec Presentation Viewing Call History Placing Calls VCC18 HD Camera Place a call from the call history list VCP40 Conferencing Phone...
Need help?
Do you have a question about the VC400 and is the answer not in the manual?
Questions and answers