Table of Contents
Advertisement
Quick Links
1SQ VCAM 2.4GHz RTF/
Tx-R Instruction Manual
WARNING
Carefully read this manual to learn the safe operation of this model.
Before use, if you feel this product is not for you, please return it to your
place of purchase.
Heli-Max products are to be used by ages 14 and over.
The instruction manual, warranties and other associated documentation
are subject to change without notice. Hobbico assumes no responsibility
for inadvertent errors to this manual.
Entire Contents © 2013 Hobbico
®
, Inc.
®
TM
HMXE0836 RTF
HMXE0837 Tx-R
™
Advertisement
Table of Contents

Related Manuals for Heli-Max 1SQ V-cam


Summary of Contents for Heli-Max 1SQ V-cam
- Page 1 Before use, if you feel this product is not for you, please return it to your place of purchase. Heli-Max products are to be used by ages 14 and over. The instruction manual, warranties and other associated documentation are subject to change without notice. Hobbico assumes no responsibility for inadvertent errors to this manual.
- Page 2 Heli-Max web site at www.helimax-rc.com. If there is any new technical information, changes or important updates to this model a “tech notice” box will appear on the 1SQ V-cam product page. Click the “tech notice” box to learn more about this important update.
-
Page 3: Warranty & Service
Max’s liability exceed the original cost of the purchased kit. Further, Heli-Max reserves the right to change or modify this warranty without notice. In that Heli-Max has no control over the final assembly or material used for final assembly, no liability shall be assumed nor accepted for any damage resulting from the use by the user of the final user-assembled product. -
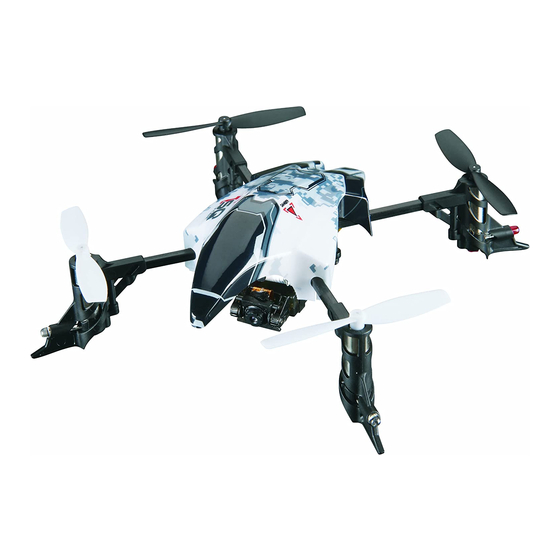
Page 4: Camera Specifications
® FEATURES & SPECIFICATIONS FEATURES & SPECIFICATIONS Features ● TAGS-FX Sensor Fusion stabilization system ● On board micro digital video camera ● 3D Aerobatic Auto-FLIP feature ● On board micro snap-shot digital picture camera ● USB Micro SD Card reader ●... -
Page 5: Battery Warnings And Usage Guidelines
Battery Warnings and Usage Guidelines Please read and understand the following regarding the usage of Li-Po batteries. ● NOTE: Heli-Max Quadcopter battery packs are not cross compatible with Heli-Max NOVUS brand battery packs or chargers. ● Through the use of the included Li-Po battery you have assumed all risk and responsibility regarding a Li-Po battery and its use. -
Page 6: Charge The Flight Battery
● Please keep all electronic components out of the reach of children! ● WARNING!! The charger supplied with the Heli-Max 1SQ Quadcopter contains protective circuitry. If you experience any difficulties while charging the battery, please disconnect the battery from the charger and unplug the charger from the power source. -
Page 7: Installing The Microsd Card
The LCD screen should be on with a throttle position indicator and other information. Make sure the electronic trim buttons on the transmitter are centered. Trims are not needed as the Heli-Max TAGS-FX Sensor Fusion system controls all flight centering. -
Page 8: Transmitter Controls
The TX460 transmitter has a dual rate function. This allows two fl ight modes, one that makes the 1SQ V-cam easer to fl y and one that makes the quad more aggressive. To toggle between the two fl ight modes quickly press down on the right control stick. - Page 9 low pitch single beep. For high rates, the ellipse will be complete and the transmitter will emit a single high pitch beep. Moving the right stick right or left will cause the quad to tilt and start moving that direction. Moves Right or Left Moves Right or Left Moves Right or Left...
- Page 10 ADJUSTING THE FLIGHT SENSITIVITY ADJUSTING THE FLIGHT SENSITIVITY You can make your 1SQ V-cam fl y more aggressively by changing the gyro sensitivity. To do this press and hold the right control stick down so the transmitter will emit a slow beeping sound. While holding the control stick down so the transmitter will continue to beep, move the left control stick up or down to adjust the sensitivity percentage shown on the LCD screen.
- Page 11 Picture but remember you will have to press the appropriate button to re-enter that mode. ® HELI-MAX TX460 SERVO REVERSING HELI-MAX TX460 SERVO REVERSING This transmitter features SLT protocol. Therefore, it will bind with other SLT receivers. In those applications, it may be necessary to reverse the servo travel direction as follows: ❏...
- Page 12 ® PROGRAMMING THE Tx-R MODEL PROGRAMMING THE Tx-R MODEL Your 1SQ V-cam uses Tactic’s SLT protocol for communication. If using the Anylink with your non SLT protocol radio system you must make sure to follow the proper mapping procedure listed with the Anylink that matches your radio brand. Failing to do so could cause an unsafe condition.
- Page 13 Futabs / Tactic AILE ELEV THRO RUDD Transmitter Settings Function Flip Video Picture Servo Rev Travel 100/100 100/100 100/100 100/100 100/100 100/100 100/100 Dual Rate 100/80 100/80 100/100 EXPO 0/-20 0/-20 NULL Timer 5 min Spektrum / JR AILE ELEV THRO RUDD Transmitter Settings...
- Page 14 The quad is now bound to the transmitter and you have programmed the (up to) three operation features. To see a video of this process go to the Heli-Max 1SQ V-cam webpage. helimax-rc.com...
- Page 15 ® FLYING YOUR 1SQ V-CAM FLYING YOUR 1SQ V-CAM ❏ Move the left stick to the lowest position and then turn the transmitter on. Electric motors are very dangerous. Do not work on the model while the flight battery is plugged in as interference may cause the main rotor blades to spin, possibly causing injury to yourself.
-
Page 16: Basic Maneuvers
Hovering Once the quad is in the air simply try to keep it in one spot. This will take some practice. Remember that even a light breeze will have an effect on the stability of the quad. Landing Level the quad into a steady hover and slowly decrease power until it lands. You might notice as the Quadcopter is ready to touch down it moves around a little. -
Page 17: Taking Photos
Press the video button (Tx-R, Flip the switch) again to start taking video. Press the video button (Tx-R, Flip the switch) once again to stop taking video. NOTE: The LED of the camera will flash letting you know you’re actively taking video. -
Page 18: Maintenance
Control Board Dampners HMXZ0001 Vcam Vid/Pic Camera HMXE2217 Screw Set HMXE2179 Frame Battery Mount HMXP1009 250mAh LiPo Battery HMXM2052 TAGS-FX Control Board HMXE2183 Foot Pads HMXJ2000 1SQ V-Cam Transmitter SLT HMXP2023 USB Charger HMXZ0002 USB microSD Card Reader HMXE2184 Motor Cover... -
Page 19: Exploded View
® EXPLODED VIEW EXPLODED VIEW... - Page 20 Declaration of Conformity: Product: Heli-Max TX460 2.4GHz 4-Channel Tx Rx Item number: HMXJ2000 TX460, Equipment class: 1 TX460 transmitter: The objects of the declaration described here...
Need help?
Do you have a question about the 1SQ V-cam and is the answer not in the manual?
Questions and answers