Table of Contents
Advertisement
Quick Links
Advertisement
Table of Contents

Related Manuals for Phonak TX-300V


Summary of Contents for Phonak TX-300V
- Page 1 2/1/2006 12:02 PM Page 1 User’s Manual TX-300V Studio Transmitter Phonak Communications AG Laenggasse 17 3280 Murten Switzerland T +41 (0) 26 672 96 72 F +41 (0) 26 672 96 77 info@phonakcom.ch www.phonakcom.ch...
- Page 2 · Antenna Mounting Assembly · 50 Ohm Coaxial Cable (7.6m) Rack Mount Kit (part number 116-1940, see page 14) Phonak™ and the Phonak Logo are registered trademarks of Phonak Communications AG. TX-300V_2006_01_20 © 2006 Phonak Communications AG. All Rights Reserved.
-
Page 3: Table Of Contents
2/1/2006 12:02 PM Page 3 Table of Contents Specifications ............4 Block Diagram . -
Page 4: Specifications
20 Maximum Frequency Accuracy /- .005% stability 0 to 50C Transmitter Stability 50 PPM Output Power 50mW, 100mW, 300Mw (Actual power for each frequency set by Phonak) Antenna Dipole Antenna (Included with Transmitter) Antenna Connector Compliance FCC Part 15, Industry Canada System Distortion <2% total harmonic distortion (THD) at 80% deviation... -
Page 5: Block Diagram
2/1/2006 12:02 PM Page 5 TX-300V Block Diagram DB-9 RS-232 POWER connector Programming 3.5MM Stereo CHANNEL SELECT HEADPHONE In-Line 230VAC Power Supply 50 Hz (provided) 15VAC, 1A Power Supply Volume Down CPU Module Phonak LCD Display MIX Level... -
Page 6: Quick Reference
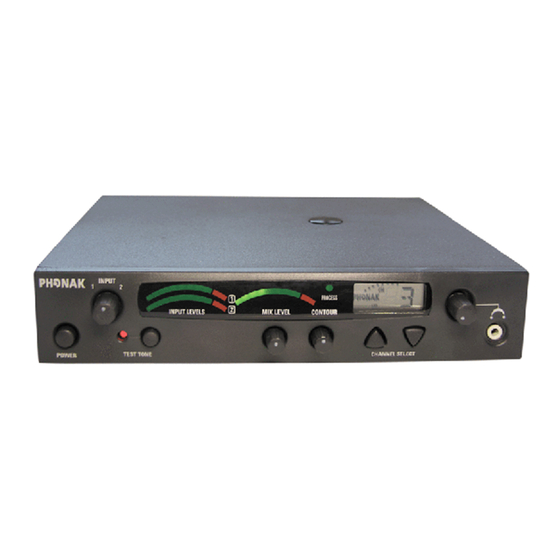
2/1/2006 12:02 PM Page 6 Quick Reference TX-300V Front Panel: Controls & Displays Indicates Pro- cess Mode is active Indicates audio input LCD: Shows Adjust audio input levels level of Input 1 and which channel of Input 1 and Input 2... -
Page 7: Setup Instructions
Mount in Rack (if necessary) If rack mounting the unit, install the optional rack mount kit (part 116-1940) according to the instructions included with the kit, then install the TX-300V in the Back of TX-300V with XLR connected to Line rack. - Page 8 Page 8 TX-300V Setup Instructions continued Antenna Installation Your TX-300V Studio Transmitter Set includes a remote antenna that features two adjustable-length radials. Extending these radials to the correct length is extremely important for the system to achieve maximum transmission range.
-
Page 9: Operating Instructions
Input 1 and Input 2. Process Mode Process mode is used for Audio Gain Control (AGC). With the process mode enabled, the TX-300V will automatically adjust for inconsistent signal input levels by raising or lowering the signal level accordingly to provide a consistent sound output level. -
Page 10: Rf Reception Maximization Strategies
5. Place the transmitting antenna as high as possible. 6. Orient the transmitting antenna vertically. 7. Position the RF Power switch on the back of the TX-300V to full RF Power, unless lower power is necessary (see page 7). CAUTION: When installing antennas, ensure the antenna is clear of power... -
Page 11: Troubleshooting
Make sure you have properly grounded the audio source to the TX-300V. Check the connections from the audio source to the TX-300V. If you can, try to use a balanced audio source - this will reduce the chance of creating hum. Connect a ground wire from the TX-300V to ground and/or to the ground of the source audio. -
Page 12: Compliance Notice
422, EN 300 454, EN 301 489-1/-9 and FCC 47 C.F.R. Part 74, including all necessary annexes. Please check with your local Phonak distributor, if you need a license from your local regulatory agency to operate the system. This transmitter may only be used to provide auditory assistance to persons in studio, stage and entertainment settings and persons with hearing disabilities. -
Page 13: Warranty
Warranty Phonak offers you a comprehensive global warranty which becomes effective on the date of purchase. Please ask your local Phonak distributor about the details and duration. This warranty covers any repairs due to defects in material and/or workmanship. The warranty does not cover damage from improper handling or care, exposure to chemicals, immersion in water or undue stress. -
Page 14: Optional Accessories
2/1/2006 12:03 PM Page 14 Rack Mount Kit 116-1940 Rack Mounting Kit Includes components for single and dual rack configuration and a security cover... - Page 15 2/1/2006 12:03 PM Page 15 Phonak Communications AG Laenggasse 17 3280 Murten Switzerland T +41 (0) 26 672 96 72 F +41 (0) 26 672 96 77 info@phonakcom.ch www.phonakcom.ch...
- Page 16 2/1/2006 12:03 PM Page 16...
Need help?
Do you have a question about the TX-300V and is the answer not in the manual?
Questions and answers